General Info
General information about the game that doesn't need more than one page to explain
- Level List
- Connected Pipes
- File Table
- Music List
- Special Event IDs
- Camera
- Particle List
- Staff Roll Characters
- Entrances
- List of Activator Actors
- List of player animations
- Background Scrolling Data Info
Level List
Every level in the game accompanied by its file name and how many areas it has.
| Filename | Level Name | Area Count |
|---|---|---|
| A01 | World 1-1 | 3 Areas |
| A02 | World 1-2 | 3 Areas |
| A03 | World 1-3 | 1 Area |
| A04 | World 1-4 | 3 Areas |
| A05 | World 1-5 | 2 Areas |
| A06 | World 1-A | 2 Areas |
| A07 | W1 Tower | 3 Areas |
| A08 | W1 Castle | 3 Areas |
| A09 | Cannon (W1 to W5) | 1 Area |
| B01 | World 2-1 | 3 Areas |
| B02 | World 2-2 | 2 Areas |
| B03 | World 2-3 | 2 Areas |
| B04 | World 2-4 | 2 Areas |
| B05 | World 2-5 | 2 Areas |
| B06 | World 2-6 | 2 Areas |
| B07 | World 2-A | 3 Areas |
| B08 | W2 Tower | 3 Areas |
| B09 | W2 Castle | 3 Areas |
| B10 | Cannon (W2 to W5) | 1 Area |
| C01 | World 3-1 | 2 Areas |
| C02 | World 3-2 | 2 Areas |
| C03 | World 3-3 | 3 Areas |
| C04 | World 3-A | 3 Areas |
| C05 | World 3-B | 2 Areas |
| C06 | World 3-C | 2 Areas |
| C07 | W3 Ghost House | 3 Areas |
| C08 | W3 Tower | 2 Areas |
| C09 | W3 Castle | 2 Areas |
| C10 | Cannon (W3 to W6) | 1 Area |
| D01 | World 4-1 | 1 Area |
| D02 | World 4-2 | 2 Areas |
| D03 | World 4-3 | 2 Areas |
| D04 | World 4-4 | 2 Areas |
| D05 | World 4-5 | 3 Areas |
| D06 | World 4-6 | 2 Areas |
| D07 | World 4-A | 2 Areas |
| D08 | W4 Ghost House | 3 Areas |
| D09 | W4 Tower | 2 Areas |
| D10 | W4 Castle | 2 Areas |
| D11 | Cannon (W4 to W7) | 1 Area |
| E01 | World 5-1 | 1 Area |
| E02 | World 5-2 | 2 Areas |
| E03 | World 5-3 | 2 Areas |
| E04 | World 5-4 | 1 Area |
| E05 | World 5-A | 2 Areas |
| E06 | World 5-B | 1 Area |
| E07 | World 5-C | 2 Areas |
| E08 | W5 Ghost House | 3 Areas |
| E09 | W5 Tower | 2 Areas |
| E10 | W5 Castle | 2 Areas |
| E11 | Cannon (W5 to W8) | 1 Area |
| F01 | World 6-1 | 2 Areas |
| F02 | World 6-2 | 2 Areas |
| F03 | World 6-3 | 2 Areas |
| F04 | World 6-4 | 1 Area |
| F05 | World 6-5 | 2 Areas |
| F06 | World 6-6 | 3 Areas |
| F07 | World 6-A | 2 Areas |
| F08 | World 6-B | 1 Area |
| F09 | W6 Tower 1 | 2 Areas |
| F10 | W6 Tower 2 | 2 Areas |
| F11 | W6 Castle | 2 Areas |
| F12 | Unused Cannon (W6 to W8) | 1 Area |
| G01 | World 7-1 | 1 Area |
| G02 | World 7-2 | 2 Areas |
| G03 | World 7-3 | 2 Areas |
| G04 | World 7-4 | 1 Area |
| G05 | World 7-5 | 3 Areas |
| G06 | World 7-6 | 3 Areas |
| G07 | World 7-7 | 1 Area |
| G08 | World 7-A | 2 Areas |
| G09 | W7 Ghost House | 3 Areas |
| G10 | W7 Tower | 2 Areas |
| G11 | W7 Castle | 2 Areas |
| H01 | World 8-1 | 2 Areas |
| H02 | World 8-2 | 3 Areas |
| H03 | World 8-3 | 2 Areas |
| H04 | World 8-4 | 2 Areas |
| H05 | World 8-5 | 2 Areas |
| H06 | World 8-6 | 2 Areas |
| H07 | World 8-7 | 1 Area |
| H08 | World 8-8 | 2 Areas |
| H09 | W8 Tower 1 | 2 Areas |
| H10 | W8 Tower 2 | 2 Areas |
| H11 | W8 Castle | 2 Areas |
| H12 | W8 Final Castle | 3 Areas |
| I01 | 1-Up Bonus Game | 1 Area |
| I02 | Item Bonus Game | 1 Area |
| I03 | Mega Mushroom Bonus Game | 1 Area |
| I04 | Bottom Screen Background Chooser | 1 Area |
| J01 | MvsL - SMB 1-1 | 1 Area |
| J02 | MvsL - Underground | 1 Area |
| J03 | MvsL - Ice World | 1 Area |
| J04 | MvsL - Pipe World | 1 Area |
| J05 | MvsL - Castle | 1 Area |
| J06 | Unused Level 1 | 1 Area |
| J07 | Unused Level 2 | 1 Area |
| J08 | Unused Level 3 | 1 Area |
| J09 | Unused Level 4 | 1 Area |
| J10 | Unused Level 5 | 1 Area |
Connected Pipes
Each end of the pipe needs an Entrance. Both must have the same connected pipe ID.
Set area 0 in one end and area 1 in the other end.
Make a Path with the same ID as the entrance's "Connected Pipe ID".
Each node on the path must be placed and "Value 6" in the node numbered as below:
Image of how to place the node in each pipe with its value:
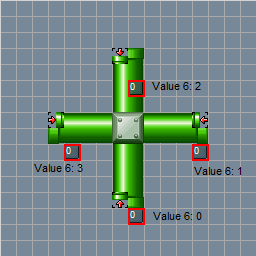
If value 6 does not show up for you, then try using the original NSMBe.
The path must be connected from one end of the pipe to the other; this is just to show the placement.
You can place more nodes on the path if you need, only the first and last need the above value 6 number.
World 7-A area 2 is good for more information.
Example shapes:
Reverse L
Setting a pipe as "exit only" also works, and is used in retail (eg 7-A).
File Table
A table of contents for the files inside of a NSMB DS ROM.
Note: bold entries are files.
TODO: Expand this table to contain all files, splitting the table if needed
| Filepath |
Description |
|---|---|
| fnt.bin | File Name Table It contains filenames, folders and folders names. |
| fat.bin | File Allocation Table It contains every file's address in the rom and its size. |
| header.bin | Header |
| arm9ovt.bin | It lists every arm9 overlay, its location in the rom and where it should be loaded in the ram. |
| arm7ovt.bin | It should list every arm7 overlay, its location in the rom and where it should be loaded in the ram. |
| arm9.bin | The code for the main processor. |
| arm7.bin | The code for the coprocessor. |
| banner.bin | Contains the game banner text and icon shown in the system bios |
| rsasig.bin | Some signature |
| / | Root folder |
| /00DUMMY | Empty, NSMBe uses it to store tileset, their objects' descriptions, backgrounds and music names after renaming them |
| /BUILDTIME | Last game build time |
| /mgvs_sound_data.sdat | Minigames music |
| /sound_data.sdat | Main game music |
| /ARCHIVE/ | Contains archives for minigames and download play |
| /BG_chk/ | Contains tile behaviour files for tilesets |
| /BG_ncg/ | Contains bitmaps for tilesets, backgrounds, and tile animations |
| /BG_ncl/ | Contains palettes and palette animations for tilesets and backgrounds, as well as jyotyu palette |
| /BG_nsc/ | Contains tilemaps for backgrounds |
| /BG_pnl/ | Contains tilemaps for tilesets |
| /BG_unt/ | Objects info for tilesets |
| /course/ | It contains all the levels .bin files |
| /demo/ | It contains some cutscene stuffs |
| /ending/ | It contains other ending stuffs (like the tower BG) |
| /enemy/ | It contains the enemies' models and animations |
| /ipl/ | Contains bitmap and palette for DS Download Play banner icon |
| /map/ | It contains all the Worldmap files |
| /obj/ | Contains bitmaps and palettes of in-course sprites |
| /particle/ | Contains particle archives |
| /player/ | It contains player's models and animations |
| /polygon_unit/ | It contains some levels effects, the quicksand files, the pipe graphics, and the End-of-level graphics |
| /script/ | It contains BMG files (used for In-Level pause scripts, Worldmap's pause scripts, and for the Titlescreen's File Select scripts) |
| /uiStudio/ | Contains files related to game UI |
| overlay7/ | It should contain the overlays for the arm7 processor |
| overlay9/ | It contains the overlays for the arm9 processor |
Music List
| Level Header ID (Hex) | ID in NSMBe/Nitro Studio (Decimal) | Common Name | Name in NSMBe | SDAT Name (in sound_data.sdat) |
|---|---|---|---|---|
| 00 | 0 | None/MvsL Stage Theme 1 (in some cases)* | MvsL Stage | BGM_VS_CHIJOU |
| 01 | 1 | Tower | Tower | BGM_TRIDE.sseq |
| 02 | 2 | Starman | Starman | BGM_MUTEKI.sseq |
| 03 | 3 | Mega Mario | Mega Mario | BGM_HUGE.sseq |
| 04 | 4 | End of Level (+ MvsL battle win) | End of Level | BGM_COURSE_CLEAR.sseq |
| 05 | 5 | Death | Death | BGM_DOWN.sseq |
| 06 | 6 | Desert | Desert | BGM_SABAKU.sseq |
| 07 | 7 | Boss | Boss | BGM_BOSS.sseq |
| 08 | 8 | VS battle lose | VS Lose | BGM_VS_LOSE_FANFARE |
| 09 | 9 | Underground | Underground | BGM_CHIKA.sseq |
| 0A | 10 | Bonus room | Bonus room | BGM_MAME.sseq |
| 0B | 11 | Underwater | Underwater | BGM_WATER3.sseq |
| 0C | 12 | Lava | Lava | BGM_KAZAN_SOTO.sseq |
| 0D | 13 | End Credits (Early/Unused, shorter) | End Credits | BGM_SAMPLE |
| 0E | 14 | Beach | Beach | BGM_SANBASHI.sseq |
| 0F | 15 | Bowser Jr. Battle | Bowser Jr. Battle | BGM_KUPPAJR |
| 10 | 16 | Ghost House | Ghost House | BGM_OBAKE.sseq |
| 11 | 17 | Castle | Castle | BGM_SHIRO.sseq |
| 12 | 18 | Switch timer | Timer | BGM_SWITCH.sseq |
| 13 | 19 | End of Game Fanfare | End of Game Fanfare | BGM_FINAL_CLEAR |
| 14 | 20 | Game Over | Game Over | BGM_GAMEOVER.sseq |
| 15 | 21 | Final Boss | Final Boss | BGM_FINAL_KUPPA.sseq |
| 16 | 22 | Boss Beaten | Boss Beaten | BGM_BOSS_CLEAR.sseq |
| 17 | None | [Nothing] | [Nothing] | |
| 18 | 24 | Athletic | Mushrooms (Athletic) | BGM_ATHLETIC.sseq |
| 19 | 25 | Toad House | Toad House | BGM_MINIGAME.sseq |
| 1A | 26 | Grassland | Grassland | BGM_CHIJOU_CONT.sseq |
| 1B | 27 | Title Screen | Title Screen | BGM_SELECT.sseq |
| 1C | 28 | SMB End of Level | SMB End of Level | BGM_GOAL_FANFARE2.sseq |
| 1D | 29 | Toad House Fanfare | Toad House Fanfare | BGM_FANFARE_KINO.sseq |
| 1E | 30 | MvsL Stage Theme 2* | MvsL Stage 2 | BGM_VS_STAGE.sseq |
| 1F | 31 | MvsL start screen (duplicate of Title Screen) | MvsL Title Screen | BGM_VS_SELECT.sseq |
| 20 | 32 | MvsL Loop | MvsL Results Screen | BGM_VS_FAN_LOOP.sseq |
| 21 | 33 | MvsL Win (Results screen) | MvsL Win | BGM_VS_WIN.sseq |
| 22 | 34 | MvsL Lose (Results screen) | MvsL Lose | BGM_VS_LOSE |
| [23 - 4F] | None | [Nothing] | [Nothing] | |
| 50 | 80 | Lava ambient | Lava ambient (Castle) | BGM_AMB_YOUGAN |
| 51 | 81 | Desert wind ambient | Desert ambient (Castle) | BGM_AMB_SABAKU |
| 52 | 82 | Water ambient | Water ambient (Castle) | BGM_AMB_WATER |
| 53 | 83 | Cave Water Ambient | Underground ambient (Castle) | BGM_AMB_CHIKA |
| [84 - 85] | None | [Nothing] | [Nothing] | |
| 56 | 86 | Sky Wind Ambient | Wind ambient (Castle) | BGM_AMB_SKY |
| [87 - 98] | None | [Nothing] | [Nothing] | |
| 63 | 99 | MvsL Stage (Early) | Early Grassland (Unused) | BGM_CHIJO |
| 64 | 100 | World 1* | World 1 | BGM_WORLD1 |
| 65 | 101 | World 2* | World 2 | BGM_WORLD2 |
| 66 | 102 | World 3* | World 3 | BGM_WORLD3 |
| 67 | 103 | World 4* | World 4 | BGM_WORLD4 |
| 68 | 104 | World 5* | World 5 | BGM_WORLD5 |
| 69 | 105 | World 6* | World 6 | BGM_WORLD6 |
| 6A | 106 | World 7* | World 7 | BGM_WORLD7 |
| 6B | 107 | World 8* | World 8 | BGM_WORLD8 |
| 6C | 108 | End Credits | Ending | BGM_ENDING |
| 6D | 109 | Intro Part 1 | Intro 1 | BGM_OPENING_DEMO1 |
| 6E | 110 | Intro Part 2 | Intro 2 | BGM_OPENING_DEMO2 |
| 6F | 111 | Peach Fanfare | Peach Fanfare | BGM_KUPPACLEAR_DEMO |
*MvsL themes and World Map themes: Loading the MvsL themes or the World map themes in a regular level (by changing the music in the View Settings for example) will play the music, but most sound effects will be muted while the music is playing (this is because they use sound banks that are too big for the game, overloading the audio memory).
Additional note: Any song with an id above 6F will not play, regardless of if there is song data associated with it or not (by editing the sound_data.sdat file)
Special Event IDs
| ID | Description |
|---|---|
| 3E | Blue coin trail while event is active. |
| 46 | Causes the unused "faded circle" screen transition to be used when using an entrance or exit. Unused |
| F3 | Partial Starman effects. Unused? |
| F4 | Partial Mega Mushroom effects. Unused? |
| EB | Make inventory contain item with no icon. Crashes when you release the item and it can't be replaced by other items. Maybe defunct unused item? Unused? |
| F7 | Locks camera into bottom left of view. Mario isn't forced to be inside this camera, but he can't interact with actors outside the camera. Unused? |
Camera
The Camera in New Super Mario Bros is controlled in several ways. You have to take into account that the camera movements will condition the gameplay.
1. How the Camera restricts Mario
The camera restricts Mario's movements in two ways:
• Mario cannot go out of the camera view through the sides.
This means that if the camera doesn't pan further, Mario can't either. The camera sides act like walls (but you can't wall jump into them)
• Mario cannot go to the bottom of the camera.
If he does so, he will die. Note that there is some margin, so you can place something like a Warp to Level some blocks below the camera view. Mario will get it before he dies.
Mario does can go out from the top of the camera. Simply the camera will not pan there, so Mario will be out of the screen.
2. Views
The camera will NEVER get out of the view. That means Mario can't get out of the view by the sides or the bottom.
3. Panning blocks
This thing is a little bit confusing. An area (not each view) is divided in blocks of 16x16 tiles (256x256 pixels). The camera will not pan into blocks that are empty (don't contain any objects).
An example (thanks to Garmichael):
Look at this level:
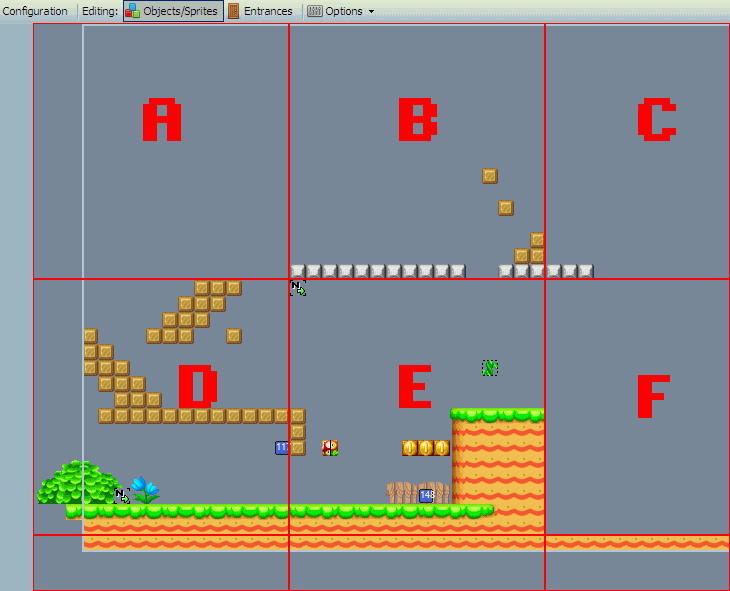
Notice that blocks A and F are empty. Mario cannot get to A from B, but he can actually jump from D to B. While he is in A, the camera will not move, but as soon as he crosses into B, the camera will jump to that location and that boundary would act like a wall. From there, As Mario approaches C, he will be able to see some of F, but as soon as he crosses into C, the camera will reposition so that the border to F is the bottom of the screen. If Mario jumps down into F, he dies (even though the block under F has ground).
4. Scroll Control and Scroll Stop sprites
These sprites control the camera in more ways. How they work is generally unknown, except for:
• Vertical scroll controls: [sprite:198] and [sprite:199]
• Horizontal scroll stop: [sprite:276]
5. Header Blocks
Block 2, Block 4, and Block 5 control more settings of the camera. Look at the List of Header Blocks page for more info.
6. Camera X & Y
The entrance's settings include two boxes named "Camera X" and "Camera Y", usually you can leave their values as 0, but sometimes you need to put values in there:

The zone and door entrance don't actually have any purpose in-game but to showcase the coordinates.
The zone delimits what you can see on the NDS screen.
If at least one of the Camera values is different from 0, then the tile at said coordinates will calibrate the camera and will serve as the top-left tile of said camera.
You usually use them when sprites 198-199 and/or 276 are in the way, or eventually to calibrate the bottom of the camera to the bottom of the zone.
The purpose of this is to show a nice transition when you change areas.
With the example earlier if both values were at 0, this is where the camera would spawn by default:
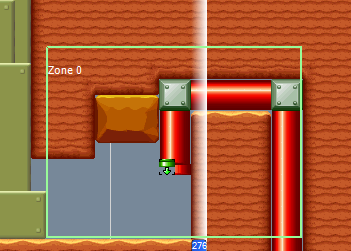
The camera is 1 tile higher than the bottom of the zone, but the biggest offender here is the sprite 276, it is only acknowledged when the player have control of Mario thus only when Mario completely exits the pipe, the camera would recognize sprite 276 and then scroll to the left at high speeds, which results in an ugly transition and you can bet this is a rookie mistake to leave that kind of camera error unchecked.
Particle List
Note: IDs can go as high as 255, all IDs past 118 are blank and have been left out for sake of shortening the list.
| Particle Id | In-Game Effect | Notes |
| 0 | toadsworth creates toad house block(s) – part 2 red toad house disappears – part 3 | |
| 1 | ||
| 2 | ||
| 3 | something in the intro | |
| 4 | ||
| 5 | whomp destroyed – part 1 | |
| 6 | whomp destroyed – part 2 | |
| 7 | whomp destroyed – part 3 | |
| 8 | ||
| 9 | whomp slams ground – part 1 | |
| A | whomp slams ground – part 2 | |
| B | whomp slams ground – part 3 | |
| C | ||
| D | mario jumps/lands on world map | also used for flying ? blocks, hammer bros and bowser jr on the world map? |
| E | mario goes into castle on world map | |
| F | ||
| 10 | ||
| 11 | something todo with end-of-boss cutscene or world map? | |
| 12 | ||
| 13 | bob-omb explodes - part 1 | sometimes spawned (off-screen?) on world map |
| 14 | bob-omb explodes - part 2 | sometimes spawned (off-screen?) on world map |
| 15 | bob-omb explodes - part 3 | |
| 16 | bob-omb explodes - part 4 | |
| 17 | bob-omb explodes - part 5 | |
| 18 | bob-omb explodes - part 6 | |
| 19 | bob-omb explodes - part 7 | |
| 1A | ||
| 1B | red toad house disappears – part 1 | |
| 1C | red toad house disappears – part 2 thwomp hits ground – part 1 | |
| 1D | thwomp hits ground – part 2 | |
| 1E | big thwomp hits ground – part 1 | |
| 1F | big thwomp hits ground – part 2 | |
| 20 | big thwomp hits ground – part 3 | |
| 21 | get mega mushroom – part 1 | |
| 22 | get mega mushroom – part 2 | |
| 23 | get mega mushroom – part 3 | |
| 24 | get mega mushroom – part 4 | |
| 25 | get mega mushroom – part 5 | |
| 26 | get mega mushroom – part 6 | |
| 27 | get mega mushroom – part 7 | |
| 28 | get mega mushroom – part 8 | |
| 29 | get mega mushroom – part 9 | |
| 2A | get mega mushroom – part 10 | |
| 2B | get mega mushroom – part 11 | |
| 2C | get mega mushroom – part 12 | |
| 2D | ||
| 2E | ||
| 2F | ||
| 30 | ||
| 31 | ||
| 32 | ||
| 33 | ||
| 34 | ||
| 35 | ||
| 36 | ||
| 37 | ||
| 38 | ||
| 39 | mega mario walks right – alternating with 3A | |
| 3A | mega mario walks right – alternating with 39 | |
| 3B | ||
| 3C | mega mario walks left – alternating with 3D | |
| 3D | mega mario walks left – alternating with 3C / goal fireworks related? – part 6 | |
| 3E | goal fireworks related? – part 7 | |
| 3F | goal fireworks related? – part 8 | |
| 40 | goal fireworks related? – part 9 | |
| 41 | goal fireworks related? – part 10 | |
| 42 | ||
| 43 | ||
| 44 | ||
| 45 | ||
| 46 | ||
| 47 | goal fireworks related? – part 1 | |
| 48 | goal fireworks related? – part 2 | |
| 49 | goal fireworks related? – part 3 | |
| 4A | goal fireworks related? – part 4 | |
| 4B | goal fireworks related? – part 5 | |
| 4C | splunkin stomped on for the second time – part 1 | |
| 4D | splunkin stomped on for the second time – part 2 | |
| 4E | splunkin stomped on for the second time – part 3 | |
| 4F | splunkin stomped on for the first time – part 1 | |
| 50 | splunkin stomped on for the first time – part 2 | |
| 51 | bowser jr lands after being defeated | |
| 52 | ||
| 53 | ||
| 54 | ||
| 55 | ||
| 56 | ||
| 57 | ||
| 58 | ||
| 59 | ||
| 5A | ||
| 5B | ||
| 5C | ||
| 5D | ||
| 5E | ||
| 5F | ||
| 60 | ||
| 61 | ||
| 62 | ||
| 63 | ||
| 64 | ||
| 65 | ||
| 66 | ||
| 67 | ||
| 68 | ||
| 69 | ||
| 6A | ||
| 6B | ||
| 6C | ||
| 6D | ||
| 6E | ||
| 6F | ||
| 70 | ||
| 71 | ||
| 72 | ||
| 73 | jump onto cliff ledge from normal ground | |
| 74 | ||
| 75 | ||
| 76 | item/object appears/disappears – part 1 | |
| 77 | item/object appears/disappears – part 2 | |
| 78 | item/object appears/disappears – part 3 | |
| 79 | enemy/mega goomba “popped” – part 1 boss shutter piece spawned/destroyed – part part 1 bowser bridge piece destroyed – part 1 | |
| 7A | enemy/mega goomba “popped” – part 2 boss shutter piece spawned/destroyed – part part 2 bowser bridge piece destroyed – part 2 | |
| 7B | ||
| 7C | ||
| 7D | ||
| 7E | mario “twinkles” in distance after being fired by warp cannon | |
| 7F | ||
| 80 | ||
| 81 | ||
| 82 | ||
| 83 | ||
| 84 | ||
| 85 | ||
| 86 | run into enemy as mega mario | |
| 87 | ||
| 88 | ||
| 89 | ||
| 8A | ||
| 8B | ||
| 8C | ||
| 8D | ||
| 8E | ||
| 8F | ||
| 90 | ||
| 91 | ||
| 92 | ||
| 93 | ||
| 94 | ||
| 95 | blue coin collected | |
| 96 | mario breaks free from under fallen snow – part 1 | |
| 97 | mario breaks free from under fallen snow – part 2 | |
| 98 | ||
| 99 | ||
| 9A | ||
| 9B | ||
| 9C | ||
| 9D | mario stomps on Crowber – part 1 | |
| 9E | mario stomps on Crowber – part 2 | |
| 9F | mario does Drill Stomp straight down | |
| A0 | bowser jr/blockhopper jumps/lands | |
| A1 | object enters/exits lava – part 1 | |
| A2 | object enters/exits lava – part 2 | |
| A3 | object enters/exits poison water – part 1 | |
| A4 | object enters/exits poison water – part 2 | |
| A5 | object enters/exits water – part 1 | |
| A6 | object enters/exits water – part 2 | |
| A7 | ||
| A8 | mario lands on soft cloud platform | |
| A9 | mario lands on quicksand | |
| AA | mario lands on sinking snow – part 1 | |
| AB | mario lands on sinking snow – part 2 | |
| AC | mario fireball hits enemy/wall – part 1 | |
| AD | mario fireball hits enemy/wall – part 2 | |
| AE | stomp on wiggler | |
| AF | ||
| B0 | ||
| B1 | ||
| B2 | kab-omb explodes – part 1 | |
| B3 | kab-omb explodes – part 2 | |
| B4 | kab-omb explodes – part 3 | |
| B5 | ||
| B6 | ground-pound on koopa troopa/buzzy beetle – part 1 | |
| B7 | ground-pound on koopa troopa/buzzy beetle – part 2 | |
| B8 | ground-pound on koopa troopa/buzzy beetle – part 3 | |
| B9 | ground-pound on koopa troopa/buzzy beetle – part 4 | |
| BA | “pop” enemy with ground-pound – part 1 | |
| BB | “pop” enemy with ground-pound – part 2 | |
| BC | “pop” enemy with ground-pound – part 3 | |
| BD | ||
| BE | ||
| BF | ||
| C0 | ||
| C1 | ||
| C2 | ||
| C3 | ||
| C4 | ||
| C5 | ||
| C6 | ||
| C7 | ||
| C8 | ||
| C9 | ||
| CA | mario stomps lakitu | |
| CB | mario lands in lakitu’s cloud | |
| CC | ||
| CD | ||
| CE | ||
| CF | ||
| D0 | bill blaster fires bullet bill – part 1 | but not rotating bill blaster |
| D1 | bill blaster fires bullet bill – part 2 | “ |
| D2 | ground-pound on koopa troopa/buzzy beetle – part 5 | |
| D3 | ground-pound on koopa troopa/buzzy beetle – part 6 | |
| D4 | ||
| D5 | ||
| D6 | ||
| D7 | ||
| D8 | toadsworth creates toad house block(s) – part 1 | |
| D9 | ||
| DA | ||
| DB | skeeter bomb enters water or maybe skeeter spawns bomb – part 3 | |
| DC | skeeter bomb enters water or maybe skeeter spawns bomb – part 4 | |
| DD | ||
| DE | ||
| DF | ||
| E0 | ||
| f8 | Mario ground pound Falling snow hits ground | |
| E2 | Mario lands after triple jump Mario ground pounds on mummipokey | |
| E3 | ||
| E4 | mario goes out of water – part 1 | |
| E5 | mario goes out of water – part 2 | |
| E6 | mario goes out of water – part 3 | |
| E7 | mario exits water – part 1 | |
| E8 | mario exits water – part 2 | |
| E9 | mario exits water – part 3 | |
| EA | get red coin | |
| EB | ||
| EC | ||
| ED | ||
| EE | mario lands on ground in deep water – part 1 | |
| EF | mario lands on ground in deep water – part 2 | |
| F0 | ||
| F1 | ||
| F2 | ||
| F3 | mario flies off Spin Block/out of tornado – part 1 | |
| F4 | mario flies off Spin Block/out of tornado – part 2 | |
| F5 | something todo with spinning/drill stomp – part 1 | |
| F6 | something todo with spinning/drill stomp – part 2 | |
| F7 | something todo with spinning/drill stomp – part 3 | |
| F8 | get star coin – part 1 | |
| F9 | get star coin – part 2 | |
| FA | get star coin – part 3 | |
| FB | ||
| FC | ||
| FD | ?/p/! switch pressed – part 1 | |
| FE | ?/p/! switch pressed (alt – part upside down or underwater only?) – part 1 | |
| FF | ?/p/! switch pressed (alt – part upside down or underwater only?) – part 2 | |
| 100 | ?/p/! switch pressed – part 2 | |
| 101 | ||
| 102 | ||
| 103 | mario does Drill Stomp when small mario | |
| 104 | mario wall jump from right – part 1 | |
| 105 | mario wall jump from right – part 2 | |
| 106 | mario wall jump from right – part 3 | |
| 107 | mario wall jump from left – part 1 | |
| 108 | mario wall jump from left – part 2 | |
| 109 | mario wall jump from left – part 3 | |
| 10A | ||
| 10B | ||
| 10C | mario lands on /starts to hang off of cliff edge | |
| 10D | ||
| 10E | mario goes into water in 1-A start section – part 1 cheepskipper enters/exits water – part 1 | |
| 10F | mario goes into water in 1-A start section – part 2 cheepskipper enters/exits water – part 2 | |
| 110 | mario goes into water in 1-A start section – part 3 spike pillar goes into water – part 1 | |
| 111 | spike pillar goes into water – part 2 | |
| 112 | ||
| 113 | cheepskipper enters/exits water – part 3 | |
| 114 | mario goes into water in 3-Castle boss room – part 1 | |
| 115 | mario goes into water in 3-Castle boss room – part 2 | |
| 116 | mario goes into water in 3-Castle boss room – part 3 | |
| 117 | mario punches fence – part 1 | |
| 118 | mario punches fence – part 2 |
Staff Roll Characters
These are the letters you can touch on the bottom screen during the credits.
| Closest ASCII Character | Character ID | Character Used? | SFX ID | SFX Name | SFX Usage Outside of Credits |
|---|---|---|---|---|---|
| A | 0x0 | Yes | 0x34 | SE_EMY_KPJR_DAMAGE_V | Bowser Jr. stomped (voice) |
| B | 0x1 | Yes | 0x35 | SE_EMY_KPJR_CRY_V | Bowser Jr. defeated |
| C | 0x2 | Yes | 0x39 | SE_EMY_KPJR_GUARD_ON | Bowser Jr. go into shell |
| D | 0x3 | Yes | 0x6e | SE_EMY_KURIBO_FUMU | Stomp on enemy / Stomp on other player |
| E | 0x4 | Yes | 0x6f | SE_EMY_KAME_FUMU | Stomp on Koopa / Kab-omb / Skeeter (?) |
| F | 0x5 | Yes | 0x70 | SE_EMY_KAME_KERU | Enemy defeated by fireball/Shell mario in shell/Ground-pound/Flagpole / Mega Goomba defeated by Mini Player / Hanging ? Block hit from side / Item destroyed in lava / Block spawned by tile creator sprite |
| G | 0x6 | Yes | 0xf5 | SE_VOC_OPDM_YES | Player reacts to completion of logo |
| H | 0x7 | Yes | 0xfa | SE_VOC_OPDM_AWAWA_01 | Player reacts to thunder strike |
| I | 0x8 | Yes | 0x128 | SE_OBJ_GOAL_HANABI | Goal firework |
| J | 0x9 | Yes | 0x103 | SE_AMB_OPDM_BABEL | Logo crashes down |
| K | 0xa | Yes | 0x123 | SE_OBJ_GET_DRAGON_COIN | Get Star Coin |
| L | 0xb | Yes | 0x10b | SE_VOC_OPDM_PEACH_HELP | |
| M | 0xc | Yes | 0x166 | SE_PLY_CHANGE_NORMAL | Turn back to normal from Mega |
| N | 0xd | Yes | 0x14f | SE_PLY_HIP_ATTACK_M | Mini ground-pound |
| O | 0xe | Yes | 0x149 | SE_PLY_JUMP_3 | Mini Player jumps |
| P | 0xf | Yes | 0x152 | SE_PLY_DOWN | Player loses a life |
| Q | 0x10 | No | 0x153 | SE_PLY_SWIM | Player swim |
| R | 0x11 | Yes | 0x168 | SE_PLY_THROW_FIRE | Fire Player/Fire Bros – throw fireball |
| S | 0x12 | Yes | 0x16c | SE_OBJ_GET_COIN | Get coin |
| T | 0x13 | Yes | 0x171 | SE_OBJ_DOKAN_BREAK | Pipe/Bill Blaster smashed from the side as Mega Player |
| U | 0x14 | Yes | 0x172 | SE_PLY_JUMPDAI | Jump on trampoline/Pot in final boss intro jumps |
| V | 0x15 | Yes | 0x17b | SE_SYS_ONE_UP | Get 1-up mushroom |
| W | 0x16 | Yes | 0x17c | SE_SYS_ONE_DOWN | Unused |
| X | 0x17 | Yes | 0x1a9 | SE_OBJ_TSUBO_BREAK | Pot in final boss intro shatters |
| Y | 0x18 | Yes | 0x1ab | SE_VOC_M_HOEE | Mario embarrassed after being kissed by peach |
| Z | 0x19 | Yes | 0x1ad | SE_VOC_P_THANK_YOU | Peach thanks Player after battle |
| a | 0x1a | Yes | 0x34 | SE_EMY_KPJR_DAMAGE_V | Bowser Jr. stomped (voice) |
| b | 0x1b | Yes | 0x35 | SE_EMY_KPJR_CRY_V | Bowser Jr. defeated |
| c | 0x1c | Yes | 0x39 | SE_EMY_KPJR_GUARD_ON | Bowser Jr. go into shell |
| d | 0x1d | Yes | 0x6e | SE_EMY_KURIBO_FUMU | Stomp on enemy / Stomp on other player |
| e | 0x1e | Yes | 0x6f | SE_EMY_KAME_FUMU | Stomp on Koopa / Kab-omb / Skeeter (?) |
| f | 0x1f | Yes | 0x70 | SE_EMY_KAME_KERU | Enemy defeated by fireball/Shell mario in shell/Ground-pound/Flagpole / Mega Goomba defeated by Mini Player / Hanging ? Block hit from side / Item destroyed in lava / Block spawned by tile creator sprite |
| g | 0x20 | Yes | 0xf5 | SE_VOC_OPDM_YES | Player reacts to completion of logo |
| h | 0x21 | Yes | 0xfa | SE_VOC_OPDM_AWAWA_01 | Player reacts to thunder strike |
| i | 0x22 | Yes | 0x128 | SE_OBJ_GOAL_HANABI | Goal firework |
| j | 0x23 | Yes | 0x103 | SE_AMB_OPDM_BABEL | Logo crashes down |
| k | 0x24 | Yes | 0x123 | SE_OBJ_GET_DRAGON_COIN | Get Star Coin |
| l | 0x25 | Yes | 0x10b | SE_VOC_OPDM_PEACH_HELP | |
| m | 0x26 | Yes | 0x166 | SE_PLY_CHANGE_NORMAL | Turn back to normal from Mega |
| n | 0x27 | Yes | 0x14f | SE_PLY_HIP_ATTACK_M | Mini ground-pound |
| o | 0x28 | Yes | 0x149 | SE_PLY_JUMP_3 | Mini Player jumps |
| p | 0x29 | Yes | 0x152 | SE_PLY_DOWN | Player loses a life |
| q | 0x2a | Yes | 0x153 | SE_PLY_SWIM | Player swim |
| r | 0x2b | Yes | 0x168 | SE_PLY_THROW_FIRE | Fire Player/Fire Bros – throw fireball |
| s | 0x2c | Yes | 0x16c | SE_OBJ_GET_COIN | Get coin |
| t | 0x2d | Yes | 0x171 | SE_OBJ_DOKAN_BREAK | Pipe/Bill Blaster smashed from the side as Mega Player |
| u | 0x2e | Yes | 0x172 | SE_PLY_JUMPDAI | Jump on trampoline/Pot in final boss intro jumps |
| v | 0x2f | Yes | 0x17b | SE_SYS_ONE_UP | Get 1-up mushroom |
| w | 0x30 | Yes | 0x17c | SE_SYS_ONE_DOWN | Unused |
| x | 0x31 | No | 0x1a9 | SE_OBJ_TSUBO_BREAK | Pot in final boss intro shatters |
| y | 0x32 | Yes | 0x1ab | SE_VOC_M_HOEE | Mario embarrassed after being kissed by peach |
| z | 0x33 | Yes | 0x1ad | SE_VOC_P_THANK_YOU | Peach thanks Player after battle |
| À | 0x34 | No | 0x36 | SE_EMY_KPJR_UH | Bowser Jr. “wakes up” after battle |
| Á | 0x35 | No | 0x37 | SE_EMY_KPJR_LAND | Bowser Jr. land after jump attack |
| Â | 0x36 | No | 0x3b | SE_EMY_KPJR_GUARD_OFF | Bowser Jr. stop hiding in shell |
| Ä | 0x37 | No | 0x3c | SE_EMY_KPJR_DAMAGE | Bowser Jr. stomped |
| Ç | 0x38 | No | 0x3d | SE_EMY_KPJR_PURUPURU | Bowser Jr. shakes head after waking up after battle |
| È | 0x39 | No | 0x77 | SE_EMY_KAME_HIT_7 | Defeat 7th and subsequent enemy in a row while sliding |
| É | 0x3a | No | 0xf6 | SE_VOC_OPDM_UN_01 | Player looks up at logo |
| Ê | 0x3b | No | 0xfc | SE_VOC_OPDM_AWAWA_02 | |
| Ë | 0x3c | No | 0xff | SE_VOC_OPDM_HOEE | |
| Ì | 0x3d | No | 0x10a | SE_VOC_OPDM_PEACH_CRY | |
| Í | 0x3e | No | 0x101 | SE_AMB_OPDM_WARBLE | Intro birds |
| Î | 0x3f | No | 0x102 | SE_AMB_OPDM_THUNDER | Thunder strike on castle |
| Ï | 0x40 | No | 0x104 | SE_EMY_OPDM_KPJR_FOOT | Bowser Jr. sneaks up on peach |
| Ñ | 0x41 | No | 0x109 | SE_PLY_OPDM_MA_HIT | |
| Ò | 0x42 | No | 0x10d | SE_OBJ_OPDM_NEW_FALL | |
| Ó | 0x43 | No | 0x10e | SE_OBJ_OPDM_NEW_SET | |
| Ô | 0x44 | No | 0x10f | SE_OBJ_OPDM_LOGO_FALL_L | |
| Ö | 0x45 | No | 0x110 | SE_OBJ_OPDM_LOGO_FALL_S | |
| Ù | 0x46 | No | 0x170 | SE_OBJ_COIN_BOUND | Loose coin hit ground |
| Ú | 0x47 | No | 0x174 | SE_OBJ_ITEM_APPEAR | Item out of block |
| Û | 0x48 | No | 0x13a | SE_SYS_MID_POINT | Pass checkpoint |
| Ü | 0x49 | No | 0x13e | SE_SYS_HURRY_UP | |
| ß | 0x4a | No | 0x14d | SE_PLY_HIP_ATTACK | Ground-pound hits ground / Ground-pound hits other player |
| à | 0x4b | No | 0x36 | SE_EMY_KPJR_UH | Bowser Jr. “wakes up” after battle |
| á | 0x4c | No | 0x37 | SE_EMY_KPJR_LAND | Bowser Jr. land after jump attack |
| â | 0x4d | No | 0x3b | SE_EMY_KPJR_GUARD_OFF | Bowser Jr. stop hiding in shell |
| ä | 0x4e | No | 0x3c | SE_EMY_KPJR_DAMAGE | Bowser Jr. stomped |
| ç | 0x4f | No | 0x3d | SE_EMY_KPJR_PURUPURU | Bowser Jr. shakes head after waking up after battle |
| è | 0x50 | No | 0x77 | SE_EMY_KAME_HIT_7 | Defeat 7th and subsequent enemy in a row while sliding |
| é | 0x51 | No | 0xf6 | SE_VOC_OPDM_UN_01 | Player looks up at logo |
| ê | 0x52 | No | 0xfc | SE_VOC_OPDM_AWAWA_02 | |
| ë | 0x53 | No | 0xff | SE_VOC_OPDM_HOEE | |
| ì | 0x54 | No | 0x10a | SE_VOC_OPDM_PEACH_CRY | |
| í | 0x55 | No | 0x101 | SE_AMB_OPDM_WARBLE | Intro birds |
| î | 0x56 | No | 0x102 | SE_AMB_OPDM_THUNDER | Thunder strike on castle |
| ï | 0x57 | No | 0x104 | SE_EMY_OPDM_KPJR_FOOT | Bowser Jr. sneaks up on peach |
| ñ | 0x58 | No | 0x109 | SE_PLY_OPDM_MA_HIT | |
| ò | 0x59 | No | 0x10d | SE_OBJ_OPDM_NEW_FALL | |
| ó | 0x5a | No | 0x10e | SE_OBJ_OPDM_NEW_SET | |
| ô | 0x5b | No | 0x10f | SE_OBJ_OPDM_LOGO_FALL_L | |
| ö | 0x5c | No | 0x110 | SE_OBJ_OPDM_LOGO_FALL_S | |
| ù | 0x5d | No | 0x170 | SE_OBJ_COIN_BOUND | Loose coin hit ground |
| ú | 0x5e | No | 0x174 | SE_OBJ_ITEM_APPEAR | Item out of block |
| û | 0x5f | No | 0x13a | SE_SYS_MID_POINT | |
| ü | 0x60 | No | 0x13e | SE_SYS_HURRY_UP | |
| . | 0x61 | No | 0x15b | SE_PLY_FOOTNOTE_H | |
| • | 0x62 | No | 0x15e | SE_PLY_FOOTNOTE_H | |
| _ | 0x63 | No | 0x16a | SE_PLY_CHANGE_SMALL | Enter/exit pipe / Enter warp / lose powerup |
| - | 0x64 | No | 0x163 | SE_PLY_CHANGE_BIG | Get powerup / Collect Starman as Mega Player |
| [another type of line] | 0x65 | No | 0x167 | SE_PLY_CHANGE_MAME | Become mini |
| & | 0x66 | Yes | 0x177 | SE_OBJ_BLOCK_BREAK | Player break brick block / boss shutter block spawn/break / block broken by tile destroyer sprite / bridge destroyed in Bowser/Big Bowser boss / peach platform destroyed in final boss / Bob-omb destroy block / Big Unagi destroy block / Mummipokey sand ball break |
| ' | 0x67 | Yes | 0x178 | SE_PLY_STAR_ATTACK | Mega Player touch enemy/Big Player touch Mini Goomba / Big Unagi destroy block / Broozer destroy block |
Entrances
1. Entrance Guide
Click the Door icon at the top to edit entrances.
Settings
• *Camera X:**
• *Camera Y:**
• *Entrance ID:** The ID associated with the entrance.
• *Destination ID:** The number of the area the pipe goes to. If not changing area, set to 0.
• *Destination Entrance:** The ID of the entrance it goes to.
• *Connected Pipe ID:** The ID of the path that makes up the pipe. Remember to check "Connected Pipe".
• *View:** The ID of the view the entrance is currently in. Not the destination view.
• *Exit Only:** Check this if you don't want the player to be able to enter, I.E. a one-way pipe.
• *<entrancesetting16>:** Not sure what it does.
• *Connected Pipe:** Check this if you're using a connected pipe. (Such as 7-A)
• *Display on Lower Screen:** Displays the view on the lower screen that the entrance is currently in.
Warp Pipe
Warp pipes are the way Mario gets around to different Views or Areas.
Simple Warp Pipe
First off, build a warp pipe using blocks. For this, I'll be using a upwards warp pipe, (object type 102)
• Place the warp pipe, make sure it's vertical. (And make sure it extends into the ground or is at least 3 blocks high.)
• Click the door icon, and add an entrance.
• Using shift+dragging, place it onto the top left part of the warp pipe.
• Click the drop down menu on the left side, select "Pipe facing Up." Set the View that it's in.
• (Note the Entrance ID if you plan to make it both ways.)
• Now go build another warp pipe somewhere else, make it horizontal this time.. (Either in the same Area or not.)
• Add an entrance, move it with shift+dragging, and place it at the top of the end.
• Set the entrance to "Pipe Facing Right."
• Check "Exit-Only." If it's in a different View, be sure to set the View it's in.
• Note it's Entrance ID, and select the first warp pipe entrance you created.
• Set the "Destination Area" to whatever area the second warp pipe is in (if you created it in another area) and set the Destination ID to the Entrance ID of the second warp pipe entrance.
• Save, and test it. It should work.
• *Troubleshooting:**
If you appear at the start of the level or in another spot not intended, check the "Destination ID".
If your camera appears somewhere without Mario, and then you die, check that the destination entrance has the View set correctly.
Connected Warp Pipe
For this, I'm gonna go ahead and make a pipe that goes up then a turn to the left. (Use Shift+dragging on a block to change length and height.) Use object 59 for a good looking turn.
Set that up, and add the entrances. You don't have to set a Destination ID.
• First, click the first path icon.
• Add a path, and set it up so the first square (0) is down 2 squares, and right 1 square from the leftmost entrance.
• Next, use Control+dragging to make two more squares, one at the top of the bottommost pipe, one to the bottom left of the entrance.
• Set up the paths with this trick.
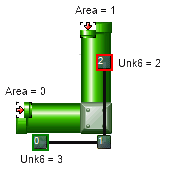
Unknown 6:
0=Pipe facing down
1=Pipe facing right
2=Pipe facing up
3=Pipe facing left
In my pipe,
square 0 is //Unknown 6: 3//
square 2 is //Unknown 6: 0//
• Now select each entrance, check "Connected Pipe", and set the Connected Pipe ID to the Path ID of the paths you just set up (IE. 0)
• For the entrance closest to the end of the path, set "Destination Area" to 1.
• Save and Play.
• *Troubleshooting**
If you enter the pipe, and a transition appears, check "connected pipe" on both entrances.
If you enter the pipe, then come back out immediately, doublecheck that the entrance closest to the end of the path has "Destination Area" set to 1, and that the "Connected Pipe ID" is correctly set.
List of Activator Actors
1. General Event Controllers
- [Class=020] [Object=101] Event Controller
- [Class=087] [Object=155] Special exit controller (warp entrance)
- [Class=137] [Object=164] Event Controller AND
- [Class=138] [Object=165] Event Controller OR
- [Class=139] [Object=166] Event Controller Random
- [Class=140] [Object=167] Event Controller Buffer
- [Class=141] [Object=168] Event Controller Zone
- [Class=142] [Object=286] Event Controller Sequencer
- [Class=255] [Object=169] Spin Block (unused Actor 255)
2. Switches and Other Event Controllers
- [Class=067] [Object=235] Star Coin
- [Class=086] [Object=152] Event trigger block
- [Class=151] [Object=034] Red Coin Ring
- [Class=242] [Object=107] ? Switch
- [Class=243] [Object=291] Brick Block containing ? Switch
- [Class=244] [Object=066] P Switch
- [Class=245] [Object=088] Brick Block containing P Switch
- [Class=246] [Object=108] ! Switch
- [Class=247] [Object=110] Brick Block containing ! Switch (unused actor)
- [Class=265] [Object=041] Bowser bridge switch (skull switch)
3. Triggerable Actors
- [Class=067] [Object=235] Star Coin
- [Class=079] [Object=103] Dorrie
- [Class=080] [Object=106] Red Coin
- [Class=092] [Object=192] Coin Spawner (unused actor)
- [Class=161] [Object=068] Lift moving up and down
- [Class=162] [Object=069] Lift moving left and right
- [Class=174] [Object=078] Lift moving one way once stood on
- [Class=183] [Object=099] Four platform rickshaw lift
- [Class=206] [Object=197] Tile Creator/Destroyer (Tile God)
- [Class=242] [Object=107] ? Switch
- [Class=243] [Object=291] Brick Block containing ? Switch
- [Class=244] [Object=066] P Switch
- [Class=245] [Object=088] Brick Block containing P Switch
- [Class=246] [Object=108] ! Switch
- [Class=247] [Object=110] Brick Block containing ! Switch (unused actor)
- [Class=263] [Object=292] Event Activated Door
- [Class=265] [Object=041] Bowser bridge switch (skull switch)
- [Class=276] [Object=218] Auto-scrolling controller
- [Class=278] [Object=231] Water
- [Class=279] [Object=234] Lava
- [Class=281] [Object=259] Poisoned Water
List of player animations
| Name | Value | anmFile | anmName |
| Idle | 0x00 | plmario | wait |
| WalkSlow | 0x01 | plmario | walk |
| Walk | 0x02 | plmario | run |
| Dash | 0x03 | pl | b_dash |
| DashFast | 0x04 | pl | b_dash2 |
| Jump | 0x05 | pl | jump |
| JumpFall | 0x06 | pl | jump2 |
| JumpLand | 0x07 | pl | jumped |
| TripleJump_unused | 0x08 | pl | 2jump1 |
| TripleJumpFall | 0x09 | pl | 2jump2 |
| TripleJumpLand | 0x0A | pl | 2jumped; also used as DoubleJumpLand |
| TripleJump | 0x0B | pl | roll_jump |
| Skid | 0x0C | pl | turn |
| SkidTurn | 0x0D | pl | trned |
| GroundPoundRoll | 0x0E | pl | hipsr |
| GroundPoundFall | 0x0F | pl | hipat |
| GroundPoundLand | 0x10 | pl | hiped |
| Crouched | 0x11 | pl | stoop |
| ThrowFireball | 0x12 | pl | fire_at |
| SlipBumpFall | 0x13 | pl | sdown |
| Sliding | 0x14 | plnovs | slip |
| StandUp | 0x15 | pl | sliped |
| SlipFall | 0x16 | plnovs | slipla |
| DiveLand | 0x17 | plnovs | sldctslpbk |
| DiveSlide | 0x18 | plnovs | lost |
| DiveStandUp | 0x19 | plnovs | roll (static) |
| RollPose | 0x1A | pl | roll (loop) |
| Roll | 0x1B | pl | carry_start |
| CarryStart | 0x1C | pl | carry_wait |
| CarryIdle | 0x1D | pl | carry_walk |
| CarryWalk | 0x1E | pl | carry_throw |
| CarryThrow | 0x1F | pl | scale_up |
| MegaGrow | 0x20 | pl | wimp |
| Walljump | 0x21 | pl | wsld |
| WallSlide | 0x22 | pl | swim_in; possibly unused |
| SwimStart | 0x23 | plnovs | swim_wait |
| SwimIdle | 0x24 | plnovs | paddle_1 |
| SwimIdle1 | 0x25 | plnovs | swim |
| Swim_legs | 0x26 | plnovs | paddle_2 |
| SwimPaddle2 | 0x27 | plnovs | paddle_end |
| SwimPaddleEnd | 0x28 | plnovs | tree_start |
| PoleGrab | 0x29 | plnovs | tree_wait |
| PoleIdle | 0x2A | plnovs | tree_wait |
| PoleClimb | 0x2B | plnovs | tree_climb |
| PoleSlide | 0x2C | plnovs | tree_pose |
| PushedFall | 0x2D | pl | shfdn |
| Push | 0x2E | pl | push |
| SpinJump | 0x2F | pl | spin_jump |
| SpinJumpLand | 0x30 | pl | spin_jump_end |
| CeilingRopeGrab | 0x31 | plnovs | monkey_start |
| CeilingRopeRightHandGrab | 0x32 | plnovs | monkey_wait_r |
| CeilingRopeLeftHandGrab | 0x33 | plnovs | monkey_wait_l |
| CeilingRopeRightHandMove | 0x34 | plnovs | monkey_r_to_l |
| CeilingRopeLeftHandMove | 0x35 | plnovs | monkey_l_to_r |
| LavaDamageJump | 0x36 | plnovs | firejmp |
| CrouchStart | 0x37 | pl | squat_start |
| SwimCarry | 0x38 | plnovs | swim_carry |
| SwimPaddleCarry | 0x39 | plnovs | paddle_carry |
| SwimThrow | 0x3A | plnovs | swim_throw |
| BumpedNormal | 0x3B | pl | sfbdn |
| BumpedHard | 0x3C | pl | sffdn |
| CannonShoot | 0x3D | pl | shoot |
| Shocked | 0x3E | plnovs | e_shock |
| ShockedFall | 0x3F | plnovs | e_down: unused |
| TightropeWalk | 0x40 | plnovs | rope_walk |
| MegaWalk | 0x41 | pl2 | big_walk |
| MegaJump | 0x42 | pl2 | big_jump_st |
| MegaJumpLand | 0x43 | pl2 | big_jump_ed |
| MegaGroundPoundRoll | 0x44 | pl2 | big_hip_st |
| MegaGroundPoundFall | 0x45 | pl2 | big_hip_at |
| MegaGroundPoundLand | 0x46 | pl2 | big_hip_ed |
| LedgeStand | 0x47 | plnovs | wall_wait |
| LedgeStandMoveLeft | 0x48 | plnovs | wall_walk_l |
| LedgeStandMoveRight | 0x49 | plnovs | wall_walk_r |
| LedgeStandClimbDown | 0x4A | plnovs | hang_start |
| LedgeGrabClimbUp | 0x4B | plnovs | hang_up |
| LedgeGrabIdle | 0x4C | plnovs | hang_wait |
| LedgeGrabMoveLeft | 0x4D | plnovs | hang_walk_l |
| LedgeGrabMoveRight | 0x4E | plnovs | hang_walk_r |
| VineRopeIdle | 0x4F | plnovs | rope_swing |
| SpinDrill | 0x50 | pl2 | spin_jump2 |
| JumpCombo2 | 0x51 | pl2 | jump_b |
| JumpCombo3 | 0x52 | pl2 | jump_c |
| JumpCombo4_kick | 0x53 | pl2 | jump_d |
| LongJump | 0x54 | pl2 | jump_b_1 |
| LongJumpFall | 0x55 | pl2 | jump_b_2 |
| DoubleJump | 0x56 | pl2 | 2jmp_c_1 |
| DoubleJumpFall | 0x57 | pl2 | 2jmp_c_2 |
| BackflipJump | 0x58 | pl2 | 2jmp_d_1; possibly unused |
| BackflipJumpFall | 0x59 | pl2 | 2jmp_d_2 |
| UnknownStarJump | 0x5A | pl2 | 2jmp_e_1 |
| UnknownStarJumpFall | 0x5B | pl2 | 2jmp_e_2 |
| JumpCombo5_twirl | 0x5C | pl2 | jump_e |
| PipeEntrance | 0x5D | pl2 | low_walk |
| DeadFall | 0x5E | pl2 | dead |
| DeadPose | 0x5F | pl2 | dead_pose |
| GoalJump | 0x60 | plnovs | goal_jump |
| GoalCap | 0x61 | plnovs | goal_puton_cap |
| DoorWalk | 0x62 | pl2 | door_walk |
| BattleGoalJump | 0x63 | plnovs | bt_goal_jmp |
| BattleGoalOut | 0x64 | plnovs | bt_goal_out |
| MegaJumpFall | 0x65 | pl2 | big_jmp_2 |
| TightropeIdle | 0x66 | plnovs | rope_wait |
| TightropeJumpLand | 0x67 | plnovs | rope_jump_ed |
| MiniWalk | 0x68 | pl2 | zero_g_walk |
| MiniJump | 0x69 | pl2 | zero_g_jump |
| MiniJumpFall | 0x6A | pl2 | zero_g_jump2 |
| MiniJumpLand | 0x6B | pl2 | zero_g_jump_ed |
| UnusedSpinJumpOff | 0x6C | pl2 | spin_jump_off; possibly unused |
| UnusedSpinJump | 0x6D | pl2 | spin_jump_st |
| Shell | 0x6E | pl2 | shell_in |
| StarRoll | 0x6F | pl2 | star_roll |
| FenceMoveVertical | 0x70 | plnovs | net_walk1 |
| FenceIdle | 0x71 | plnovs | net_wait |
| UnusedDamageFall | 0x72 | plnovs | e_damage1 |
| UnusedDamageLand | 0x73 | plnovs | e_damage2 |
| FenceSlam | 0x74 | plnovs | net_attack |
| FenceMoveHorizontal | 0x75 | plnovs | net_walk2 |
| LedgeJump | 0x76 | plnovs | w_jump1 |
| LedgeJumpFall | 0x77 | plnovs | w_jump2 |
| LedgeJumpLand | 0x78 | plnovs | w_jump_ed |
| LedgeGrab | 0x79 | plnovs | jump_hang |
| SwimWalk | 0x7A | plnovs | swim_walk |
| SwimStanding | 0x7B | plnovs | swim_standing |
| Buried | 0x7C | plnovs | buried |
| BuriedStandUp | 0x7D | plnovs | buried_ed |
| BuriedFall | 0x7E | plnovs | buried_st |
| BuriedDamage | 0x7F | plnovs | buried_damage |
| MegaSitCrouch | 0x80 | pl2 | big_hip_squat |
| WaterDeadFall | 0x81 | plnovs | swim_dead |
| TightropeUnbalanced | 0x82 | plnovs | rope_wait2 |
| MegaIdle | 0x83 | pl2 | big_wait |
| BossCallPeach | 0x84 | plnovs | find |
| BossStarePeach | 0x85 | plnovs | find_loop |
| BossReactPeach | 0x86 | plnovs | find_surprise |
| BossWin | 0x87 | plnovs | boss_key_get |
| MegaWin | 0x88 | plnovs | big_goal |
| FinalBossEnd | 0x89 | plnovs | m_kiss |
| FinalBossPeach | 0x8A | plnovs | m_fall_wait |
| FinalBossCap | 0x8B | plnovs | m_escort |
| FinalBossKiss | 0x8C | plnovs | m_shy |
| GoalJumpLand | 0x8D | plnovs | goal_jump_ed |
| BossIdle | 0x8E | plnovs | bt_wait |
| BossStartled | 0x8F | plnovs | bt_surprise |
| BeanStalkMove | 0x90 | plnovs | pea_plant |
| BeanStalkGrab | 0x91 | plnovs | pea_plant_st |
| BeanStalkIdle | 0x92 | plnovs | pea_plant_wait |
| BowserJrWin | 0x93 | plnovs | jr_clear |
Background Scrolling Data Info
TODO: Info for BG start position nybble. Would also be nice to know which BG speeds are all used.
Foregrounds and backgrounds scroll differently in many levels — sometimes they have a fast speed ratio and sometimes they can be completely static. This can be adjusted by hex editing your level.
- Background only --> Change block 3 only.
- Foreground only --> Change block 5 only.
- Both --> Change both blocks 3 and 5.
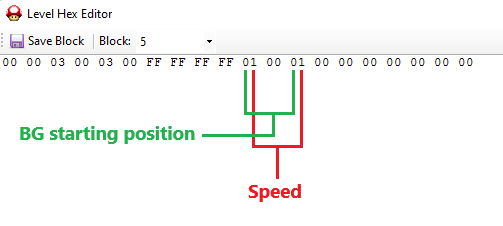
- Byte 11: Control BG horizontal scrolling.
- Byte 13: Control BG vertical scrolling.
And for each byte:
- First Nybble: Control where the background starts when the player enters the views.
- Second Nybble: Control speed.
(Image source: MarioSunshine)
Scroll speed data
- 0x0: Same as FG speed. Used in w2-3 (sewer level) for example.
- 0x1: 50% FG speed.
- 0x2: 25% FG speed. Common for top backgrounds.
- 0x3: 12.5% FG speed. Common for bottom backgrounds.
- 0x4: 120% FG speed. Unused.
- 0x5: 75% FG speed.
- 0x6: 6.25% FG speed.
- 0x7: 9.375% FG speed.
- 0x8: 20.3125% FG speed.
- 0x9: Same as FG speed.
- 0xA: Same as FG speed.
- 0xB: Same as FG speed.
- 0xC: Same as FG speed.
- 0xD: 200% FG speed. Unused.
- 0xE: 400% FG speed. Unused.
- 0xF: 800% FG speed. Unused.
(Source: RoadrunnerWMC)
Disabling vertical scrolling
- Background only --> Change both bytes 13 and 16 of block 3 only.
- Foreground only --> Change both bytes 13 and 16 of block 5 only.
- Both --> Change both bytes 13 and 16 of both blocks 3 and 5.
- Byte 13: enters 40.
- Byte 16: enters 10.
(Source: MeroMero)
Automatic horizontal scrolling
It only works for backgrounds that already have a horizontal animation, this can be achieved by putting a value of 10 for byte 16 and it will animate the whole background instead of partially animating it.
(Note: if byte 13 value is somewhere between 40 and 4F, this effect will be overridden and instead the vertical scrolling will be disabled).