New Super Mario Bros. DS
Information about modding NSMB DS
- General Info
- Level List
- Connected Pipes
- File Table
- Music List
- Special Event IDs
- Camera
- Particle List
- Staff Roll Characters
- Entrances
- List of Activator Actors
- List of player animations
- Background Scrolling Data Info
- Modding Tutorials
- Tools
- Code Modification
- Using GDB with Ghidra and melonDS
- Setting Up Code Modifications
- Porting old patch syntax to NCPatcher
- Porting old patches to the NSMB Code Reference
- Custom Actors
- 2D Graphics
- World Map
General Info
General information about the game that doesn't need more than one page to explain
Level List
Every level in the game accompanied by its file name and how many areas it has.
| Filename | Level Name | Area Count |
|---|---|---|
| A01 | World 1-1 | 3 Areas |
| A02 | World 1-2 | 3 Areas |
| A03 | World 1-3 | 1 Area |
| A04 | World 1-4 | 3 Areas |
| A05 | World 1-5 | 2 Areas |
| A06 | World 1-A | 2 Areas |
| A07 | W1 Tower | 3 Areas |
| A08 | W1 Castle | 3 Areas |
| A09 | Cannon (W1 to W5) | 1 Area |
| B01 | World 2-1 | 3 Areas |
| B02 | World 2-2 | 2 Areas |
| B03 | World 2-3 | 2 Areas |
| B04 | World 2-4 | 2 Areas |
| B05 | World 2-5 | 2 Areas |
| B06 | World 2-6 | 2 Areas |
| B07 | World 2-A | 3 Areas |
| B08 | W2 Tower | 3 Areas |
| B09 | W2 Castle | 3 Areas |
| B10 | Cannon (W2 to W5) | 1 Area |
| C01 | World 3-1 | 2 Areas |
| C02 | World 3-2 | 2 Areas |
| C03 | World 3-3 | 3 Areas |
| C04 | World 3-A | 3 Areas |
| C05 | World 3-B | 2 Areas |
| C06 | World 3-C | 2 Areas |
| C07 | W3 Ghost House | 3 Areas |
| C08 | W3 Tower | 2 Areas |
| C09 | W3 Castle | 2 Areas |
| C10 | Cannon (W3 to W6) | 1 Area |
| D01 | World 4-1 | 1 Area |
| D02 | World 4-2 | 2 Areas |
| D03 | World 4-3 | 2 Areas |
| D04 | World 4-4 | 2 Areas |
| D05 | World 4-5 | 3 Areas |
| D06 | World 4-6 | 2 Areas |
| D07 | World 4-A | 2 Areas |
| D08 | W4 Ghost House | 3 Areas |
| D09 | W4 Tower | 2 Areas |
| D10 | W4 Castle | 2 Areas |
| D11 | Cannon (W4 to W7) | 1 Area |
| E01 | World 5-1 | 1 Area |
| E02 | World 5-2 | 2 Areas |
| E03 | World 5-3 | 2 Areas |
| E04 | World 5-4 | 1 Area |
| E05 | World 5-A | 2 Areas |
| E06 | World 5-B | 1 Area |
| E07 | World 5-C | 2 Areas |
| E08 | W5 Ghost House | 3 Areas |
| E09 | W5 Tower | 2 Areas |
| E10 | W5 Castle | 2 Areas |
| E11 | Cannon (W5 to W8) | 1 Area |
| F01 | World 6-1 | 2 Areas |
| F02 | World 6-2 | 2 Areas |
| F03 | World 6-3 | 2 Areas |
| F04 | World 6-4 | 1 Area |
| F05 | World 6-5 | 2 Areas |
| F06 | World 6-6 | 3 Areas |
| F07 | World 6-A | 2 Areas |
| F08 | World 6-B | 1 Area |
| F09 | W6 Tower 1 | 2 Areas |
| F10 | W6 Tower 2 | 2 Areas |
| F11 | W6 Castle | 2 Areas |
| F12 | Unused Cannon (W6 to W8) | 1 Area |
| G01 | World 7-1 | 1 Area |
| G02 | World 7-2 | 2 Areas |
| G03 | World 7-3 | 2 Areas |
| G04 | World 7-4 | 1 Area |
| G05 | World 7-5 | 3 Areas |
| G06 | World 7-6 | 3 Areas |
| G07 | World 7-7 | 1 Area |
| G08 | World 7-A | 2 Areas |
| G09 | W7 Ghost House | 3 Areas |
| G10 | W7 Tower | 2 Areas |
| G11 | W7 Castle | 2 Areas |
| H01 | World 8-1 | 2 Areas |
| H02 | World 8-2 | 3 Areas |
| H03 | World 8-3 | 2 Areas |
| H04 | World 8-4 | 2 Areas |
| H05 | World 8-5 | 2 Areas |
| H06 | World 8-6 | 2 Areas |
| H07 | World 8-7 | 1 Area |
| H08 | World 8-8 | 2 Areas |
| H09 | W8 Tower 1 | 2 Areas |
| H10 | W8 Tower 2 | 2 Areas |
| H11 | W8 Castle | 2 Areas |
| H12 | W8 Final Castle | 3 Areas |
| I01 | 1-Up Bonus Game | 1 Area |
| I02 | Item Bonus Game | 1 Area |
| I03 | Mega Mushroom Bonus Game | 1 Area |
| I04 | Bottom Screen Background Chooser | 1 Area |
| J01 | MvsL - SMB 1-1 | 1 Area |
| J02 | MvsL - Underground | 1 Area |
| J03 | MvsL - Ice World | 1 Area |
| J04 | MvsL - Pipe World | 1 Area |
| J05 | MvsL - Castle | 1 Area |
| J06 | Unused Level 1 | 1 Area |
| J07 | Unused Level 2 | 1 Area |
| J08 | Unused Level 3 | 1 Area |
| J09 | Unused Level 4 | 1 Area |
| J10 | Unused Level 5 | 1 Area |
Connected Pipes
Each end of the pipe needs an Entrance. Both must have the same connected pipe ID.
Set area 0 in one end and area 1 in the other end.
Make a Path with the same ID as the entrance's "Connected Pipe ID".
Each node on the path must be placed and "Value 6" in the node numbered as below:
Image of how to place the node in each pipe with its value:
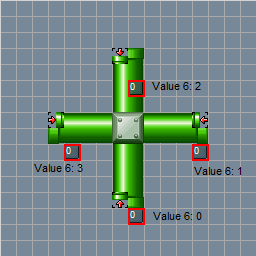
If value 6 does not show up for you, then try using the original NSMBe.
The path must be connected from one end of the pipe to the other; this is just to show the placement.
You can place more nodes on the path if you need, only the first and last need the above value 6 number.
World 7-A area 2 is good for more information.
Example shapes:
Reverse L
Setting a pipe as "exit only" also works, and is used in retail (eg 7-A).
File Table
A table of contents for the files inside of a NSMB DS ROM.
Note: bold entries are files.
TODO: Expand this table to contain all files, splitting the table if needed
| Filepath |
Description |
|---|---|
| fnt.bin | File Name Table It contains filenames, folders and folders names. |
| fat.bin | File Allocation Table It contains every file's address in the rom and its size. |
| header.bin | Header |
| arm9ovt.bin | It lists every arm9 overlay, its location in the rom and where it should be loaded in the ram. |
| arm7ovt.bin | It should list every arm7 overlay, its location in the rom and where it should be loaded in the ram. |
| arm9.bin | The code for the main processor. |
| arm7.bin | The code for the coprocessor. |
| banner.bin | Contains the game banner text and icon shown in the system bios |
| rsasig.bin | Some signature |
| / | Root folder |
| /00DUMMY | Empty, NSMBe uses it to store tileset, their objects' descriptions, backgrounds and music names after renaming them |
| /BUILDTIME | Last game build time |
| /mgvs_sound_data.sdat | Minigames music |
| /sound_data.sdat | Main game music |
| /ARCHIVE/ | Contains archives for minigames and download play |
| /BG_chk/ | Contains tile behaviour files for tilesets |
| /BG_ncg/ | Contains bitmaps for tilesets, backgrounds, and tile animations |
| /BG_ncl/ | Contains palettes and palette animations for tilesets and backgrounds, as well as jyotyu palette |
| /BG_nsc/ | Contains tilemaps for backgrounds |
| /BG_pnl/ | Contains tilemaps for tilesets |
| /BG_unt/ | Objects info for tilesets |
| /course/ | It contains all the levels .bin files |
| /demo/ | It contains some cutscene stuffs |
| /ending/ | It contains other ending stuffs (like the tower BG) |
| /enemy/ | It contains the enemies' models and animations |
| /ipl/ | Contains bitmap and palette for DS Download Play banner icon |
| /map/ | It contains all the Worldmap files |
| /obj/ | Contains bitmaps and palettes of in-course sprites |
| /particle/ | Contains particle archives |
| /player/ | It contains player's models and animations |
| /polygon_unit/ | It contains some levels effects, the quicksand files, the pipe graphics, and the End-of-level graphics |
| /script/ | It contains BMG files (used for In-Level pause scripts, Worldmap's pause scripts, and for the Titlescreen's File Select scripts) |
| /uiStudio/ | Contains files related to game UI |
| overlay7/ | It should contain the overlays for the arm7 processor |
| overlay9/ | It contains the overlays for the arm9 processor |
Music List
| Level Header ID (Hex) | ID in NSMBe/Nitro Studio (Decimal) | Common Name | Name in NSMBe | SDAT Name (in sound_data.sdat) |
|---|---|---|---|---|
| 00 | 0 | None/MvsL Stage Theme 1 (in some cases)* | MvsL Stage | BGM_VS_CHIJOU |
| 01 | 1 | Tower | Tower | BGM_TRIDE.sseq |
| 02 | 2 | Starman | Starman | BGM_MUTEKI.sseq |
| 03 | 3 | Mega Mario | Mega Mario | BGM_HUGE.sseq |
| 04 | 4 | End of Level (+ MvsL battle win) | End of Level | BGM_COURSE_CLEAR.sseq |
| 05 | 5 | Death | Death | BGM_DOWN.sseq |
| 06 | 6 | Desert | Desert | BGM_SABAKU.sseq |
| 07 | 7 | Boss | Boss | BGM_BOSS.sseq |
| 08 | 8 | VS battle lose | VS Lose | BGM_VS_LOSE_FANFARE |
| 09 | 9 | Underground | Underground | BGM_CHIKA.sseq |
| 0A | 10 | Bonus room | Bonus room | BGM_MAME.sseq |
| 0B | 11 | Underwater | Underwater | BGM_WATER3.sseq |
| 0C | 12 | Lava | Lava | BGM_KAZAN_SOTO.sseq |
| 0D | 13 | End Credits (Early/Unused, shorter) | End Credits | BGM_SAMPLE |
| 0E | 14 | Beach | Beach | BGM_SANBASHI.sseq |
| 0F | 15 | Bowser Jr. Battle | Bowser Jr. Battle | BGM_KUPPAJR |
| 10 | 16 | Ghost House | Ghost House | BGM_OBAKE.sseq |
| 11 | 17 | Castle | Castle | BGM_SHIRO.sseq |
| 12 | 18 | Switch timer | Timer | BGM_SWITCH.sseq |
| 13 | 19 | End of Game Fanfare | End of Game Fanfare | BGM_FINAL_CLEAR |
| 14 | 20 | Game Over | Game Over | BGM_GAMEOVER.sseq |
| 15 | 21 | Final Boss | Final Boss | BGM_FINAL_KUPPA.sseq |
| 16 | 22 | Boss Beaten | Boss Beaten | BGM_BOSS_CLEAR.sseq |
| 17 | None | [Nothing] | [Nothing] | |
| 18 | 24 | Athletic | Mushrooms (Athletic) | BGM_ATHLETIC.sseq |
| 19 | 25 | Toad House | Toad House | BGM_MINIGAME.sseq |
| 1A | 26 | Grassland | Grassland | BGM_CHIJOU_CONT.sseq |
| 1B | 27 | Title Screen | Title Screen | BGM_SELECT.sseq |
| 1C | 28 | SMB End of Level | SMB End of Level | BGM_GOAL_FANFARE2.sseq |
| 1D | 29 | Toad House Fanfare | Toad House Fanfare | BGM_FANFARE_KINO.sseq |
| 1E | 30 | MvsL Stage Theme 2* | MvsL Stage 2 | BGM_VS_STAGE.sseq |
| 1F | 31 | MvsL start screen (duplicate of Title Screen) | MvsL Title Screen | BGM_VS_SELECT.sseq |
| 20 | 32 | MvsL Loop | MvsL Results Screen | BGM_VS_FAN_LOOP.sseq |
| 21 | 33 | MvsL Win (Results screen) | MvsL Win | BGM_VS_WIN.sseq |
| 22 | 34 | MvsL Lose (Results screen) | MvsL Lose | BGM_VS_LOSE |
| [23 - 4F] | None | [Nothing] | [Nothing] | |
| 50 | 80 | Lava ambient | Lava ambient (Castle) | BGM_AMB_YOUGAN |
| 51 | 81 | Desert wind ambient | Desert ambient (Castle) | BGM_AMB_SABAKU |
| 52 | 82 | Water ambient | Water ambient (Castle) | BGM_AMB_WATER |
| 53 | 83 | Cave Water Ambient | Underground ambient (Castle) | BGM_AMB_CHIKA |
| [84 - 85] | None | [Nothing] | [Nothing] | |
| 56 | 86 | Sky Wind Ambient | Wind ambient (Castle) | BGM_AMB_SKY |
| [87 - 98] | None | [Nothing] | [Nothing] | |
| 63 | 99 | MvsL Stage (Early) | Early Grassland (Unused) | BGM_CHIJO |
| 64 | 100 | World 1* | World 1 | BGM_WORLD1 |
| 65 | 101 | World 2* | World 2 | BGM_WORLD2 |
| 66 | 102 | World 3* | World 3 | BGM_WORLD3 |
| 67 | 103 | World 4* | World 4 | BGM_WORLD4 |
| 68 | 104 | World 5* | World 5 | BGM_WORLD5 |
| 69 | 105 | World 6* | World 6 | BGM_WORLD6 |
| 6A | 106 | World 7* | World 7 | BGM_WORLD7 |
| 6B | 107 | World 8* | World 8 | BGM_WORLD8 |
| 6C | 108 | End Credits | Ending | BGM_ENDING |
| 6D | 109 | Intro Part 1 | Intro 1 | BGM_OPENING_DEMO1 |
| 6E | 110 | Intro Part 2 | Intro 2 | BGM_OPENING_DEMO2 |
| 6F | 111 | Peach Fanfare | Peach Fanfare | BGM_KUPPACLEAR_DEMO |
*MvsL themes and World Map themes: Loading the MvsL themes or the World map themes in a regular level (by changing the music in the View Settings for example) will play the music, but most sound effects will be muted while the music is playing (this is because they use sound banks that are too big for the game, overloading the audio memory).
Additional note: Any song with an id above 6F will not play, regardless of if there is song data associated with it or not (by editing the sound_data.sdat file)
Special Event IDs
| ID | Description |
|---|---|
| 3E | Blue coin trail while event is active. |
| 46 | Causes the unused "faded circle" screen transition to be used when using an entrance or exit. Unused |
| F3 | Partial Starman effects. Unused? |
| F4 | Partial Mega Mushroom effects. Unused? |
| EB | Make inventory contain item with no icon. Crashes when you release the item and it can't be replaced by other items. Maybe defunct unused item? Unused? |
| F7 | Locks camera into bottom left of view. Mario isn't forced to be inside this camera, but he can't interact with actors outside the camera. Unused? |
Camera
The Camera in New Super Mario Bros is controlled in several ways. You have to take into account that the camera movements will condition the gameplay.
1. How the Camera restricts Mario
The camera restricts Mario's movements in two ways:
• Mario cannot go out of the camera view through the sides.
This means that if the camera doesn't pan further, Mario can't either. The camera sides act like walls (but you can't wall jump into them)
• Mario cannot go to the bottom of the camera.
If he does so, he will die. Note that there is some margin, so you can place something like a Warp to Level some blocks below the camera view. Mario will get it before he dies.
Mario does can go out from the top of the camera. Simply the camera will not pan there, so Mario will be out of the screen.
2. Views
The camera will NEVER get out of the view. That means Mario can't get out of the view by the sides or the bottom.
3. Panning blocks
This thing is a little bit confusing. An area (not each view) is divided in blocks of 16x16 tiles (256x256 pixels). The camera will not pan into blocks that are empty (don't contain any objects).
An example (thanks to Garmichael):
Look at this level:
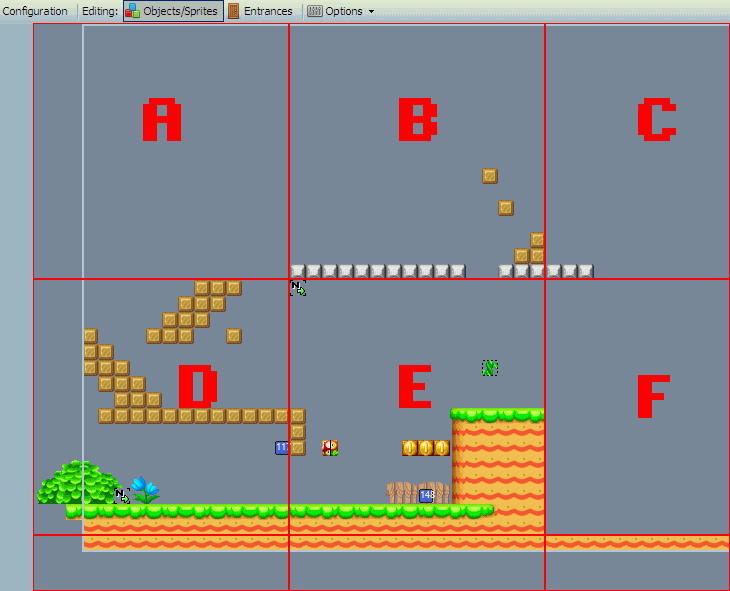
Notice that blocks A and F are empty. Mario cannot get to A from B, but he can actually jump from D to B. While he is in A, the camera will not move, but as soon as he crosses into B, the camera will jump to that location and that boundary would act like a wall. From there, As Mario approaches C, he will be able to see some of F, but as soon as he crosses into C, the camera will reposition so that the border to F is the bottom of the screen. If Mario jumps down into F, he dies (even though the block under F has ground).
4. Scroll Control and Scroll Stop sprites
These sprites control the camera in more ways. How they work is generally unknown, except for:
• Vertical scroll controls: [sprite:198] and [sprite:199]
• Horizontal scroll stop: [sprite:276]
5. Header Blocks
Block 2, Block 4, and Block 5 control more settings of the camera. Look at the List of Header Blocks page for more info.
6. Camera X & Y
The entrance's settings include two boxes named "Camera X" and "Camera Y", usually you can leave their values as 0, but sometimes you need to put values in there:

The zone and door entrance don't actually have any purpose in-game but to showcase the coordinates.
The zone delimits what you can see on the NDS screen.
If at least one of the Camera values is different from 0, then the tile at said coordinates will calibrate the camera and will serve as the top-left tile of said camera.
You usually use them when sprites 198-199 and/or 276 are in the way, or eventually to calibrate the bottom of the camera to the bottom of the zone.
The purpose of this is to show a nice transition when you change areas.
With the example earlier if both values were at 0, this is where the camera would spawn by default:
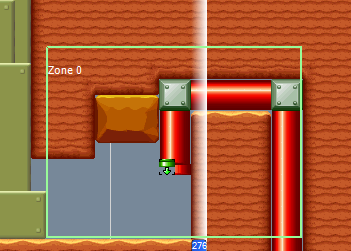
The camera is 1 tile higher than the bottom of the zone, but the biggest offender here is the sprite 276, it is only acknowledged when the player have control of Mario thus only when Mario completely exits the pipe, the camera would recognize sprite 276 and then scroll to the left at high speeds, which results in an ugly transition and you can bet this is a rookie mistake to leave that kind of camera error unchecked.
Particle List
Note: IDs can go as high as 255, all IDs past 118 are blank and have been left out for sake of shortening the list.
| Particle Id | In-Game Effect | Notes |
| 0 | toadsworth creates toad house block(s) – part 2 red toad house disappears – part 3 | |
| 1 | ||
| 2 | ||
| 3 | something in the intro | |
| 4 | ||
| 5 | whomp destroyed – part 1 | |
| 6 | whomp destroyed – part 2 | |
| 7 | whomp destroyed – part 3 | |
| 8 | ||
| 9 | whomp slams ground – part 1 | |
| A | whomp slams ground – part 2 | |
| B | whomp slams ground – part 3 | |
| C | ||
| D | mario jumps/lands on world map | also used for flying ? blocks, hammer bros and bowser jr on the world map? |
| E | mario goes into castle on world map | |
| F | ||
| 10 | ||
| 11 | something todo with end-of-boss cutscene or world map? | |
| 12 | ||
| 13 | bob-omb explodes - part 1 | sometimes spawned (off-screen?) on world map |
| 14 | bob-omb explodes - part 2 | sometimes spawned (off-screen?) on world map |
| 15 | bob-omb explodes - part 3 | |
| 16 | bob-omb explodes - part 4 | |
| 17 | bob-omb explodes - part 5 | |
| 18 | bob-omb explodes - part 6 | |
| 19 | bob-omb explodes - part 7 | |
| 1A | ||
| 1B | red toad house disappears – part 1 | |
| 1C | red toad house disappears – part 2 thwomp hits ground – part 1 | |
| 1D | thwomp hits ground – part 2 | |
| 1E | big thwomp hits ground – part 1 | |
| 1F | big thwomp hits ground – part 2 | |
| 20 | big thwomp hits ground – part 3 | |
| 21 | get mega mushroom – part 1 | |
| 22 | get mega mushroom – part 2 | |
| 23 | get mega mushroom – part 3 | |
| 24 | get mega mushroom – part 4 | |
| 25 | get mega mushroom – part 5 | |
| 26 | get mega mushroom – part 6 | |
| 27 | get mega mushroom – part 7 | |
| 28 | get mega mushroom – part 8 | |
| 29 | get mega mushroom – part 9 | |
| 2A | get mega mushroom – part 10 | |
| 2B | get mega mushroom – part 11 | |
| 2C | get mega mushroom – part 12 | |
| 2D | ||
| 2E | ||
| 2F | ||
| 30 | ||
| 31 | ||
| 32 | ||
| 33 | ||
| 34 | ||
| 35 | ||
| 36 | ||
| 37 | ||
| 38 | ||
| 39 | mega mario walks right – alternating with 3A | |
| 3A | mega mario walks right – alternating with 39 | |
| 3B | ||
| 3C | mega mario walks left – alternating with 3D | |
| 3D | mega mario walks left – alternating with 3C / goal fireworks related? – part 6 | |
| 3E | goal fireworks related? – part 7 | |
| 3F | goal fireworks related? – part 8 | |
| 40 | goal fireworks related? – part 9 | |
| 41 | goal fireworks related? – part 10 | |
| 42 | ||
| 43 | ||
| 44 | ||
| 45 | ||
| 46 | ||
| 47 | goal fireworks related? – part 1 | |
| 48 | goal fireworks related? – part 2 | |
| 49 | goal fireworks related? – part 3 | |
| 4A | goal fireworks related? – part 4 | |
| 4B | goal fireworks related? – part 5 | |
| 4C | splunkin stomped on for the second time – part 1 | |
| 4D | splunkin stomped on for the second time – part 2 | |
| 4E | splunkin stomped on for the second time – part 3 | |
| 4F | splunkin stomped on for the first time – part 1 | |
| 50 | splunkin stomped on for the first time – part 2 | |
| 51 | bowser jr lands after being defeated | |
| 52 | ||
| 53 | ||
| 54 | ||
| 55 | ||
| 56 | ||
| 57 | ||
| 58 | ||
| 59 | ||
| 5A | ||
| 5B | ||
| 5C | ||
| 5D | ||
| 5E | ||
| 5F | ||
| 60 | ||
| 61 | ||
| 62 | ||
| 63 | ||
| 64 | ||
| 65 | ||
| 66 | ||
| 67 | ||
| 68 | ||
| 69 | ||
| 6A | ||
| 6B | ||
| 6C | ||
| 6D | ||
| 6E | ||
| 6F | ||
| 70 | ||
| 71 | ||
| 72 | ||
| 73 | jump onto cliff ledge from normal ground | |
| 74 | ||
| 75 | ||
| 76 | item/object appears/disappears – part 1 | |
| 77 | item/object appears/disappears – part 2 | |
| 78 | item/object appears/disappears – part 3 | |
| 79 | enemy/mega goomba “popped” – part 1 boss shutter piece spawned/destroyed – part part 1 bowser bridge piece destroyed – part 1 | |
| 7A | enemy/mega goomba “popped” – part 2 boss shutter piece spawned/destroyed – part part 2 bowser bridge piece destroyed – part 2 | |
| 7B | ||
| 7C | ||
| 7D | ||
| 7E | mario “twinkles” in distance after being fired by warp cannon | |
| 7F | ||
| 80 | ||
| 81 | ||
| 82 | ||
| 83 | ||
| 84 | ||
| 85 | ||
| 86 | run into enemy as mega mario | |
| 87 | ||
| 88 | ||
| 89 | ||
| 8A | ||
| 8B | ||
| 8C | ||
| 8D | ||
| 8E | ||
| 8F | ||
| 90 | ||
| 91 | ||
| 92 | ||
| 93 | ||
| 94 | ||
| 95 | blue coin collected | |
| 96 | mario breaks free from under fallen snow – part 1 | |
| 97 | mario breaks free from under fallen snow – part 2 | |
| 98 | ||
| 99 | ||
| 9A | ||
| 9B | ||
| 9C | ||
| 9D | mario stomps on Crowber – part 1 | |
| 9E | mario stomps on Crowber – part 2 | |
| 9F | mario does Drill Stomp straight down | |
| A0 | bowser jr/blockhopper jumps/lands | |
| A1 | object enters/exits lava – part 1 | |
| A2 | object enters/exits lava – part 2 | |
| A3 | object enters/exits poison water – part 1 | |
| A4 | object enters/exits poison water – part 2 | |
| A5 | object enters/exits water – part 1 | |
| A6 | object enters/exits water – part 2 | |
| A7 | ||
| A8 | mario lands on soft cloud platform | |
| A9 | mario lands on quicksand | |
| AA | mario lands on sinking snow – part 1 | |
| AB | mario lands on sinking snow – part 2 | |
| AC | mario fireball hits enemy/wall – part 1 | |
| AD | mario fireball hits enemy/wall – part 2 | |
| AE | stomp on wiggler | |
| AF | ||
| B0 | ||
| B1 | ||
| B2 | kab-omb explodes – part 1 | |
| B3 | kab-omb explodes – part 2 | |
| B4 | kab-omb explodes – part 3 | |
| B5 | ||
| B6 | ground-pound on koopa troopa/buzzy beetle – part 1 | |
| B7 | ground-pound on koopa troopa/buzzy beetle – part 2 | |
| B8 | ground-pound on koopa troopa/buzzy beetle – part 3 | |
| B9 | ground-pound on koopa troopa/buzzy beetle – part 4 | |
| BA | “pop” enemy with ground-pound – part 1 | |
| BB | “pop” enemy with ground-pound – part 2 | |
| BC | “pop” enemy with ground-pound – part 3 | |
| BD | ||
| BE | ||
| BF | ||
| C0 | ||
| C1 | ||
| C2 | ||
| C3 | ||
| C4 | ||
| C5 | ||
| C6 | ||
| C7 | ||
| C8 | ||
| C9 | ||
| CA | mario stomps lakitu | |
| CB | mario lands in lakitu’s cloud | |
| CC | ||
| CD | ||
| CE | ||
| CF | ||
| D0 | bill blaster fires bullet bill – part 1 | but not rotating bill blaster |
| D1 | bill blaster fires bullet bill – part 2 | “ |
| D2 | ground-pound on koopa troopa/buzzy beetle – part 5 | |
| D3 | ground-pound on koopa troopa/buzzy beetle – part 6 | |
| D4 | ||
| D5 | ||
| D6 | ||
| D7 | ||
| D8 | toadsworth creates toad house block(s) – part 1 | |
| D9 | ||
| DA | ||
| DB | skeeter bomb enters water or maybe skeeter spawns bomb – part 3 | |
| DC | skeeter bomb enters water or maybe skeeter spawns bomb – part 4 | |
| DD | ||
| DE | ||
| DF | ||
| E0 | ||
| f8 | Mario ground pound Falling snow hits ground | |
| E2 | Mario lands after triple jump Mario ground pounds on mummipokey | |
| E3 | ||
| E4 | mario goes out of water – part 1 | |
| E5 | mario goes out of water – part 2 | |
| E6 | mario goes out of water – part 3 | |
| E7 | mario exits water – part 1 | |
| E8 | mario exits water – part 2 | |
| E9 | mario exits water – part 3 | |
| EA | get red coin | |
| EB | ||
| EC | ||
| ED | ||
| EE | mario lands on ground in deep water – part 1 | |
| EF | mario lands on ground in deep water – part 2 | |
| F0 | ||
| F1 | ||
| F2 | ||
| F3 | mario flies off Spin Block/out of tornado – part 1 | |
| F4 | mario flies off Spin Block/out of tornado – part 2 | |
| F5 | something todo with spinning/drill stomp – part 1 | |
| F6 | something todo with spinning/drill stomp – part 2 | |
| F7 | something todo with spinning/drill stomp – part 3 | |
| F8 | get star coin – part 1 | |
| F9 | get star coin – part 2 | |
| FA | get star coin – part 3 | |
| FB | ||
| FC | ||
| FD | ?/p/! switch pressed – part 1 | |
| FE | ?/p/! switch pressed (alt – part upside down or underwater only?) – part 1 | |
| FF | ?/p/! switch pressed (alt – part upside down or underwater only?) – part 2 | |
| 100 | ?/p/! switch pressed – part 2 | |
| 101 | ||
| 102 | ||
| 103 | mario does Drill Stomp when small mario | |
| 104 | mario wall jump from right – part 1 | |
| 105 | mario wall jump from right – part 2 | |
| 106 | mario wall jump from right – part 3 | |
| 107 | mario wall jump from left – part 1 | |
| 108 | mario wall jump from left – part 2 | |
| 109 | mario wall jump from left – part 3 | |
| 10A | ||
| 10B | ||
| 10C | mario lands on /starts to hang off of cliff edge | |
| 10D | ||
| 10E | mario goes into water in 1-A start section – part 1 cheepskipper enters/exits water – part 1 | |
| 10F | mario goes into water in 1-A start section – part 2 cheepskipper enters/exits water – part 2 | |
| 110 | mario goes into water in 1-A start section – part 3 spike pillar goes into water – part 1 | |
| 111 | spike pillar goes into water – part 2 | |
| 112 | ||
| 113 | cheepskipper enters/exits water – part 3 | |
| 114 | mario goes into water in 3-Castle boss room – part 1 | |
| 115 | mario goes into water in 3-Castle boss room – part 2 | |
| 116 | mario goes into water in 3-Castle boss room – part 3 | |
| 117 | mario punches fence – part 1 | |
| 118 | mario punches fence – part 2 |
Staff Roll Characters
These are the letters you can touch on the bottom screen during the credits.
| Closest ASCII Character | Character ID | Character Used? | SFX ID | SFX Name | SFX Usage Outside of Credits |
|---|---|---|---|---|---|
| A | 0x0 | Yes | 0x34 | SE_EMY_KPJR_DAMAGE_V | Bowser Jr. stomped (voice) |
| B | 0x1 | Yes | 0x35 | SE_EMY_KPJR_CRY_V | Bowser Jr. defeated |
| C | 0x2 | Yes | 0x39 | SE_EMY_KPJR_GUARD_ON | Bowser Jr. go into shell |
| D | 0x3 | Yes | 0x6e | SE_EMY_KURIBO_FUMU | Stomp on enemy / Stomp on other player |
| E | 0x4 | Yes | 0x6f | SE_EMY_KAME_FUMU | Stomp on Koopa / Kab-omb / Skeeter (?) |
| F | 0x5 | Yes | 0x70 | SE_EMY_KAME_KERU | Enemy defeated by fireball/Shell mario in shell/Ground-pound/Flagpole / Mega Goomba defeated by Mini Player / Hanging ? Block hit from side / Item destroyed in lava / Block spawned by tile creator sprite |
| G | 0x6 | Yes | 0xf5 | SE_VOC_OPDM_YES | Player reacts to completion of logo |
| H | 0x7 | Yes | 0xfa | SE_VOC_OPDM_AWAWA_01 | Player reacts to thunder strike |
| I | 0x8 | Yes | 0x128 | SE_OBJ_GOAL_HANABI | Goal firework |
| J | 0x9 | Yes | 0x103 | SE_AMB_OPDM_BABEL | Logo crashes down |
| K | 0xa | Yes | 0x123 | SE_OBJ_GET_DRAGON_COIN | Get Star Coin |
| L | 0xb | Yes | 0x10b | SE_VOC_OPDM_PEACH_HELP | |
| M | 0xc | Yes | 0x166 | SE_PLY_CHANGE_NORMAL | Turn back to normal from Mega |
| N | 0xd | Yes | 0x14f | SE_PLY_HIP_ATTACK_M | Mini ground-pound |
| O | 0xe | Yes | 0x149 | SE_PLY_JUMP_3 | Mini Player jumps |
| P | 0xf | Yes | 0x152 | SE_PLY_DOWN | Player loses a life |
| Q | 0x10 | No | 0x153 | SE_PLY_SWIM | Player swim |
| R | 0x11 | Yes | 0x168 | SE_PLY_THROW_FIRE | Fire Player/Fire Bros – throw fireball |
| S | 0x12 | Yes | 0x16c | SE_OBJ_GET_COIN | Get coin |
| T | 0x13 | Yes | 0x171 | SE_OBJ_DOKAN_BREAK | Pipe/Bill Blaster smashed from the side as Mega Player |
| U | 0x14 | Yes | 0x172 | SE_PLY_JUMPDAI | Jump on trampoline/Pot in final boss intro jumps |
| V | 0x15 | Yes | 0x17b | SE_SYS_ONE_UP | Get 1-up mushroom |
| W | 0x16 | Yes | 0x17c | SE_SYS_ONE_DOWN | Unused |
| X | 0x17 | Yes | 0x1a9 | SE_OBJ_TSUBO_BREAK | Pot in final boss intro shatters |
| Y | 0x18 | Yes | 0x1ab | SE_VOC_M_HOEE | Mario embarrassed after being kissed by peach |
| Z | 0x19 | Yes | 0x1ad | SE_VOC_P_THANK_YOU | Peach thanks Player after battle |
| a | 0x1a | Yes | 0x34 | SE_EMY_KPJR_DAMAGE_V | Bowser Jr. stomped (voice) |
| b | 0x1b | Yes | 0x35 | SE_EMY_KPJR_CRY_V | Bowser Jr. defeated |
| c | 0x1c | Yes | 0x39 | SE_EMY_KPJR_GUARD_ON | Bowser Jr. go into shell |
| d | 0x1d | Yes | 0x6e | SE_EMY_KURIBO_FUMU | Stomp on enemy / Stomp on other player |
| e | 0x1e | Yes | 0x6f | SE_EMY_KAME_FUMU | Stomp on Koopa / Kab-omb / Skeeter (?) |
| f | 0x1f | Yes | 0x70 | SE_EMY_KAME_KERU | Enemy defeated by fireball/Shell mario in shell/Ground-pound/Flagpole / Mega Goomba defeated by Mini Player / Hanging ? Block hit from side / Item destroyed in lava / Block spawned by tile creator sprite |
| g | 0x20 | Yes | 0xf5 | SE_VOC_OPDM_YES | Player reacts to completion of logo |
| h | 0x21 | Yes | 0xfa | SE_VOC_OPDM_AWAWA_01 | Player reacts to thunder strike |
| i | 0x22 | Yes | 0x128 | SE_OBJ_GOAL_HANABI | Goal firework |
| j | 0x23 | Yes | 0x103 | SE_AMB_OPDM_BABEL | Logo crashes down |
| k | 0x24 | Yes | 0x123 | SE_OBJ_GET_DRAGON_COIN | Get Star Coin |
| l | 0x25 | Yes | 0x10b | SE_VOC_OPDM_PEACH_HELP | |
| m | 0x26 | Yes | 0x166 | SE_PLY_CHANGE_NORMAL | Turn back to normal from Mega |
| n | 0x27 | Yes | 0x14f | SE_PLY_HIP_ATTACK_M | Mini ground-pound |
| o | 0x28 | Yes | 0x149 | SE_PLY_JUMP_3 | Mini Player jumps |
| p | 0x29 | Yes | 0x152 | SE_PLY_DOWN | Player loses a life |
| q | 0x2a | Yes | 0x153 | SE_PLY_SWIM | Player swim |
| r | 0x2b | Yes | 0x168 | SE_PLY_THROW_FIRE | Fire Player/Fire Bros – throw fireball |
| s | 0x2c | Yes | 0x16c | SE_OBJ_GET_COIN | Get coin |
| t | 0x2d | Yes | 0x171 | SE_OBJ_DOKAN_BREAK | Pipe/Bill Blaster smashed from the side as Mega Player |
| u | 0x2e | Yes | 0x172 | SE_PLY_JUMPDAI | Jump on trampoline/Pot in final boss intro jumps |
| v | 0x2f | Yes | 0x17b | SE_SYS_ONE_UP | Get 1-up mushroom |
| w | 0x30 | Yes | 0x17c | SE_SYS_ONE_DOWN | Unused |
| x | 0x31 | No | 0x1a9 | SE_OBJ_TSUBO_BREAK | Pot in final boss intro shatters |
| y | 0x32 | Yes | 0x1ab | SE_VOC_M_HOEE | Mario embarrassed after being kissed by peach |
| z | 0x33 | Yes | 0x1ad | SE_VOC_P_THANK_YOU | Peach thanks Player after battle |
| À | 0x34 | No | 0x36 | SE_EMY_KPJR_UH | Bowser Jr. “wakes up” after battle |
| Á | 0x35 | No | 0x37 | SE_EMY_KPJR_LAND | Bowser Jr. land after jump attack |
| Â | 0x36 | No | 0x3b | SE_EMY_KPJR_GUARD_OFF | Bowser Jr. stop hiding in shell |
| Ä | 0x37 | No | 0x3c | SE_EMY_KPJR_DAMAGE | Bowser Jr. stomped |
| Ç | 0x38 | No | 0x3d | SE_EMY_KPJR_PURUPURU | Bowser Jr. shakes head after waking up after battle |
| È | 0x39 | No | 0x77 | SE_EMY_KAME_HIT_7 | Defeat 7th and subsequent enemy in a row while sliding |
| É | 0x3a | No | 0xf6 | SE_VOC_OPDM_UN_01 | Player looks up at logo |
| Ê | 0x3b | No | 0xfc | SE_VOC_OPDM_AWAWA_02 | |
| Ë | 0x3c | No | 0xff | SE_VOC_OPDM_HOEE | |
| Ì | 0x3d | No | 0x10a | SE_VOC_OPDM_PEACH_CRY | |
| Í | 0x3e | No | 0x101 | SE_AMB_OPDM_WARBLE | Intro birds |
| Î | 0x3f | No | 0x102 | SE_AMB_OPDM_THUNDER | Thunder strike on castle |
| Ï | 0x40 | No | 0x104 | SE_EMY_OPDM_KPJR_FOOT | Bowser Jr. sneaks up on peach |
| Ñ | 0x41 | No | 0x109 | SE_PLY_OPDM_MA_HIT | |
| Ò | 0x42 | No | 0x10d | SE_OBJ_OPDM_NEW_FALL | |
| Ó | 0x43 | No | 0x10e | SE_OBJ_OPDM_NEW_SET | |
| Ô | 0x44 | No | 0x10f | SE_OBJ_OPDM_LOGO_FALL_L | |
| Ö | 0x45 | No | 0x110 | SE_OBJ_OPDM_LOGO_FALL_S | |
| Ù | 0x46 | No | 0x170 | SE_OBJ_COIN_BOUND | Loose coin hit ground |
| Ú | 0x47 | No | 0x174 | SE_OBJ_ITEM_APPEAR | Item out of block |
| Û | 0x48 | No | 0x13a | SE_SYS_MID_POINT | Pass checkpoint |
| Ü | 0x49 | No | 0x13e | SE_SYS_HURRY_UP | |
| ß | 0x4a | No | 0x14d | SE_PLY_HIP_ATTACK | Ground-pound hits ground / Ground-pound hits other player |
| à | 0x4b | No | 0x36 | SE_EMY_KPJR_UH | Bowser Jr. “wakes up” after battle |
| á | 0x4c | No | 0x37 | SE_EMY_KPJR_LAND | Bowser Jr. land after jump attack |
| â | 0x4d | No | 0x3b | SE_EMY_KPJR_GUARD_OFF | Bowser Jr. stop hiding in shell |
| ä | 0x4e | No | 0x3c | SE_EMY_KPJR_DAMAGE | Bowser Jr. stomped |
| ç | 0x4f | No | 0x3d | SE_EMY_KPJR_PURUPURU | Bowser Jr. shakes head after waking up after battle |
| è | 0x50 | No | 0x77 | SE_EMY_KAME_HIT_7 | Defeat 7th and subsequent enemy in a row while sliding |
| é | 0x51 | No | 0xf6 | SE_VOC_OPDM_UN_01 | Player looks up at logo |
| ê | 0x52 | No | 0xfc | SE_VOC_OPDM_AWAWA_02 | |
| ë | 0x53 | No | 0xff | SE_VOC_OPDM_HOEE | |
| ì | 0x54 | No | 0x10a | SE_VOC_OPDM_PEACH_CRY | |
| í | 0x55 | No | 0x101 | SE_AMB_OPDM_WARBLE | Intro birds |
| î | 0x56 | No | 0x102 | SE_AMB_OPDM_THUNDER | Thunder strike on castle |
| ï | 0x57 | No | 0x104 | SE_EMY_OPDM_KPJR_FOOT | Bowser Jr. sneaks up on peach |
| ñ | 0x58 | No | 0x109 | SE_PLY_OPDM_MA_HIT | |
| ò | 0x59 | No | 0x10d | SE_OBJ_OPDM_NEW_FALL | |
| ó | 0x5a | No | 0x10e | SE_OBJ_OPDM_NEW_SET | |
| ô | 0x5b | No | 0x10f | SE_OBJ_OPDM_LOGO_FALL_L | |
| ö | 0x5c | No | 0x110 | SE_OBJ_OPDM_LOGO_FALL_S | |
| ù | 0x5d | No | 0x170 | SE_OBJ_COIN_BOUND | Loose coin hit ground |
| ú | 0x5e | No | 0x174 | SE_OBJ_ITEM_APPEAR | Item out of block |
| û | 0x5f | No | 0x13a | SE_SYS_MID_POINT | |
| ü | 0x60 | No | 0x13e | SE_SYS_HURRY_UP | |
| . | 0x61 | No | 0x15b | SE_PLY_FOOTNOTE_H | |
| • | 0x62 | No | 0x15e | SE_PLY_FOOTNOTE_H | |
| _ | 0x63 | No | 0x16a | SE_PLY_CHANGE_SMALL | Enter/exit pipe / Enter warp / lose powerup |
| - | 0x64 | No | 0x163 | SE_PLY_CHANGE_BIG | Get powerup / Collect Starman as Mega Player |
| [another type of line] | 0x65 | No | 0x167 | SE_PLY_CHANGE_MAME | Become mini |
| & | 0x66 | Yes | 0x177 | SE_OBJ_BLOCK_BREAK | Player break brick block / boss shutter block spawn/break / block broken by tile destroyer sprite / bridge destroyed in Bowser/Big Bowser boss / peach platform destroyed in final boss / Bob-omb destroy block / Big Unagi destroy block / Mummipokey sand ball break |
| ' | 0x67 | Yes | 0x178 | SE_PLY_STAR_ATTACK | Mega Player touch enemy/Big Player touch Mini Goomba / Big Unagi destroy block / Broozer destroy block |
Entrances
1. Entrance Guide
Click the Door icon at the top to edit entrances.
Settings
• *Camera X:**
• *Camera Y:**
• *Entrance ID:** The ID associated with the entrance.
• *Destination ID:** The number of the area the pipe goes to. If not changing area, set to 0.
• *Destination Entrance:** The ID of the entrance it goes to.
• *Connected Pipe ID:** The ID of the path that makes up the pipe. Remember to check "Connected Pipe".
• *View:** The ID of the view the entrance is currently in. Not the destination view.
• *Exit Only:** Check this if you don't want the player to be able to enter, I.E. a one-way pipe.
• *<entrancesetting16>:** Not sure what it does.
• *Connected Pipe:** Check this if you're using a connected pipe. (Such as 7-A)
• *Display on Lower Screen:** Displays the view on the lower screen that the entrance is currently in.
Warp Pipe
Warp pipes are the way Mario gets around to different Views or Areas.
Simple Warp Pipe
First off, build a warp pipe using blocks. For this, I'll be using a upwards warp pipe, (object type 102)
• Place the warp pipe, make sure it's vertical. (And make sure it extends into the ground or is at least 3 blocks high.)
• Click the door icon, and add an entrance.
• Using shift+dragging, place it onto the top left part of the warp pipe.
• Click the drop down menu on the left side, select "Pipe facing Up." Set the View that it's in.
• (Note the Entrance ID if you plan to make it both ways.)
• Now go build another warp pipe somewhere else, make it horizontal this time.. (Either in the same Area or not.)
• Add an entrance, move it with shift+dragging, and place it at the top of the end.
• Set the entrance to "Pipe Facing Right."
• Check "Exit-Only." If it's in a different View, be sure to set the View it's in.
• Note it's Entrance ID, and select the first warp pipe entrance you created.
• Set the "Destination Area" to whatever area the second warp pipe is in (if you created it in another area) and set the Destination ID to the Entrance ID of the second warp pipe entrance.
• Save, and test it. It should work.
• *Troubleshooting:**
If you appear at the start of the level or in another spot not intended, check the "Destination ID".
If your camera appears somewhere without Mario, and then you die, check that the destination entrance has the View set correctly.
Connected Warp Pipe
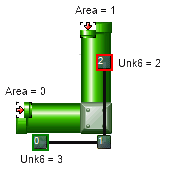
For this, I'm gonna go ahead and make a pipe that goes up then a turn to the left. (Use Shift+dragging on a block to change length and height.) Use object 59 for a good looking turn.
Set that up, and add the entrances. You don't have to set a Destination ID.
• First, click the first path icon.
• Add a path, and set it up so the first square (0) is down 2 squares, and right 1 square from the leftmost entrance.
• Next, use Control+dragging to make two more squares, one at the top of the bottommost pipe, one to the bottom left of the entrance.
• Set up the paths with this trick.
Unknown 6:
0=Pipe facing down
1=Pipe facing right
2=Pipe facing up
3=Pipe facing left
In my pipe,
square 0 is //Unknown 6: 3//
square 2 is //Unknown 6: 0//
• Now select each entrance, check "Connected Pipe", and set the Connected Pipe ID to the Path ID of the paths you just set up (IE. 0)
• For the entrance closest to the end of the path, set "Destination Area" to 1.
• Save and Play.
• *Troubleshooting**
If you enter the pipe, and a transition appears, check "connected pipe" on both entrances.
If you enter the pipe, then come back out immediately, doublecheck that the entrance closest to the end of the path has "Destination Area" set to 1, and that the "Connected Pipe ID" is correctly set.
List of Activator Actors
1. General Event Controllers
- [Class=020] [Object=101] Event Controller
- [Class=087] [Object=155] Special exit controller (warp entrance)
- [Class=137] [Object=164] Event Controller AND
- [Class=138] [Object=165] Event Controller OR
- [Class=139] [Object=166] Event Controller Random
- [Class=140] [Object=167] Event Controller Buffer
- [Class=141] [Object=168] Event Controller Zone
- [Class=142] [Object=286] Event Controller Sequencer
- [Class=255] [Object=169] Spin Block (unused Actor 255)
2. Switches and Other Event Controllers
- [Class=067] [Object=235] Star Coin
- [Class=086] [Object=152] Event trigger block
- [Class=151] [Object=034] Red Coin Ring
- [Class=242] [Object=107] ? Switch
- [Class=243] [Object=291] Brick Block containing ? Switch
- [Class=244] [Object=066] P Switch
- [Class=245] [Object=088] Brick Block containing P Switch
- [Class=246] [Object=108] ! Switch
- [Class=247] [Object=110] Brick Block containing ! Switch (unused actor)
- [Class=265] [Object=041] Bowser bridge switch (skull switch)
3. Triggerable Actors
- [Class=067] [Object=235] Star Coin
- [Class=079] [Object=103] Dorrie
- [Class=080] [Object=106] Red Coin
- [Class=092] [Object=192] Coin Spawner (unused actor)
- [Class=161] [Object=068] Lift moving up and down
- [Class=162] [Object=069] Lift moving left and right
- [Class=174] [Object=078] Lift moving one way once stood on
- [Class=183] [Object=099] Four platform rickshaw lift
- [Class=206] [Object=197] Tile Creator/Destroyer (Tile God)
- [Class=242] [Object=107] ? Switch
- [Class=243] [Object=291] Brick Block containing ? Switch
- [Class=244] [Object=066] P Switch
- [Class=245] [Object=088] Brick Block containing P Switch
- [Class=246] [Object=108] ! Switch
- [Class=247] [Object=110] Brick Block containing ! Switch (unused actor)
- [Class=263] [Object=292] Event Activated Door
- [Class=265] [Object=041] Bowser bridge switch (skull switch)
- [Class=276] [Object=218] Auto-scrolling controller
- [Class=278] [Object=231] Water
- [Class=279] [Object=234] Lava
- [Class=281] [Object=259] Poisoned Water
List of player animations
| Name | Value | anmFile | anmName |
| Idle | 0x00 | plmario | wait |
| WalkSlow | 0x01 | plmario | walk |
| Walk | 0x02 | plmario | run |
| Dash | 0x03 | pl | b_dash |
| DashFast | 0x04 | pl | b_dash2 |
| Jump | 0x05 | pl | jump |
| JumpFall | 0x06 | pl | jump2 |
| JumpLand | 0x07 | pl | jumped |
| TripleJump_unused | 0x08 | pl | 2jump1 |
| TripleJumpFall | 0x09 | pl | 2jump2 |
| TripleJumpLand | 0x0A | pl | 2jumped; also used as DoubleJumpLand |
| TripleJump | 0x0B | pl | roll_jump |
| Skid | 0x0C | pl | turn |
| SkidTurn | 0x0D | pl | trned |
| GroundPoundRoll | 0x0E | pl | hipsr |
| GroundPoundFall | 0x0F | pl | hipat |
| GroundPoundLand | 0x10 | pl | hiped |
| Crouched | 0x11 | pl | stoop |
| ThrowFireball | 0x12 | pl | fire_at |
| SlipBumpFall | 0x13 | pl | sdown |
| Sliding | 0x14 | plnovs | slip |
| StandUp | 0x15 | pl | sliped |
| SlipFall | 0x16 | plnovs | slipla |
| DiveLand | 0x17 | plnovs | sldctslpbk |
| DiveSlide | 0x18 | plnovs | lost |
| DiveStandUp | 0x19 | plnovs | roll (static) |
| RollPose | 0x1A | pl | roll (loop) |
| Roll | 0x1B | pl | carry_start |
| CarryStart | 0x1C | pl | carry_wait |
| CarryIdle | 0x1D | pl | carry_walk |
| CarryWalk | 0x1E | pl | carry_throw |
| CarryThrow | 0x1F | pl | scale_up |
| MegaGrow | 0x20 | pl | wimp |
| Walljump | 0x21 | pl | wsld |
| WallSlide | 0x22 | pl | swim_in; possibly unused |
| SwimStart | 0x23 | plnovs | swim_wait |
| SwimIdle | 0x24 | plnovs | paddle_1 |
| SwimIdle1 | 0x25 | plnovs | swim |
| Swim_legs | 0x26 | plnovs | paddle_2 |
| SwimPaddle2 | 0x27 | plnovs | paddle_end |
| SwimPaddleEnd | 0x28 | plnovs | tree_start |
| PoleGrab | 0x29 | plnovs | tree_wait |
| PoleIdle | 0x2A | plnovs | tree_wait |
| PoleClimb | 0x2B | plnovs | tree_climb |
| PoleSlide | 0x2C | plnovs | tree_pose |
| PushedFall | 0x2D | pl | shfdn |
| Push | 0x2E | pl | push |
| SpinJump | 0x2F | pl | spin_jump |
| SpinJumpLand | 0x30 | pl | spin_jump_end |
| CeilingRopeGrab | 0x31 | plnovs | monkey_start |
| CeilingRopeRightHandGrab | 0x32 | plnovs | monkey_wait_r |
| CeilingRopeLeftHandGrab | 0x33 | plnovs | monkey_wait_l |
| CeilingRopeRightHandMove | 0x34 | plnovs | monkey_r_to_l |
| CeilingRopeLeftHandMove | 0x35 | plnovs | monkey_l_to_r |
| LavaDamageJump | 0x36 | plnovs | firejmp |
| CrouchStart | 0x37 | pl | squat_start |
| SwimCarry | 0x38 | plnovs | swim_carry |
| SwimPaddleCarry | 0x39 | plnovs | paddle_carry |
| SwimThrow | 0x3A | plnovs | swim_throw |
| BumpedNormal | 0x3B | pl | sfbdn |
| BumpedHard | 0x3C | pl | sffdn |
| CannonShoot | 0x3D | pl | shoot |
| Shocked | 0x3E | plnovs | e_shock |
| ShockedFall | 0x3F | plnovs | e_down: unused |
| TightropeWalk | 0x40 | plnovs | rope_walk |
| MegaWalk | 0x41 | pl2 | big_walk |
| MegaJump | 0x42 | pl2 | big_jump_st |
| MegaJumpLand | 0x43 | pl2 | big_jump_ed |
| MegaGroundPoundRoll | 0x44 | pl2 | big_hip_st |
| MegaGroundPoundFall | 0x45 | pl2 | big_hip_at |
| MegaGroundPoundLand | 0x46 | pl2 | big_hip_ed |
| LedgeStand | 0x47 | plnovs | wall_wait |
| LedgeStandMoveLeft | 0x48 | plnovs | wall_walk_l |
| LedgeStandMoveRight | 0x49 | plnovs | wall_walk_r |
| LedgeStandClimbDown | 0x4A | plnovs | hang_start |
| LedgeGrabClimbUp | 0x4B | plnovs | hang_up |
| LedgeGrabIdle | 0x4C | plnovs | hang_wait |
| LedgeGrabMoveLeft | 0x4D | plnovs | hang_walk_l |
| LedgeGrabMoveRight | 0x4E | plnovs | hang_walk_r |
| VineRopeIdle | 0x4F | plnovs | rope_swing |
| SpinDrill | 0x50 | pl2 | spin_jump2 |
| JumpCombo2 | 0x51 | pl2 | jump_b |
| JumpCombo3 | 0x52 | pl2 | jump_c |
| JumpCombo4_kick | 0x53 | pl2 | jump_d |
| LongJump | 0x54 | pl2 | jump_b_1 |
| LongJumpFall | 0x55 | pl2 | jump_b_2 |
| DoubleJump | 0x56 | pl2 | 2jmp_c_1 |
| DoubleJumpFall | 0x57 | pl2 | 2jmp_c_2 |
| BackflipJump | 0x58 | pl2 | 2jmp_d_1; possibly unused |
| BackflipJumpFall | 0x59 | pl2 | 2jmp_d_2 |
| UnknownStarJump | 0x5A | pl2 | 2jmp_e_1 |
| UnknownStarJumpFall | 0x5B | pl2 | 2jmp_e_2 |
| JumpCombo5_twirl | 0x5C | pl2 | jump_e |
| PipeEntrance | 0x5D | pl2 | low_walk |
| DeadFall | 0x5E | pl2 | dead |
| DeadPose | 0x5F | pl2 | dead_pose |
| GoalJump | 0x60 | plnovs | goal_jump |
| GoalCap | 0x61 | plnovs | goal_puton_cap |
| DoorWalk | 0x62 | pl2 | door_walk |
| BattleGoalJump | 0x63 | plnovs | bt_goal_jmp |
| BattleGoalOut | 0x64 | plnovs | bt_goal_out |
| MegaJumpFall | 0x65 | pl2 | big_jmp_2 |
| TightropeIdle | 0x66 | plnovs | rope_wait |
| TightropeJumpLand | 0x67 | plnovs | rope_jump_ed |
| MiniWalk | 0x68 | pl2 | zero_g_walk |
| MiniJump | 0x69 | pl2 | zero_g_jump |
| MiniJumpFall | 0x6A | pl2 | zero_g_jump2 |
| MiniJumpLand | 0x6B | pl2 | zero_g_jump_ed |
| UnusedSpinJumpOff | 0x6C | pl2 | spin_jump_off; possibly unused |
| UnusedSpinJump | 0x6D | pl2 | spin_jump_st |
| Shell | 0x6E | pl2 | shell_in |
| StarRoll | 0x6F | pl2 | star_roll |
| FenceMoveVertical | 0x70 | plnovs | net_walk1 |
| FenceIdle | 0x71 | plnovs | net_wait |
| UnusedDamageFall | 0x72 | plnovs | e_damage1 |
| UnusedDamageLand | 0x73 | plnovs | e_damage2 |
| FenceSlam | 0x74 | plnovs | net_attack |
| FenceMoveHorizontal | 0x75 | plnovs | net_walk2 |
| LedgeJump | 0x76 | plnovs | w_jump1 |
| LedgeJumpFall | 0x77 | plnovs | w_jump2 |
| LedgeJumpLand | 0x78 | plnovs | w_jump_ed |
| LedgeGrab | 0x79 | plnovs | jump_hang |
| SwimWalk | 0x7A | plnovs | swim_walk |
| SwimStanding | 0x7B | plnovs | swim_standing |
| Buried | 0x7C | plnovs | buried |
| BuriedStandUp | 0x7D | plnovs | buried_ed |
| BuriedFall | 0x7E | plnovs | buried_st |
| BuriedDamage | 0x7F | plnovs | buried_damage |
| MegaSitCrouch | 0x80 | pl2 | big_hip_squat |
| WaterDeadFall | 0x81 | plnovs | swim_dead |
| TightropeUnbalanced | 0x82 | plnovs | rope_wait2 |
| MegaIdle | 0x83 | pl2 | big_wait |
| BossCallPeach | 0x84 | plnovs | find |
| BossStarePeach | 0x85 | plnovs | find_loop |
| BossReactPeach | 0x86 | plnovs | find_surprise |
| BossWin | 0x87 | plnovs | boss_key_get |
| MegaWin | 0x88 | plnovs | big_goal |
| FinalBossEnd | 0x89 | plnovs | m_kiss |
| FinalBossPeach | 0x8A | plnovs | m_fall_wait |
| FinalBossCap | 0x8B | plnovs | m_escort |
| FinalBossKiss | 0x8C | plnovs | m_shy |
| GoalJumpLand | 0x8D | plnovs | goal_jump_ed |
| BossIdle | 0x8E | plnovs | bt_wait |
| BossStartled | 0x8F | plnovs | bt_surprise |
| BeanStalkMove | 0x90 | plnovs | pea_plant |
| BeanStalkGrab | 0x91 | plnovs | pea_plant_st |
| BeanStalkIdle | 0x92 | plnovs | pea_plant_wait |
| BowserJrWin | 0x93 | plnovs | jr_clear |
Background Scrolling Data Info
TODO: Info for BG start position nybble. Would also be nice to know which BG speeds are all used.
Foregrounds and backgrounds scroll differently in many levels — sometimes they have a fast speed ratio and sometimes they can be completely static. This can be adjusted by hex editing your level.
- Background only --> Change block 3 only.
- Foreground only --> Change block 5 only.
- Both --> Change both blocks 3 and 5.
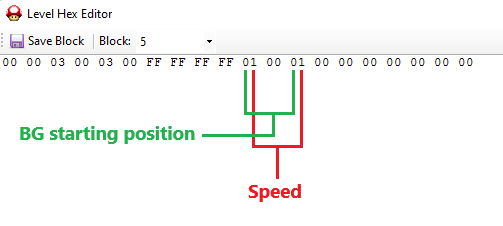
- Byte 11: Control BG horizontal scrolling.
- Byte 13: Control BG vertical scrolling.
And for each byte:
- First Nybble: Control where the background starts when the player enters the views.
- Second Nybble: Control speed.
(Image source: MarioSunshine)
Scroll speed data
- 0x0: Same as FG speed. Used in w2-3 (sewer level) for example.
- 0x1: 50% FG speed.
- 0x2: 25% FG speed. Common for top backgrounds.
- 0x3: 12.5% FG speed. Common for bottom backgrounds.
- 0x4: 120% FG speed. Unused.
- 0x5: 75% FG speed.
- 0x6: 6.25% FG speed.
- 0x7: 9.375% FG speed.
- 0x8: 20.3125% FG speed.
- 0x9: Same as FG speed.
- 0xA: Same as FG speed.
- 0xB: Same as FG speed.
- 0xC: Same as FG speed.
- 0xD: 200% FG speed. Unused.
- 0xE: 400% FG speed. Unused.
- 0xF: 800% FG speed. Unused.
(Source: RoadrunnerWMC)
Disabling vertical scrolling
- Background only --> Change both bytes 13 and 16 of block 3 only.
- Foreground only --> Change both bytes 13 and 16 of block 5 only.
- Both --> Change both bytes 13 and 16 of both blocks 3 and 5.
- Byte 13: enters 40.
- Byte 16: enters 10.
(Source: MeroMero)
Automatic horizontal scrolling
It only works for backgrounds that already have a horizontal animation, this can be achieved by putting a value of 10 for byte 16 and it will animate the whole background instead of partially animating it.
(Note: if byte 13 value is somewhere between 40 and 4F, this effect will be overridden and instead the vertical scrolling will be disabled).
Modding Tutorials
Tutorials on how to mod NSMB DS
Mario vs Luigi
This page documents how to play MvsL hacks and objects that work in MvsL.
Modding MvsL is significantly more difficult than modding Singleplayer levels. If you're just getting started with modding the game, you might want to start here
FaQ
How do I play Mario vs Luigi hacks?
- The easiest way to play an MvsL hack on real hardware is by using “Multi-cart”
- This requires that you own two flashcards (such as an R4 Card).
- To set this method up, simply put the same ROM on both flashcards. Then, in the game, choose the option to “Compete with another New Super Mario Bros. Owner” and play MvsL as you normally would.
- If you do not have access to two flashcards, then you have two, more difficult, options remaining
- Your first option is to try and use a hacked NDS firmware that bypasses Download Play's signature check
- Download firmware.nds and put it on your flashcard.
- Open this ROM on the DS you will launch Download Play from.
- Now, eject the flashcard from the DS you just ran the ROM on. (This will not cause your DS to freeze)
- Finally, put the flashcard back in the other DS.
- Once you have done this, you can run the ROM of the MvsL hack and select “Play with someone who doesn't own New Super Mario Bros”
- If the firmware ROM does not work on your flashcard, try this one instead.
- Your final option is to use normal DS Download Play with “DLP Mode” in NSMBe 5
- Open a clean (unedited) ROM
- Open it in NSMBe
- After you open the ROM, go to Tools and check “Enable DLP-friendly mode”
- Now, you can make whatever changes you want to the ROM
- When you're done, you can play with another DS through DS Download Play like you normally would using the “Play with someone who doesn't own New Super Mario Bros” option
- Your first option is to try and use a hacked NDS firmware that bypasses Download Play's signature check
- If the game hangs at the Nintendo logo, you might have missed a step. Double check you did everything and try again with another clean ROM
- If the DS freezes with a black screen after you select a level it can mean one of two things:
- Your flashcard is not compatible with this method
- There's something wrong with the level that is making the game freeze
My level crashes, what do I do now?
- If you are not using any Code Hacks, then here are some things to consider
- Have you changed any object banks? This causes MvsL to crash so you need to change the object banks back to whatever the level had originally.
- Double-check that you are not using an object that has been confirmed to crash MvsL. There is a table later on this page that shows what objects are compatible with MvsL.
- Have you changed the number of Battle Stars that are in the level? Changing the number of Battle Stars in a level can cause MvsL to crash, and you will need to restore the original amount of Battle Stars the level had.
My level crashes, but I'm using Code Hacks!
- Even with Code Hacks, not all objects work in MvsL. Take a look at the table at the end of the page to see if all of the objects you're using are compatible with MvsL.
My level makes us de-sync, what's going on?
- Because of the nature of how multiplayer works in this game, the Random Number Generator seed is only synchronized once when the connection is established. Only inputs are sent from one console to another, so the code must account for both player actors. If code does not account for each player, the games will become de-synced. For example, if an enemy was coded to imply get the values of a player on the local console, it will read different data on each console. This causes the enemy to act differently on each DS, thus causing a de-sync.
Implementation example:
// Enemy reads only the position of its own console player
playerPositionX = Game::getPlayer(Game::localPlayerID)->position.x;
// Now the position that was read is different between both consoles
// for this enemy and he will behave differently for each console!
// This is very bad!

// A solution would be to get the position of the closest player
playerPositionX = enemy->getClosestPlayer(nullptr, nullptr)->position.x;
// This way, it gets the closest player instead of its console player
Object Compatibility (Vanilla)
- These objects will work in MvsL regardless of if you are using code hacks
- Most of the objects in this list are objects that are already used in MvsL
| Object ID | Actor Name |
|---|---|
| 23 | Pipe Piranha Plant (Facing up) |
| 24 | Pipe Piranha Plant (Facing down) |
| 25 | Pipe Piranha Plant (Facing right) |
| 26 | Pipe Piranha Plant (Facing left) |
| 27 | Bill Blaster (Bullet Bill launcher) |
| 28 | Bob-omb |
| 71 | Stonewall moving up & down |
| 72 | Stonewall moving left & right |
| 95 | Spin Block |
| 148 | Goomba |
| 149 | Koopa Troopa |
| 210 | MvsL Big Star |
Object Compatibility with Code Hacks
- This spreadsheet is based on the MvsL Hacking Starter Pack
- There are 4 kinds of compatibility
- Works: This object completely works in MvsL
- Partial: Some parts of this object do not work in MvsL. The notes column will mention what doesn't work
- N/A: The object does not load but it also does not crash the game
- Crash: The object crashes the game when loaded. See the notes for possible workarounds.
| Object ID | Object Name | Compatibility | Notes |
| 0 | Crash Object (Player Actor) | Crash | Needs the clone code hack |
| 1 | Crash Object (Player Actor) | Crash | Needs the clone code hack |
| 2 | Crash Object (Player Actor) | Crash | Needs the clone code hack |
| 3 | Crash Object (Player Actor) | Crash | Needs the clone code hack |
| 4 | Crash Object (Player Actor) | Crash | Needs the clone code hack |
| 5 | Crash Object (Player Actor) | Crash | Needs the clone code hack |
| 6 | Crash Object (Player Actor) | Crash | Needs the clone code hack |
| 7 | Crash Object (Player Actor) | Crash | Needs the clone code hack |
| 8 | Crash Object (Player Actor) | Crash | Needs the clone code hack |
| 9 | Crash Object (Player Actor) | Crash | Needs the clone code hack |
| 10 | Nothing | N/A | Technically works due to it being nothing |
| 11 | Nothing | N/A | Technically works due to it being nothing |
| 12 | Nothing | N/A | Technically works due to it being nothing |
| 13 | Nothing | N/A | Technically works due to it being nothing |
| 14 | Nothing | N/A | Technically works due to it being nothing |
| 15 | Nothing | N/A | Technically works due to it being nothing |
| 16 | Nothing | N/A | Technically works due to it being nothing |
| 17 | Nothing | N/A | Technically works due to it being nothing |
| 18 | Nothing | N/A | Technically works due to it being nothing |
| 19 | Nothing | N/A | Technically works due to it being nothing |
| 20 | Defunct Actor 22 | N/A | If using the Actor Spawner code hack it works |
| 21 | Mega Goomba | Works | If using Boss Particle code hack |
| 22 | Hammer Brother from map | N/A | MvsL is missing a world map so... |
| 23 | Pipe Piranha Plant (facing up) | Works | |
| 24 | Pipe Piranha Plant (facing down) | Works | |
| 25 | Pipe Piranha Plant (facing right) | Works | |
| 26 | Pipe Piranha Plant (facing left) | Works | |
| 27 | Bill Blaster (Bullet Bill launcher) | Works | |
| 28 | Bob-omb | Works | |
| 29 | Princess Peach | Works | |
| 30 | Monty Tank | Works | If using Boss Particle code hack |
| 31 | Cheep Cheep | Works | |
| 32 | Goal Pole's Flag | Works | |
| 33 | Trampoline (portable springboard) | Crash | |
| 34 | Red Ring | Crash | |
| 35 | Final Bowser Controller | Crash | |
| 36 | Thwomp | Works | |
| 37 | Spiny | Works | |
| 38 | Boo | Works | |
| 39 | Castle boss controller | Partial | Some of the options crash the game, you can use a switch instead. |
| 40 | Lakitu (unused object) | Works | |
| 41 | Bowser bridge switch | Works | Loads, but graphics are not loaded correctly |
| 42 | Chain Chomp/Log | Works | |
| 43 | Chain Chomp (unused object) | Works | |
| 44 | Fire Snake (unused Actor 46) | Works | |
| 45 | Respawnable Hidden Block | Works | |
| 46 | Event controller - activates Spiked Ball when touched by Snake Block | Works | |
| 47 | Lakithunder | Works | |
| 48 | Aquatic bubble current (up) | Works | |
| 49 | Aquatic bubble current (down) | Works | |
| 50 | Aquatic bubble current (right) | Works | |
| 51 | Aquatic bubble current (left) | Works | |
| 52 | Buzzy Beetle | Works | |
| 53 | Dry Bones | Works | |
| 54 | Lava Bubble (Podoboo) | Works | |
| 55 | Bullet Bill Spawner | Works | |
| 56 | Fire Bar | Works | |
| 57 | Coin | Works | |
| 58 | Bowser | Works | |
| 59 | Hammer Brother | Works | |
| 60 | Nothing | N/A | Technically works due to it being nothing |
| 61 | Nothing | N/A | Technically works due to it being nothing |
| 62 | Big Bowser (unused object) | Works | |
| 63 | Dry Bowser | Works | |
| 64 | Whomp | Works | |
| 65 | Cheepskipper | Works | |
| 66 | P Switch | Works | Graphics are not loaded correctly |
| 67 | Sushi (shark) | Works | |
| 68 | Lift moving up and down | Works | |
| 69 | Lift moving left and right | Works | |
| 70 | Rotating log lift (unused actor) | Works | |
| 71 | Stonewall moving up and down | Works | |
| 72 | Stonewall moving left and right | Works | |
| 73 | Wobbly metal lift | Works | |
| 74 | Wobble Rock | Works | |
| 75 | Seesaw lift | Works | |
| 76 | Scale lift | Works | |
| 77 | Flimsy Lift (falls once touched) | Works | |
| 78 | Lift moving one way once stood on | Works | |
| 79 | Three-platform rickshaw lift (rotates in place by self) | Works | |
| 80 | Lift spawner | Works | |
| 81 | Nothing | N/A | Technically works due to it being nothing |
| 82 | Rotating rectangle lift | Works | |
| 83 | Self-activating block | Works | |
| 84 | Zoom | Works | |
| 85 | Flip fence (duplicate object) | Works | |
| 86 | Rotating triangle lift | Works | |
| 87 | Nothing | N/A | Technically works due to it being nothing |
| 88 | Brick Block containing P Switch | Works | P-Switch graphics are not loaded correctly |
| 89 | Snailicorn | Works | |
| 90 | Wiggler | Works | |
| 91 | Track-controlled lift | Works | |
| 92 | Unagi (eel) | Works | |
| 93 | Arrow signboard | Works | |
| 94 | Swooper | Works | |
| 95 | Spin Block | Works | |
| 96 | Seaweed | Works | |
| 97 | Nothing | N/A | Technically works due to it being nothing |
| 98 | Camera vertical scrolling | N/A | |
| 99 | Four-platform rickshaw lift | Works | |
| 100 | Vertical camera offset (unused actor) | N/A | |
| 101 | Event controller - view enter | Works | |
| 102 | Spiked Ball | Works | |
| 103 | Dorrie | Works | |
| 104 | Tweester (Tornado) | Works | |
| 105 | Whirlpool | Works | |
| 106 | Red Coin | Crashes | |
| 107 | ? Switch | Works | Graphics are not loaded correctly |
| 108 | ! Switch | Works | Graphics are not loaded correctly |
| 109 | Amp | Works | |
| 110 | Brick Block containing !-Switch | Works | !-Switch graphics are not loaded correctly |
| 111 | Floating log | Works | |
| 112 | Nothing | N/A | Technically works due to it being nothing |
| 113 | Cheep Chomp | Works | |
| 114 | Burner (Small) | Works | |
| 115 | Large Spiked Ball | Works | |
| 116 | Skeeter (Water Bug) | Works | Causes a desync however |
| 117 | Map Flying ? Block | N/A | |
| 118 | Burner | Works | |
| 119 | Swinging lift (pendulum-like) | Works | |
| 120 | Grounded Piranha Plant | Works | |
| 121 | Nothing | N/A | Technically works due to it being nothing |
| 122 | Big Grounded Piranha Plant | Works | |
| 123 | Grounded Fire Piranha Plant | Works | |
| 124 | Large grounded Fire Piranha Plant | Works | |
| 125 | Defunct Actor 229 | N/A | |
| 126 | Drawbridge lift | Works | |
| 127 | Big four-platform rickshaw lift | Works | |
| 128 | Warp Cannon | Works | |
| 129 | Boss Key Location | Works | |
| 130 | Jumping Cheep Cheep | Works | |
| 131 | Checkpoint - vertical | Works | Does the animation but doesn't set anything |
| 132 | Checkpoint | Works | Does the animation but doesn't set anything |
| 133 | Nothing | N/A | Technically works due to it being nothing |
| 134 | Nothing | N/A | Technically works due to it being nothing |
| 135 | Nothing | N/A | Technically works due to it being nothing |
| 136 | Pokey | Works | |
| 137 | Nothing | N/A | Technically works due to it being nothing |
| 138 | Nothing | N/A | Technically works due to it being nothing |
| 139 | Nothing | N/A | Technically works due to it being nothing |
| 140 | Boss Key | Works | |
| 141 | Swelling ground | Works | |
| 142 | Tightrope | Works | |
| 143 | Spiked ? Block (unused actor 251) | Crashes | |
| 144 | Spiked ? Block | Crashes | |
| 145 | Spiked ? Block (unused actor 253) | Crashes | |
| 146 | Ground-pound panel | Works | |
| 147 | Bump from below platform | Works | |
| 148 | Goomba | Works | |
| 149 | Koopa Troopa | Works | |
| 150 | Koopa Paratroopa | Works | |
| 151 | Nothing | N/A | Technically works due to it being nothing |
| 152 | Event trigger block | Crash | |
| 153 | Nothing | N/A | Technically works due to it being nothing |
| 154 | Nothing | N/A | Technically works due to it being nothing |
| 155 | Special exit controller (warp entrance) | Crash | Sometimes just corrupts graphics and does nothing |
| 156 | Nothing | N/A | Technically works due to it being nothing |
| 157 | Fire Brother | Partial | Causes a desync |
| 158 | Boomerang Brother | Partial | Causes a desync |
| 159 | Nothing | N/A | Technically works due to it being nothing |
| 160 | Nothing | N/A | Technically works due to it being nothing |
| 161 | Nothing | N/A | Technically works due to it being nothing |
| 162 | Mushroom Platform lift | Works | |
| 163 | Nothing | N/A | Technically works due to it being nothing |
| 164 | Event controller - "AND" | Works | |
| 165 | Event controller - "OR" (If X OR Y, do Z) | Works | |
| 166 | Event controller - "RANDOM" | Works | |
| 167 | Event controller - chainer (If X, do Y) | Works | |
| 168 | Event controller - "IF" (uses zones) | Works | |
| 169 | Spin Block (unused Actor 255) | N/A | Doesn't spawn |
| 170 | Nothing | N/A | Technically works due to it being nothing |
| 171 | Spin Block (unused Actor 256) | N/A | Doesn't Spawn |
| 172 | Nothing | N/A | Technically works due to it being nothing |
| 173 | Swinging/able rope | Works | |
| 174 | Mushroom Platform lift | Works | |
| 175 | Bouncy bricks (Unused) | Works | |
| 176 | Nothing | N/A | Technically works due to it being nothing |
| 177 | Nothing | N/A | Technically works due to it being nothing |
| 178 | Nothing | N/A | Technically works due to it being nothing |
| 179 | Nothing | N/A | Technically works due to it being nothing |
| 180 | Climbing Koopa | Works | |
| 181 | Nothing | N/A | Technically works due to it being nothing |
| 182 | Nothing | N/A | Technically works due to it being nothing |
| 183 | Lakitu spawner | Works | |
| 184 | Nothing | N/A | Technically works due to it being nothing |
| 185 | Cheep Cheep random spawner | Works | |
| 186 | Paragoomba | Works | |
| 187 | Balance lift | Works | |
| 188 | Nothing | N/A | Technically works due to it being nothing |
| 189 | Pipe Cannon | Works | Desynchronizes the game |
| 190 | Nothing | N/A | Technically works due to it being nothing |
| 191 | Hanging Bouncing ? Block | Works | |
| 192 | Coin Spawner (unused actor) | Crash | |
| 193 | Big Dry Bones | Works | |
| 194 | Big Thwomp | Works | |
| 195 | 0 Stick to bottom length activator left | Works | |
| 196 | 0 Stick to bottom length activator right | Works | |
| 197 | Tile Creator/Destroyer (Tile God) | Crash | |
| 198 | In air vertical scroll stop left | N/A | |
| 199 | In air vertical scroll stop right | N/A | |
| 200 | Nothing | N/A | Technically works due to it being nothing |
| 201 | Nothing | N/A | Technically works due to it being nothing |
| 202 | Nothing | N/A | Technically works due to it being nothing |
| 203 | Unused Purple Mushroom Platform Lift | Works | |
| 204 | Fire Snake | Works | |
| 205 | Flame Chomp Spawner | Works | |
| 206 | Ghost house goo | Works | |
| 207 | Big Cheep Cheep | Works | |
| 208 | Nothing | N/A | Technically works due to it being nothing |
| 209 | Sledge Brother | Works | Causes a desync however |
| 210 | MvsL Battle Star | Works | Who would've thought |
| 211 | Blooper | Works | |
| 212 | Blooper Nanny (unused actor 144) | Works | |
| 213 | Blooper Nanny that w/ Baby Bloopers | Works | |
| 214 | Nothing | N/A | Technically works due to it being nothing |
| 215 | Nothing | N/A | Technically works due to it being nothing |
| 216 | Nothing | N/A | Technically works due to it being nothing |
| 217 | Nothing | N/A | Technically works due to it being nothing |
| 218 | Auto-scrolling controller | Works | If the players spawn in the same position after respawning it stops working |
| 219 | Spike Top | Works | |
| 220 | Bowser Jr. | Works | |
| 221 | Nothing | N/A | Technically works due to it being nothing |
| 222 | Mini Goomba | Works | |
| 223 | Flip fence | Works | |
| 224 | Big flip fence | Works | |
| 225 | Nothing | N/A | Technically works due to it being nothing |
| 226 | Scuttlebug | N/A | |
| 227 | Moneybag | Works | |
| 228 | Roulette Block | Crash | |
| 229 | Petey Piranha | Works | |
| 230 | Nothing | N/A | Technically works due to it being nothing |
| 231 | Water | Works | |
| 232 | Hanging ? Block | Works | |
| 233 | Swinging/able pole | Works | |
| 234 | Lava | Partial | Causes a desync, line the top with lava tiles |
| 235 | Star Coin | Crash | |
| 236 | Rotating square lift | Works | |
| 237 | Broozer | Works | |
| 238 | Purple Mushroom Platform lift | Works | |
| 239 | Yellow/Orange Mushroom Platform | Works | |
| 240 | Nothing | N/A | Technically works due to it being nothing |
| 241 | Bill Blaster Turret | Works | |
| 242 | Blue Mushroom Platform | Works | |
| 243 | Roof Spiny | Works | |
| 244 | Bouncy Mushroom Platform | Works | |
| 245 | Corked Pipe + foot pump | Crashes | |
| 246 | Floating barrel | Works | |
| 247 | Sushi spawner (shark spawner) | Works | |
| 248 | Balloon Boo | Works | |
| 249 | Track-controlled wall-jump lift | Works | |
| 250 | Crowber | Works | |
| 251 | Big Unagi | Crash | |
| 252 | Banzai Bill Blaster | Works | |
| 253 | Nothing | N/A | Technically works due to it being nothing |
| 254 | Kab-omb | Works | |
| 255 | Jungle FG Effect (Unused Actor) | Works | |
| 256 | Rotating carry-through-wall turntable-like lift | Works | |
| 257 | Coin trail Cheep Cheep | Works | |
| 258 | Spike Bass (unused object) | Works | |
| 259 | Poisoned Water | Partial | Causes desync |
| 260 | Fast Spike Pillar - Down | Works | |
| 261 | Fast Spike Pillar - Up | Works | |
| 262 | Fast Spike Pillar - Left | Works | |
| 263 | Fast Spike Pillar - Right | Works | |
| 264 | Mega Ground Pound's sky drops + | Crash | |
| 265 | Phantom Hand (Pointing hand) | Works | |
| 266 | Invisible Lava Bubble (unused actor) | Works | |
| 267 | Nothing | N/A | Technically works due to it being nothing |
| 268 | Underwater bounce bubble | Works | |
| 269 | Giant Wiggler | Works | |
| 270 | Smashed pipe object | Works | |
| 271 | Crowber spawner | Works | |
| 272 | Snowy branch | Works | |
| 273 | Snow Spike | Works | |
| 274 | Sinking-snow pile | Works | |
| 275 | Blockhopper | Partial | Desyncs |
| 276 | Scroll and Mario stop sideways | Works | |
| 277 | Arrow sign | Works | |
| 278 | Groundpound-able ghost house goo | Works | |
| 279 | Flipper (one-way gate) | Works | |
| 280 | Horizontal camera offset | N/A | Not sure how this object works |
| 281 | Squiggler | Works | |
| 282 | Swinging/able vine | Works | |
| 283 | Spike Bass spawner | Works | |
| 284 | Splunkin (pumpkin) | Works | |
| 285 | Scuttlebug spawner | N/A | |
| 286 | Event controller - multi-chainer | Works | |
| 287 | Enemy-in-Pipe Generator | Works | |
| 288 | Nothing | N/A | Technically works due to it being nothing |
| 289 | Platform Block (expandable block) | Works | Doesn't respawn if it turns into bricks and you collect a battle star. |
| 290 | Flying ? Block | Crash | Black screen |
| 291 | Brick Block containing ? Switch | Works | ? Switch graphics are not loaded correctly |
| 292 | Event Activated Door | Works | |
| 293 | Touching ground vertical scroll stop left | Works | |
| 294 | Touching ground vertical scroll stop right | Works | |
| 295 | Mummipokey | Works | Use a P-Switch |
| 296 | Lift moving left and right | Works | |
| 297 | Stonewall moving left and right | Works | |
| 298 | Stonewall moving u, d, l, r | Works | |
| 299 | Snake Block | Works | |
| 300 | Haunted lift | Works | |
| 301 | Toadsworth | Works | Only freezes Mario for a few seconds, and Luigi can roam freely. Background chooser will break because of BMG differences. |
| 302 | Toad House block | Doesn't work | Garble graphics. |
| 303 | Ball 'n' Chain | Works | |
| 304 | Spike Pillar - down | Works | |
| 305 | Final Castle Create Loop | N/A | I have no idea how this works. |
| 306 | Final Castle Wrong Path | N/A | I have no idea how this works. |
| 307 | Spike Pillar - up | Works | |
| 308 | Spike Pillar - left | Works | |
| 309 | Spike Pillar - right | Works | |
| 310 | Fog FG effect | Partial | Graphics are not loaded correctly |
| 311 | Snow FG effect 1 | Works | |
| 312 | Rise or lower while/once on Mushroom Platform lift - mechanical | Works | |
| 313 | Snow FG effect 2 | Works | |
| 314 | Snow FG effect 3 | Works | |
| 315 | Cloud FG effect | Partial | Graphics are not loaded correctly |
| 316 | Water FG effect 1 | Works | |
| 317 | Water FG effect 2 | Works | |
| 318 | Fire FG effect 1 | Works | |
| 319 | Fire FG effect 2 | Works | |
| 320 | Fire FG effect 3 | Works | |
| 321 | Light FG Effect 1 | N/A | |
| 322 | Light FG Effect 2 | Works | |
| 323 | Squishy cloud platform | Works | Both players can interact with it at the same time |
| 324 | Grassland Clouds FG effect | Partial | Graphics are not loaded correctly |
| 325 | Small Grassland Clouds FG effect | Partial | Graphics are not loaded correctly |
Modding 101 - Creating a Bare-Bones Level
Welcome to the world of New Super Mario Bros. DS modding. Making your first level is the first step every modder takes when starting from scratch.
In this tutorial, you'll learn how to:
- Install the necessary tools to start modding
- Open your ROM in the editor
- Open a level from your ROM
- Create a bare-bones level to build from
Section 1: Getting Ready
To edit the game, you'll need a copy of your New Super Mario Bros. DS ROM and the New Super Mario Bros. Editor (NSMBe).
We are not allowed to give a download to the ROM. If you have a 3DS, here is a guide that lets you dump your game cartridge ROM using a modded 3DS.
For the best compatibility for more complex tasks, you will need a US region ROM.
Head over to GitHub to download the latest version of NSMBe from the Mamamia Team. When you click the link, you will be taken to a page that looks like this:
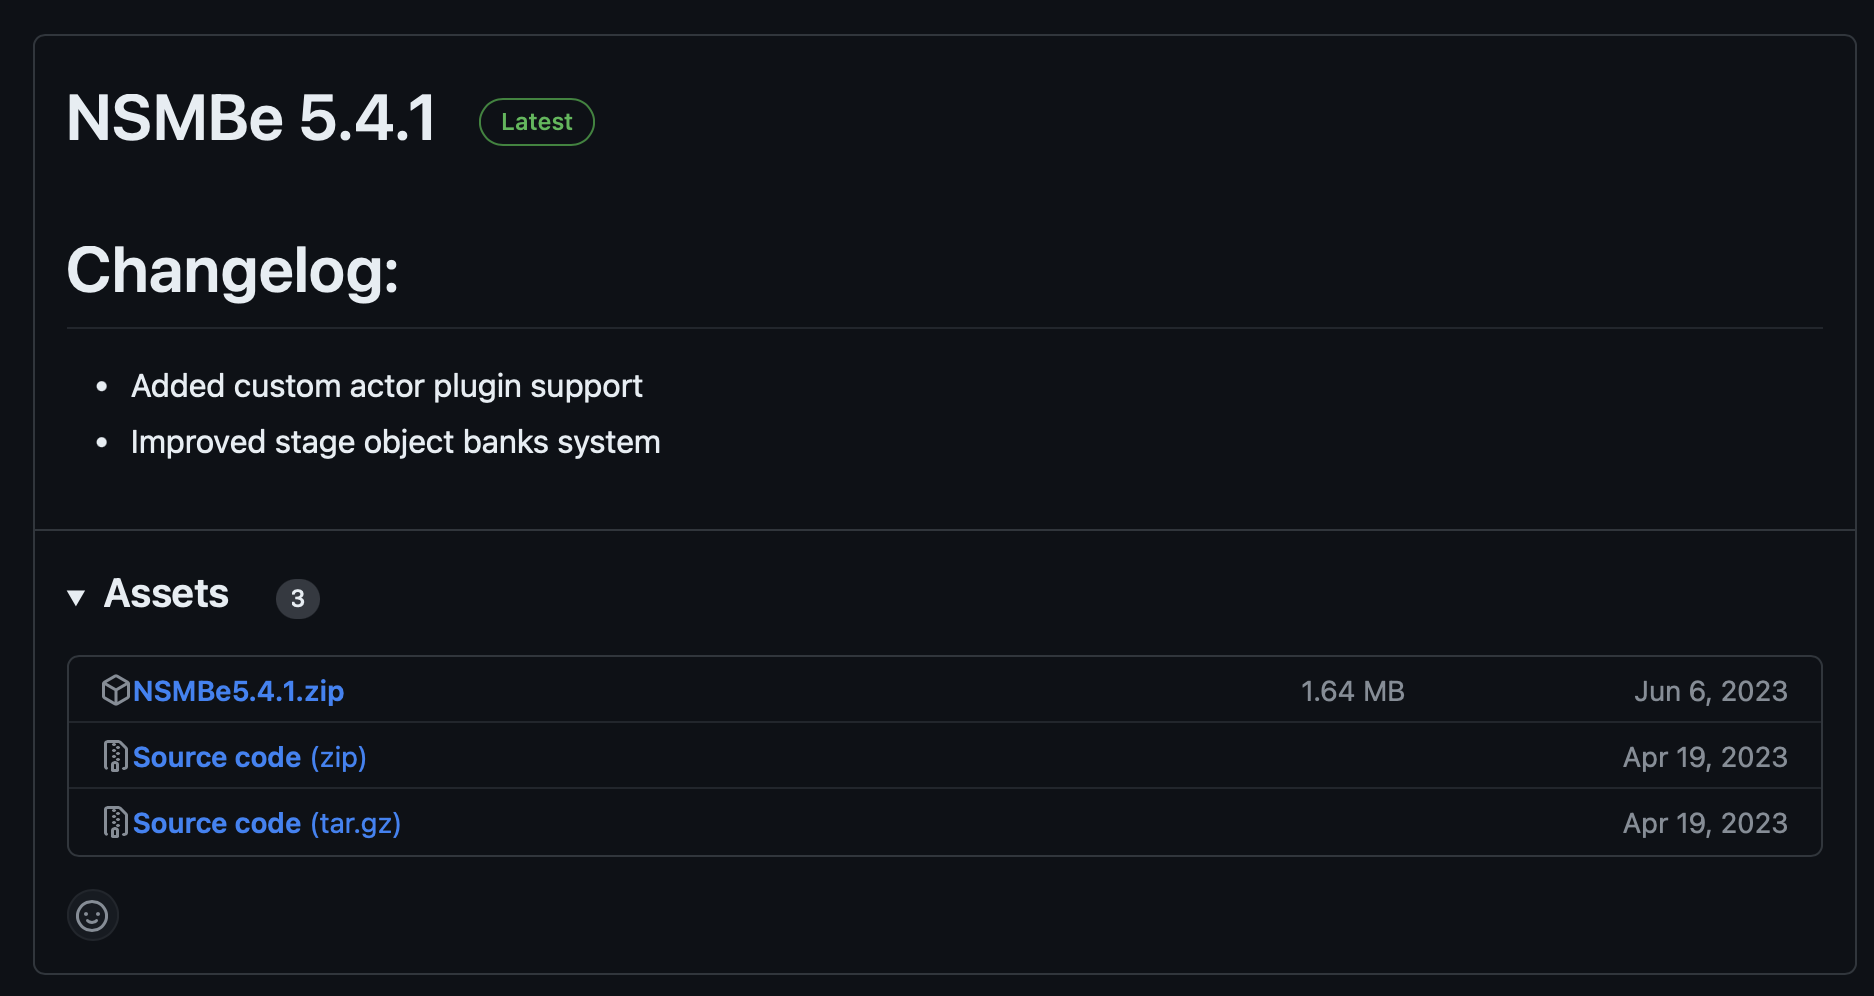
Just click on NSMBeX.X.X.zip to download the editor. (The X's will match with whatever version the editor is on. As of writing this version is 5.4.1, as seen in the screenshot)
Now, in your downloads folder, you need to extract the zip file. On Windows, this is done by right-clicking the .zip and clicking Extract All... Just click extract on the window that appears. You should now have a folder in your Downloads folder named NSMBeX.X.X.
The final folder will look something like this:

You have now installed the necessary tools to begin modding
Section 2: Opening Your ROM
Now that you have the editor extracted, let's open up your ROM!
Inside of the NSMBeX.X.X folder, open the app named NSMBe5.exe. You should see a window that looks something like this:
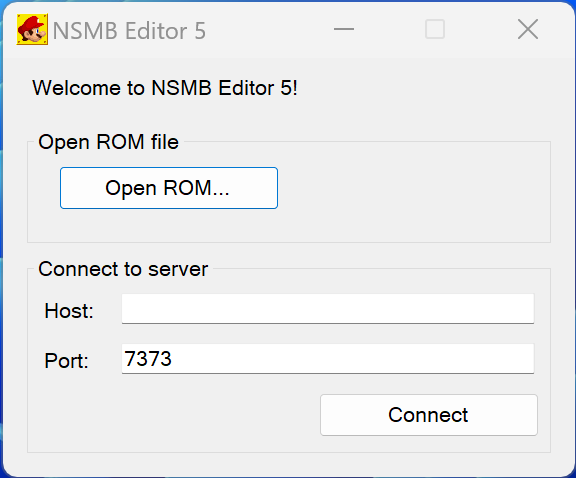
Now, click on Open ROM... and open your dumped ROM of New Super Mario Bros. DS
The ROM will have an extension of .nds
You should now see this:

You have now opened your ROM in the editor
Section 3: Opening a Level
Now for the fun part, editing a level!
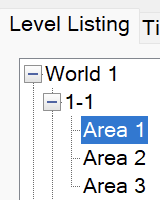
To start, we will open 1-1, Area 1. To do this, open the World 1 drop down, open the 1-1 dropdown, and finally double click on Area 1.
Each level in the game has a various number of Areas. Nintendo used these as a way to keep each sub-area separated. For example, Area 1 of 1-1 is where you start the level, and Area 2 is the bonus room found in Area 1.
You will now be presented with the level view:

If the level view appears too small, you may need to modify the config file. To do this: open the file named "NSMBe5.exe.config" using Notepad, delete the lines: <System.Windows.Forms.ApplicationConfigurationSection> <add key="DpiAwareness" value="PerMonitorV2"/></System.Windows.Forms.ApplicationConfigurationSection> After deleting the lines, save the file, restart the editor, and open Area 1 again.
You have now opened a level from your ROM
Section 4: Creating a Bare-Bones Level
It is best practice to start from a blank level, so let's clear out the existing level by pressing Ctrl+A to select everything in the level, followed by clicking the ![]() at the top of the editor window. Your blank level will look like this:
at the top of the editor window. Your blank level will look like this:
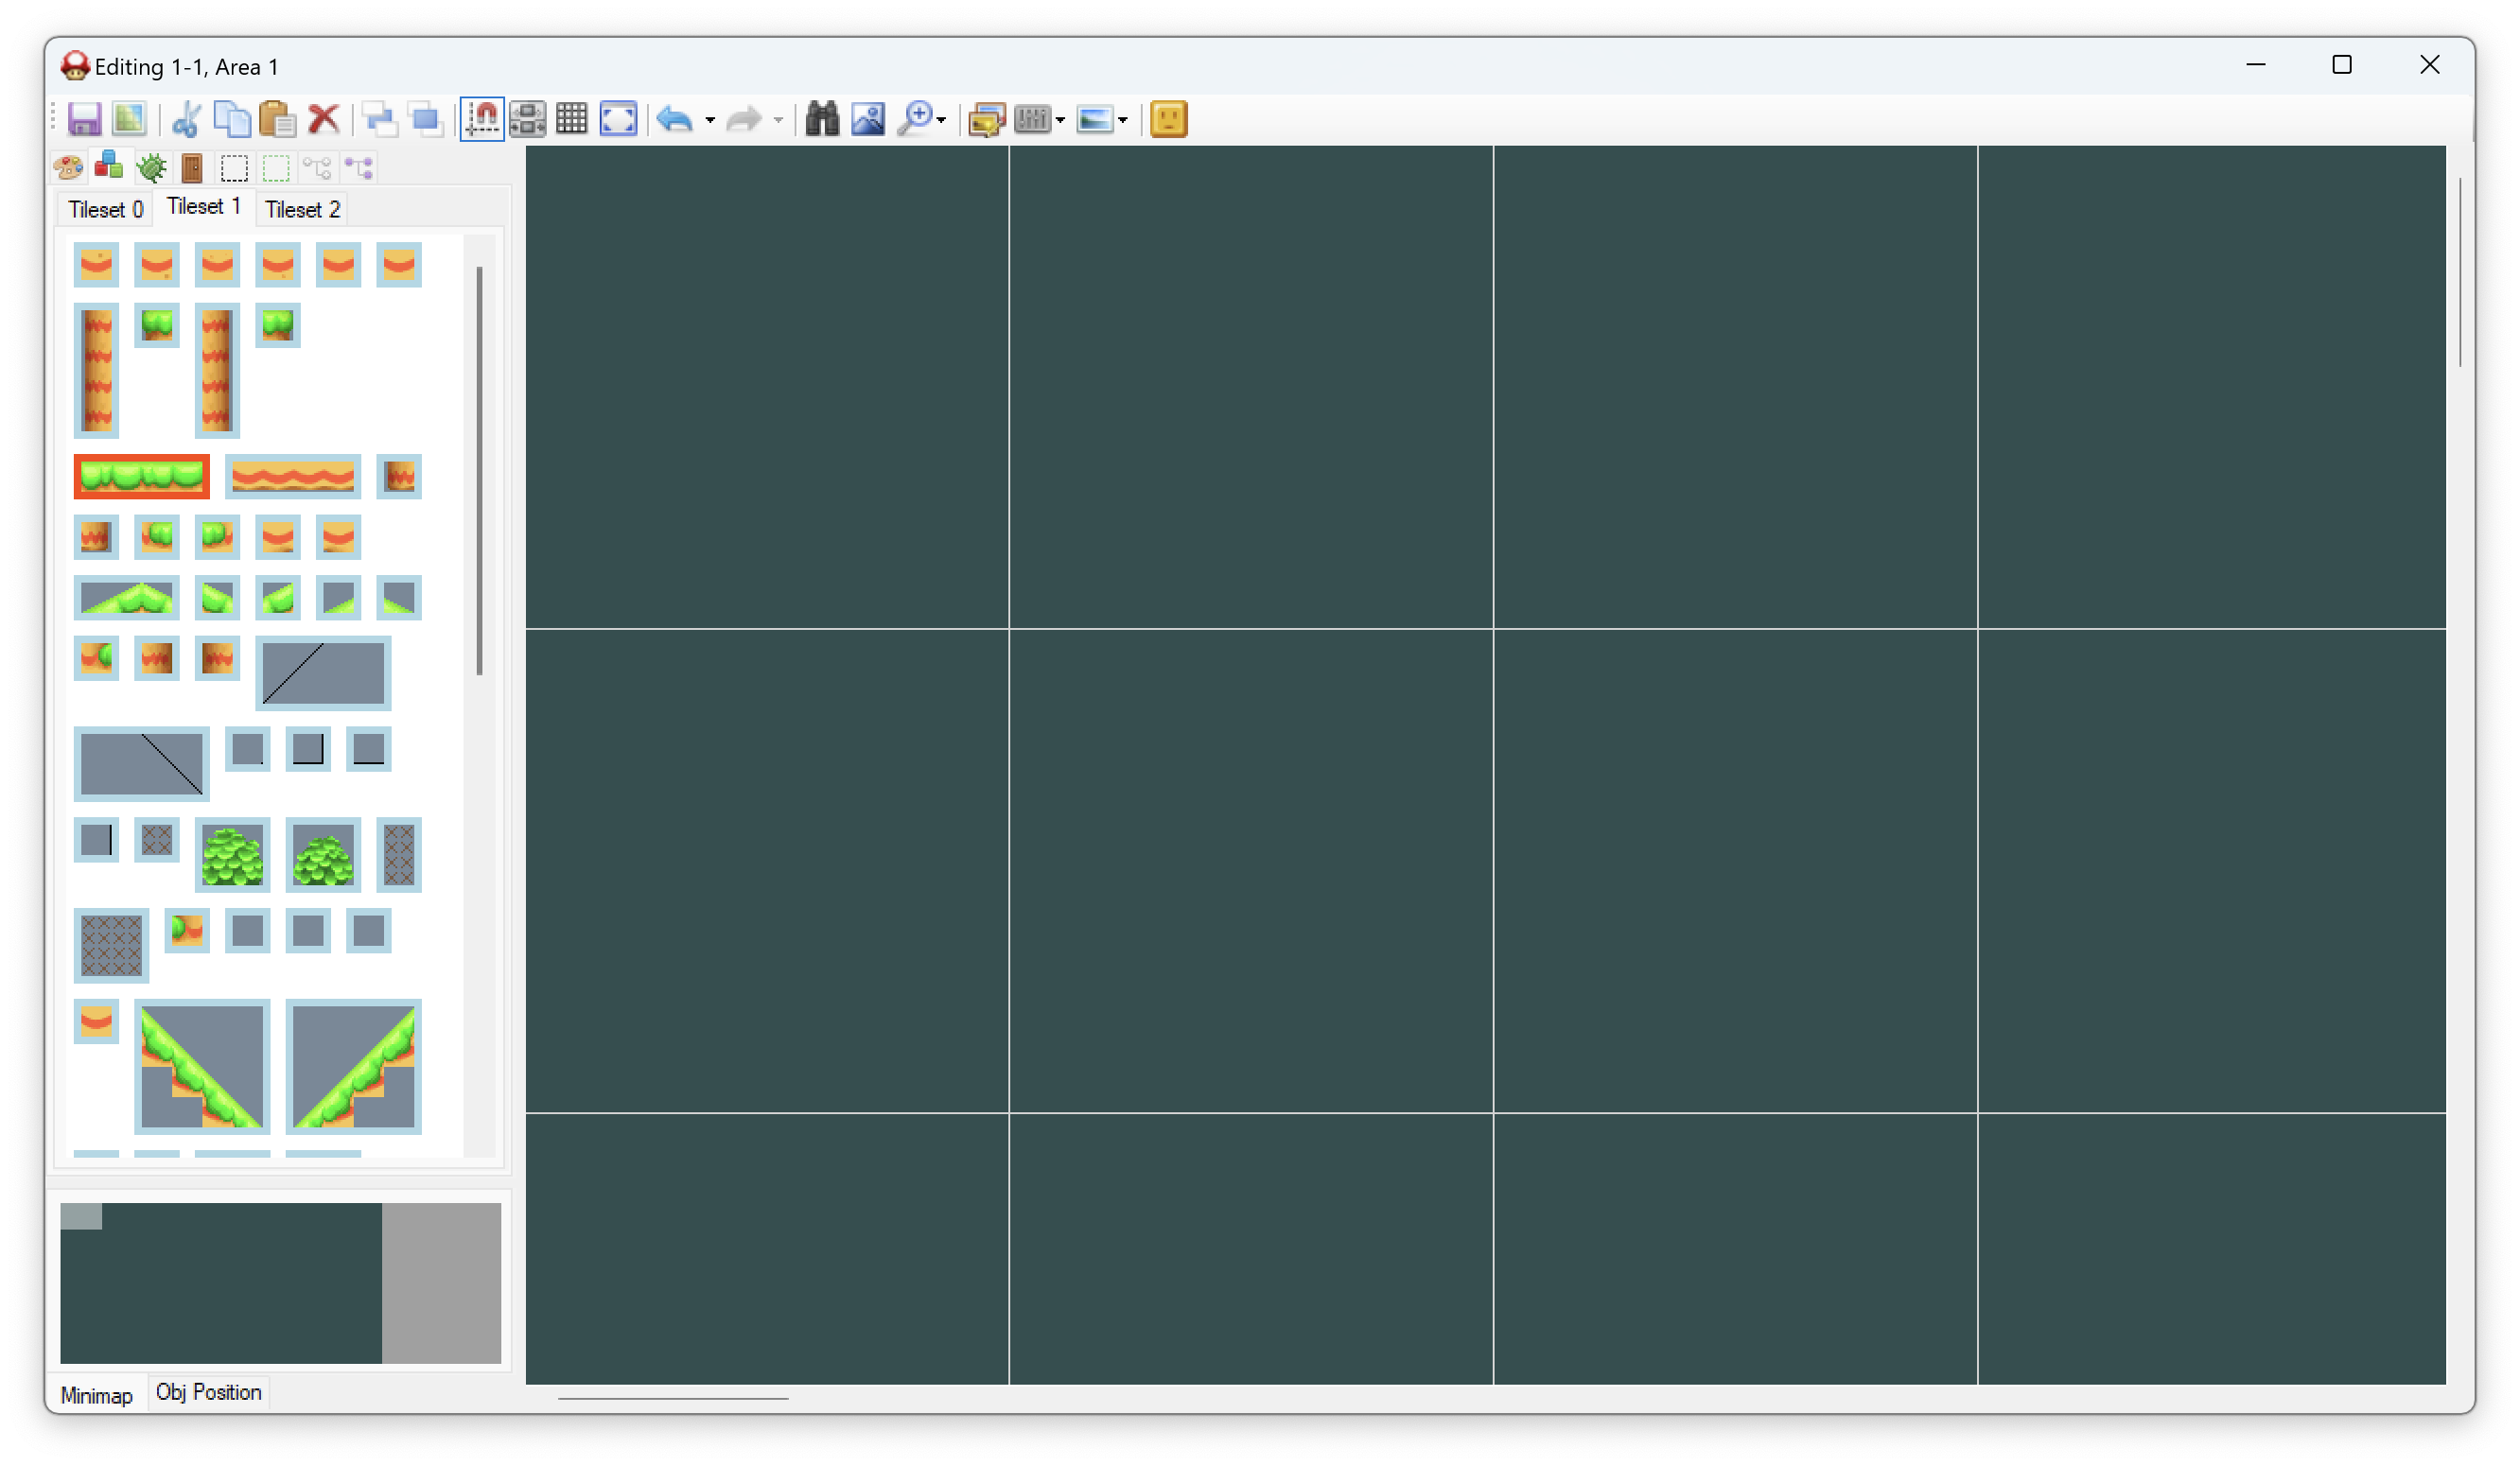
Now that we have a blank level, what do we need to add back?
All levels in NSMB DS must at minimum have a Start Entrance and at least one main View. With that being said, let's add them back!
To begin, we will add the main view. To do this, click on ![]() in the sub-menu bar. This will show a list of all the views in the level (or it would if we didn't just delete everything in the level). To create a view, all we need to do is click on Add. Your level will now have a transparent box:
in the sub-menu bar. This will show a list of all the views in the level (or it would if we didn't just delete everything in the level). To create a view, all we need to do is click on Add. Your level will now have a transparent box:
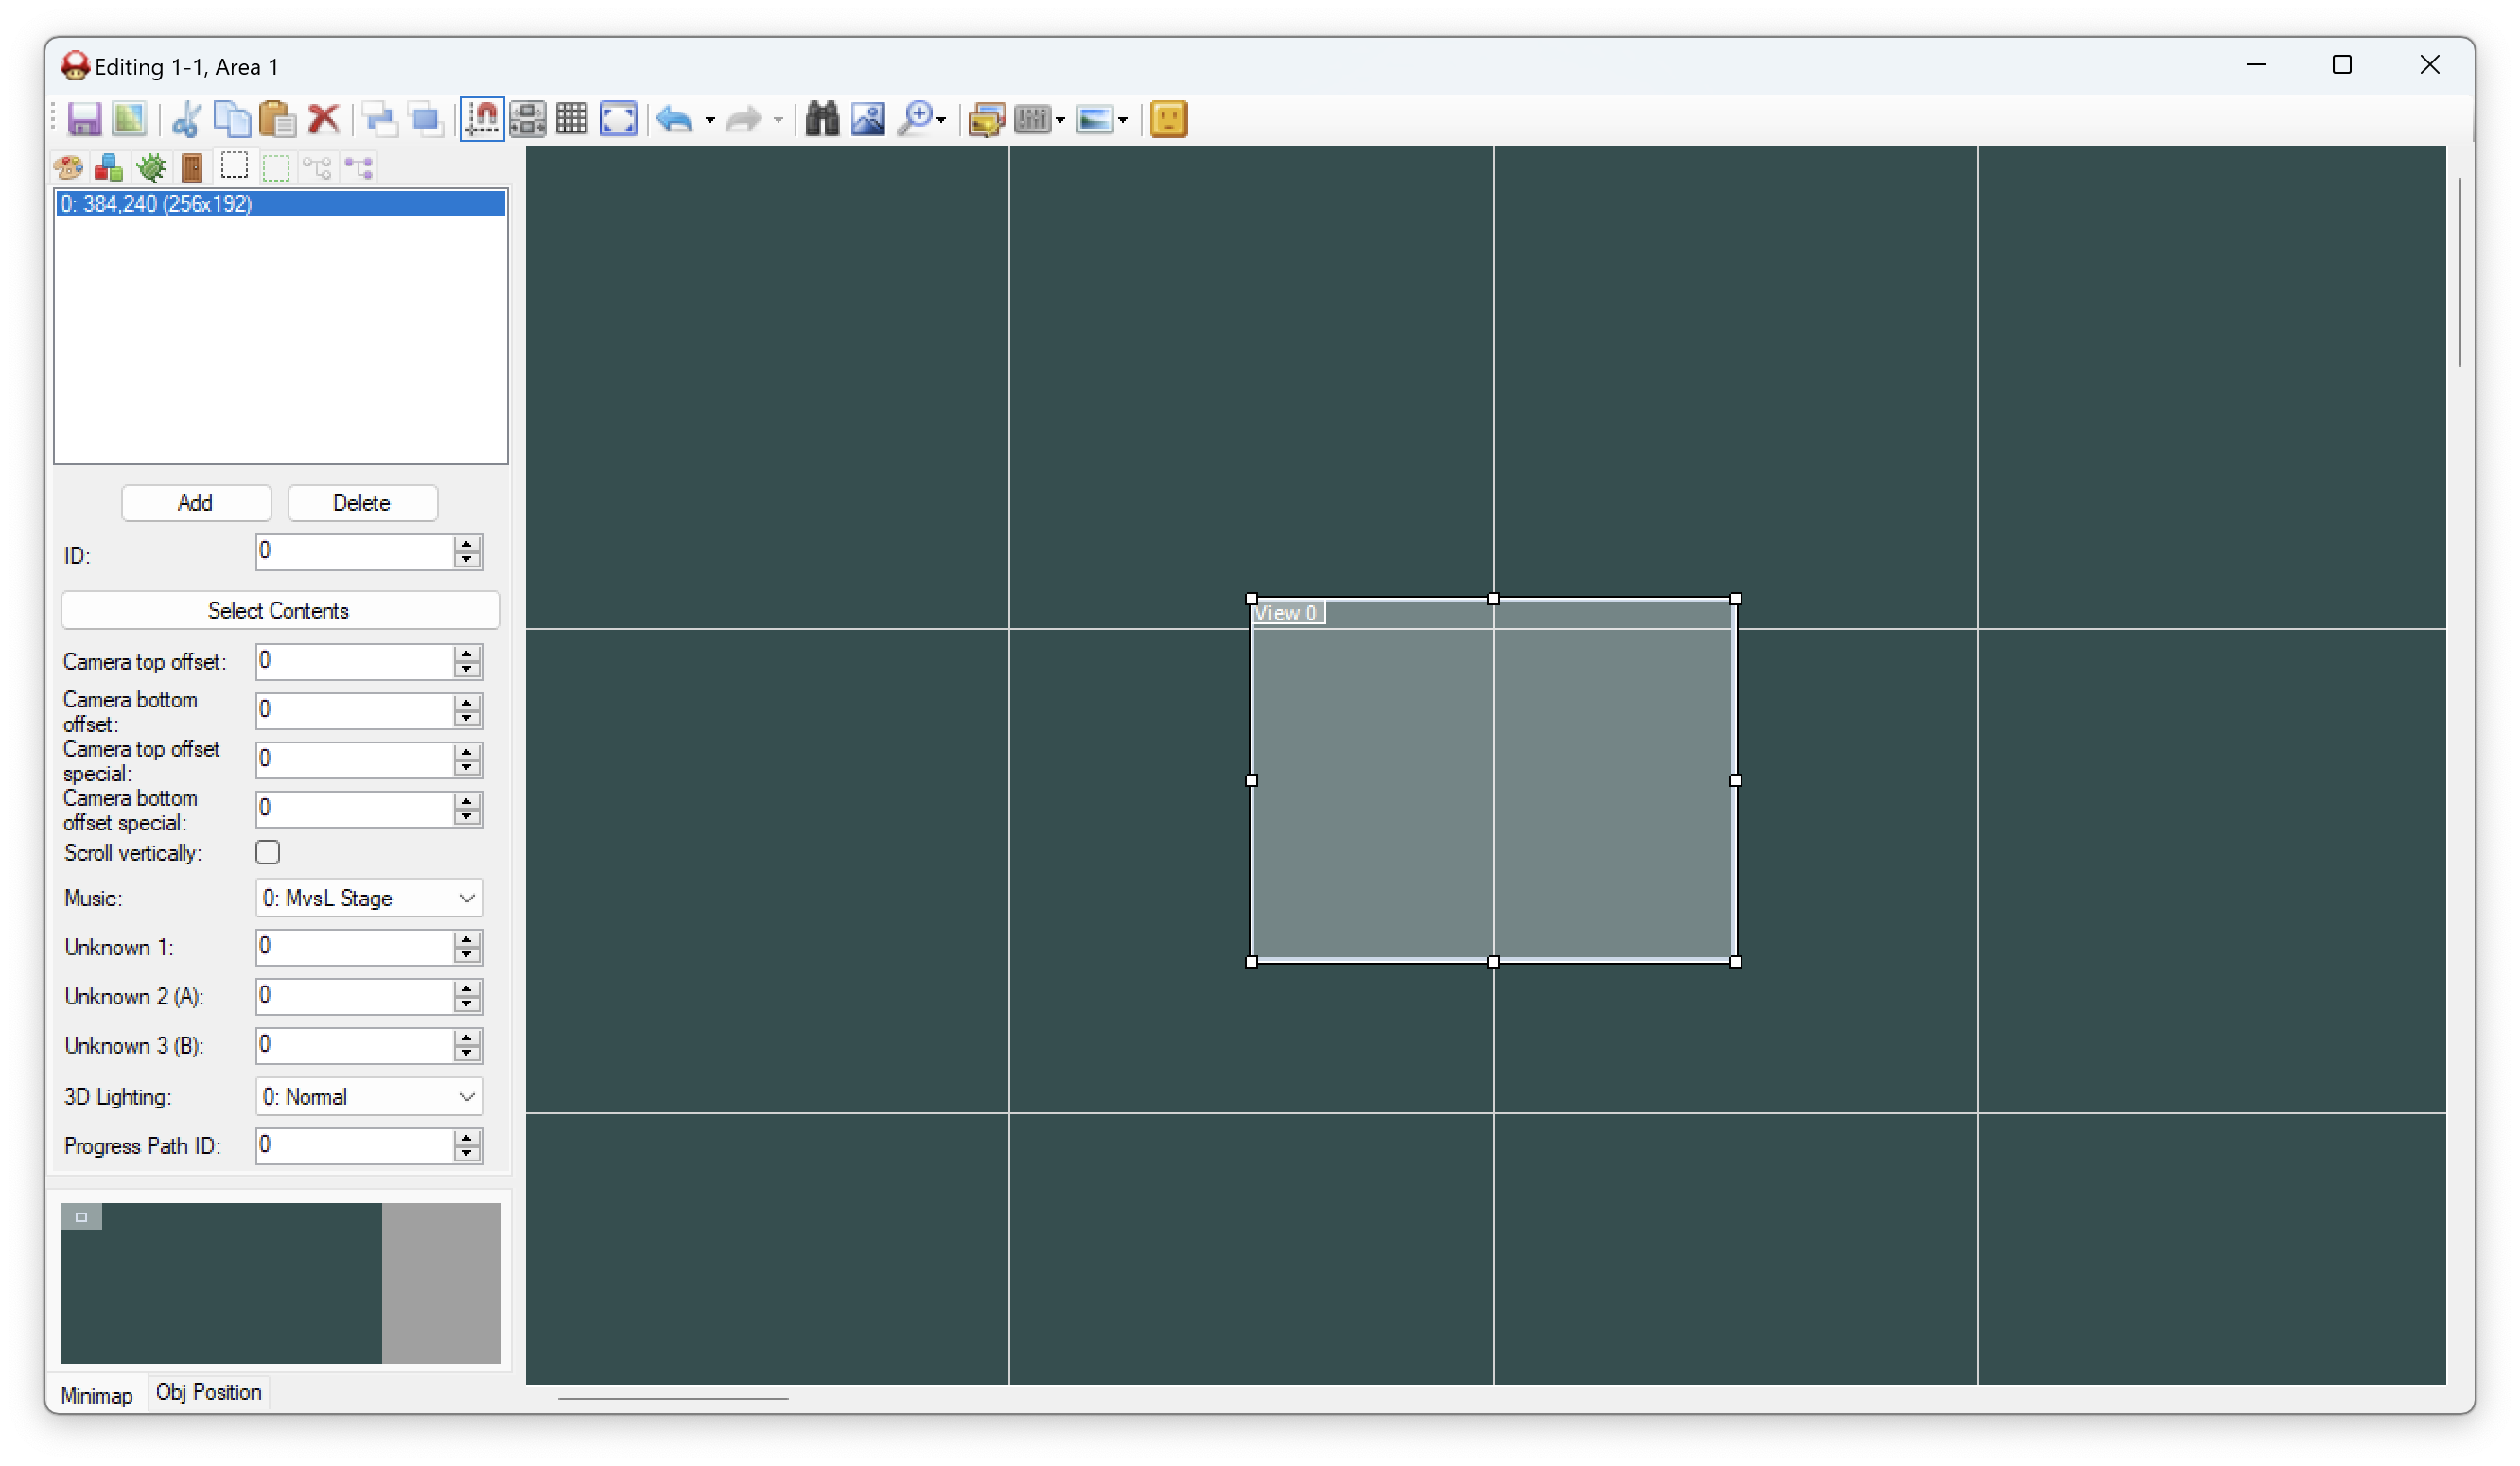
You'll notice a bunch of settings here. For now, the only thing you need to worry about is checking Scroll vertically. This allows the in-game camera to follow Mario up and down inside of your level.
The View defines the bounds of your level. The camera is not allowed to go outside of the current view. Mario can go above the view, however the camera will not follow him. The sides of a view will stop Mario. Mario will die if he falls below the bottom of the view.
Click and drag the small box that says View 0 and move the View to the top left of the level. While we're moving the view, go ahead and grab the bottom right box and extend the view to be one square big. You're level should look like this now:

Now, let's create the Start Entrance. Click on the ![]() button in the sub-menu. Similarly to the views button, this will give a list of every Entrance that is in this level. Go ahead and click on Add to create a new Entrance.
button in the sub-menu. Similarly to the views button, this will give a list of every Entrance that is in this level. Go ahead and click on Add to create a new Entrance.
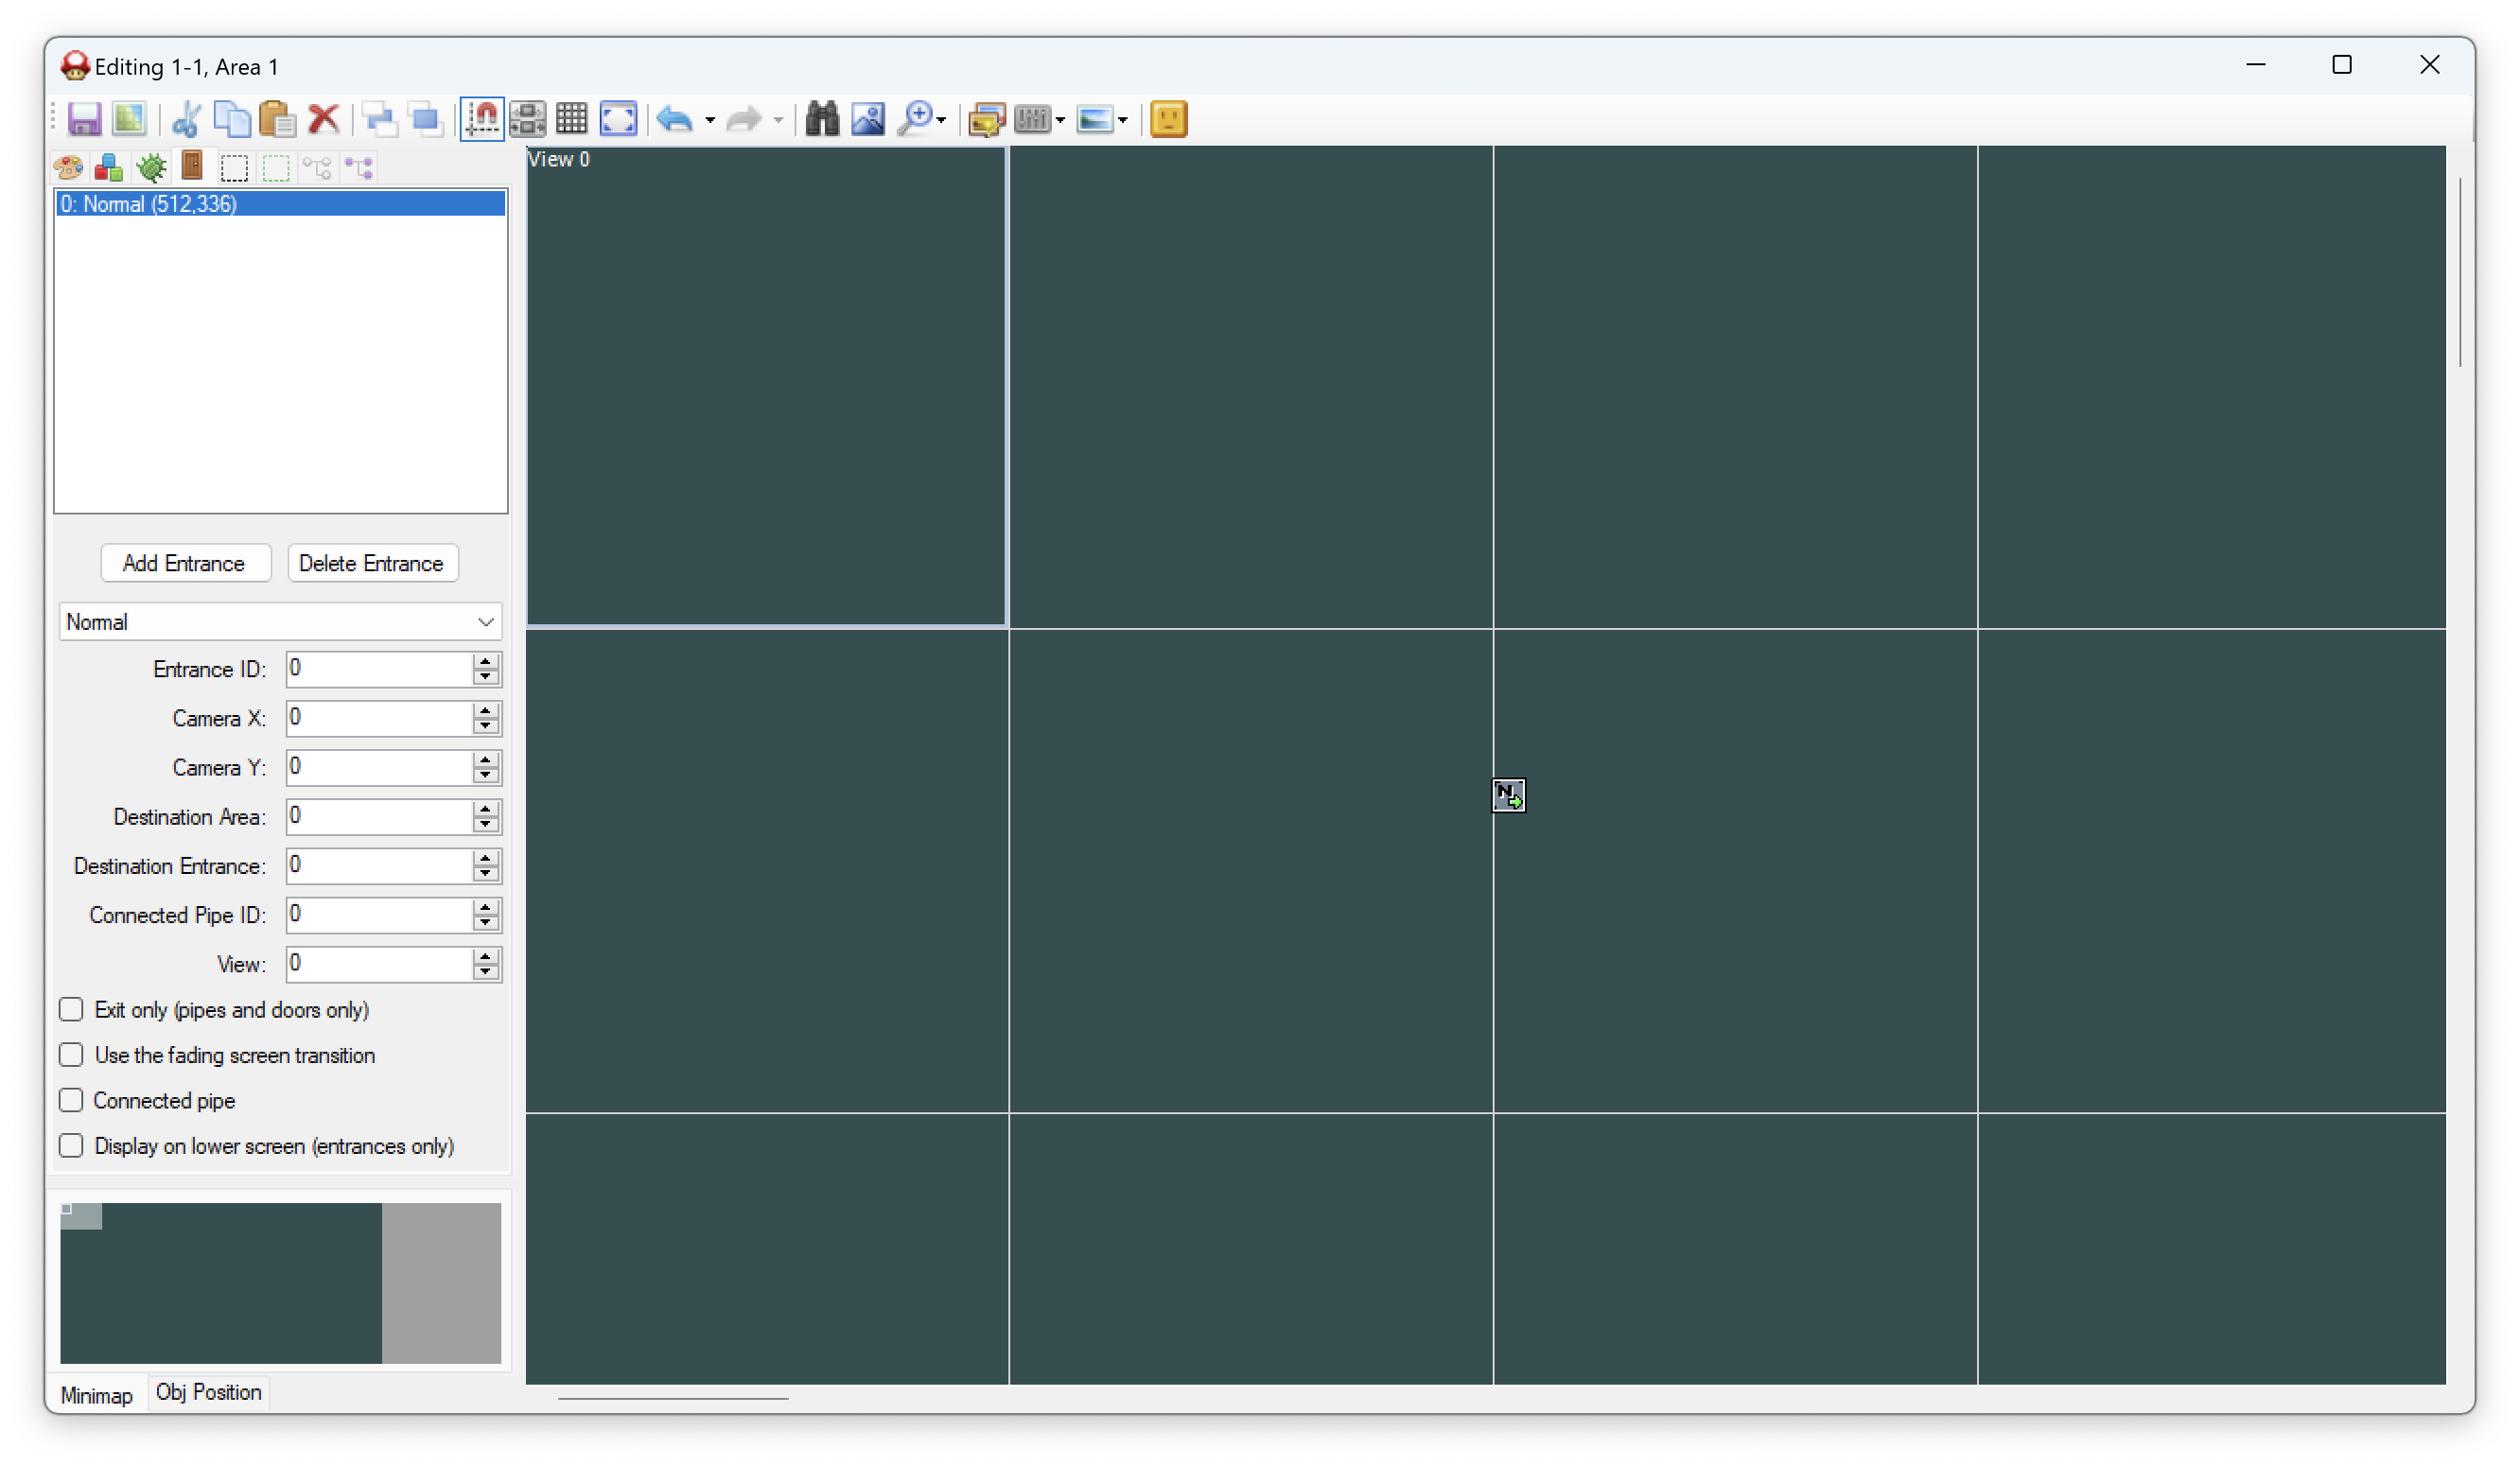
Once again, there are a few settings on the entrance that you can play with but for now let's just move the entrance inside of our View.

There we go! We have what's at minimum required. However...if we were to play this level now, Mario would just fall down and die. Let's add a floor and the Goal Pole's Flag to this level!
To get to the Tile picker, click on the ![]() button (and also click on Tileset 1 if it is not already selected). Your side bar should now be filled with Tiles!
button (and also click on Tileset 1 if it is not already selected). Your side bar should now be filled with Tiles!
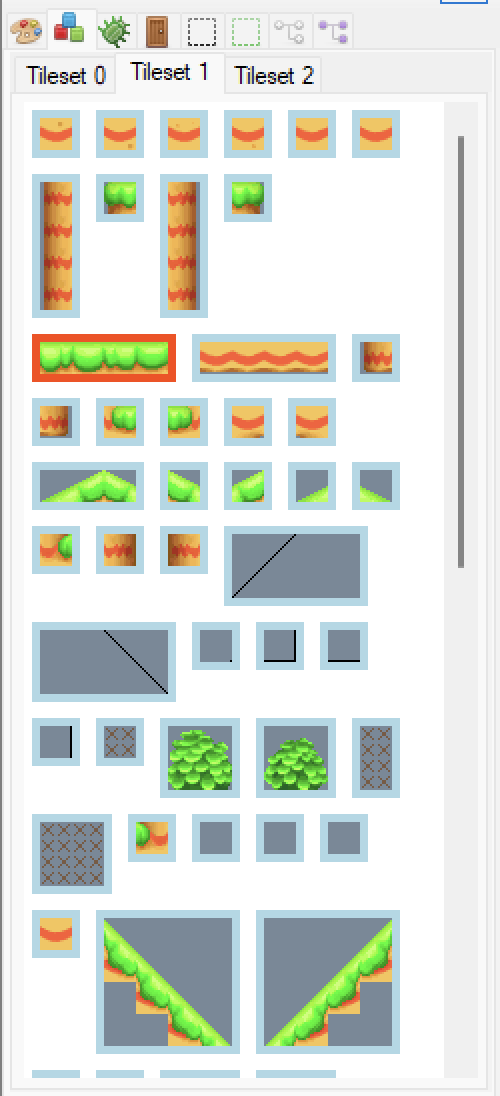
Go ahead and pick the tile I have selected (highlighted in red in the screenshot), then right-click to place the tile in our view. After this, you can grab the corner of the tile and stretch it out across the view.
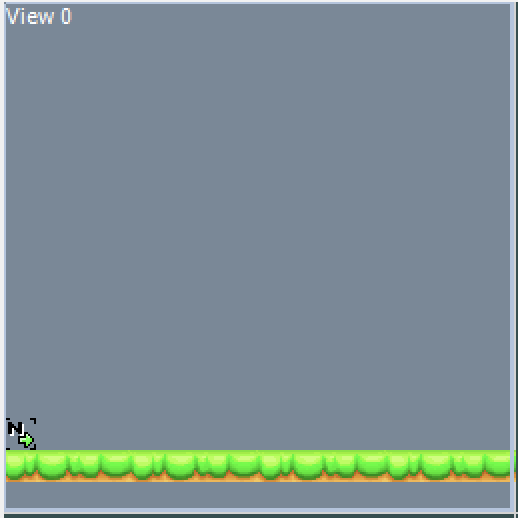
Not bad! Now, let's make a Goal Pole for Mario to clear the level with.
First off, click on the ![]() button in the sub menu to bring up the Actor List.
button in the sub menu to bring up the Actor List.

This is every Actor in the game. You'll become familiar with more Actors as you begin making levels. For now, enter "Goal Pole's Flag" into the search box. This will now filter out all other Actors.

Click on the Actor in the list, then right click in the level like you did for the tile. This will add the Goal Pole's Flag into the level.

On the left, you'll notice that some options for the Goal Pole's Flag has appeared. All Actors will have an options menu appear for them when they are highlighted in the level.
All that's left to do now is finish tiling the Goal Pole.
Test your knowledge! The Goal Pole tiles are located in Tileset 0, try and build the flag like the next screenshot! Here's a tip, the Goal Pole is 9 tiles high and two tiles wide.
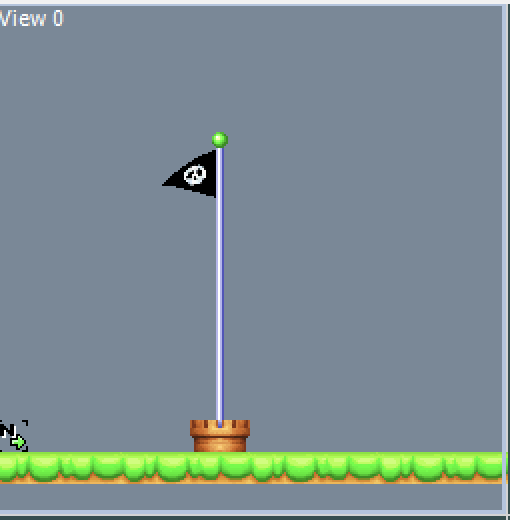 With the flag created, we now need to build the castle. To begin, head over to Tileset 2 and click on the castle. Now, right click to place the castle and drag it to create the castle. Your level will look like this now:
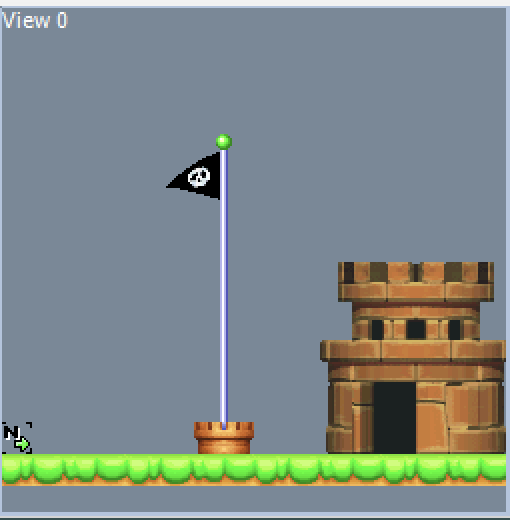
We're almost done. The castle in this game is composed of three tiles: the castle we just created, the wall that will stop Mario, and the roof that allows the small flag to show up after you cleared the level. Select the wall from the tile picker:
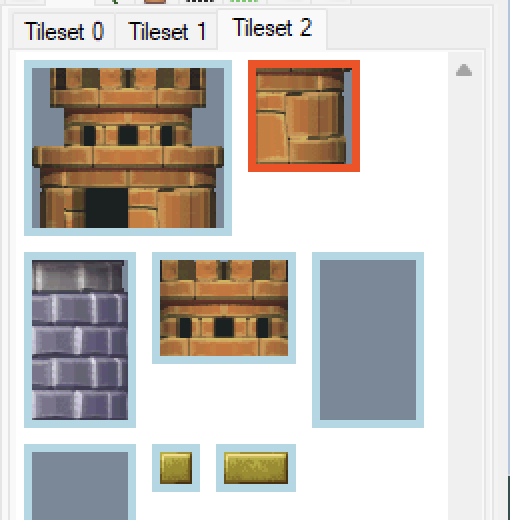 Drag this wall over the castle you created.
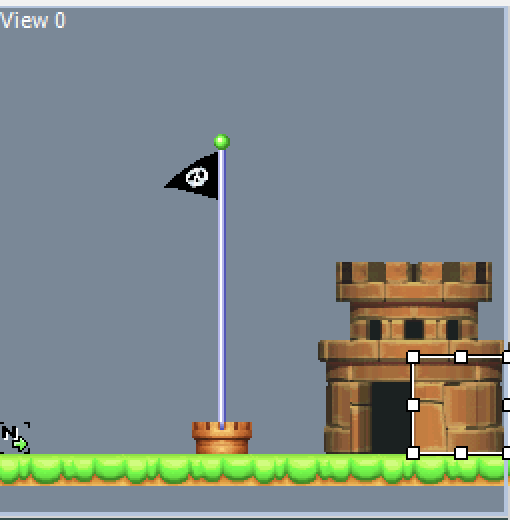 Lastly, drag the roof tile over the castle like you just did for the wall
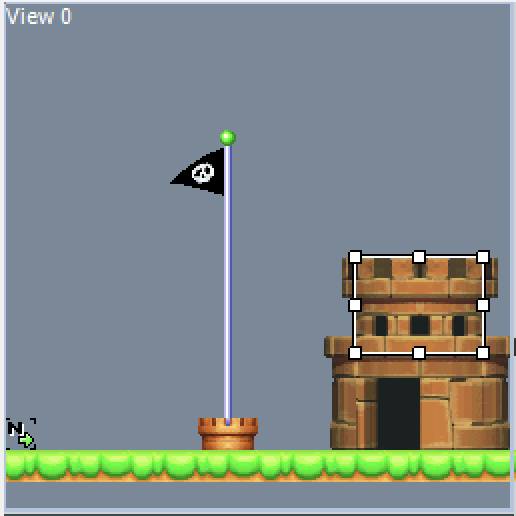
You have now created a bare-bones level
You can now save your level using the save icon or by pressing Ctrl+S.
Tools
The tools used to mod NSMB DS with a general overview of how to use them
NSMBe
TODO: Maybe a different screenshot?
NSMBe is a multipurpose modding tool for New Super Mario Bros., capable of editing levels, graphics, tilesets, and backgrounds.
The editor is currently maintained by Mamma Mia Team. You can download the latest release from GitHub.
Recognized NSMB ROMs
When a ROM is opened in NSMBe, it checks the ROM's game code to see which release of New Super Mario Bros. it is. The following releases are recognized by NSMBe:
- North American (A2DE)
- European (A2DP)
- Japanese (A2DJ)
- Korean (A2DK)
- Chinese (A2DC)
If the ROM opened is not one of these versions (such as a kiosk demo ROM, or a ROM besides New Super Mario Bros.), NSMBe will not show the Level Listing, Tilesets, or Backgrounds tab.
Known Bugs
TODO:
- Does the "Data Finder" button throw an exception in the latest version?
- Can .nml files be imported over MvsL Download Play levels as of the latest version?
- Does 8-8 area 2 open properly as of the latest version?
- What is the last version the "Decompress overlay" button is known to work on? It's functional in v5.3 b6
- The "Decompress overlay" button in the ROM File Browser tab is nonfunctional
- Certain levels from the vanilla game (such as 1-4 area 2) cannot be opened and instead thrown an exception
- Colour 0 is always rendered as transparent in the graphics editor, even in textures that are not meant to render it as transparent
- Certain models (such as w8.nsbmd) will show a message stating "This file is already being edited" even when not opened in the graphics editor; they are suchly uneditable through NSMBe's graphics editor without modification
- The "Edit Properties" button in the Backgrounds tab will not apply changes made to file IDs
- The undo button in the tilemap editor will not properly undo tiles drawn over tiles which use a palette greater than the amount of palettes opened (such as the blue coins in the jyotyu tileset tilemap)
- The object preview in the tile object editor does not accurately render the behaviour of slope control tiles as they function in-game
- NSMBe will regard files closed in the graphics editor by right-clicking as still "open" and will throw an error upon attempting to reopen said file, even after closing the graphics editor window
NCPatcher
NCPatcher is a program that modifies the executable binaries of a Nintendo DS ROM.
It was created because of the need to have more flexible patching features that other patchers did not have.
Check out the documentation over at the NCPatcher GitHub.
A tutorial will be created on using this tool for NSMB DS specifically soon
Fire Flower
Fire Flower has been replaced by NCPatcher
Fire Flower is a patcher for Nintendo DS games. It works different to any other patchers and aims towards performance, user-friendliness and practicability.
Code Modification
Going beyond the basics and modifying the game's code.
Using GDB with Ghidra and melonDS
What you'll need:
- The latest version of Ghidra
- A build of melonDS that has the GDB enabled
-
The easiest way to get this is to grab a GitHub action build of melonDS. You can find that here. (Note: you'll need to be signed into a GitHub account to download these builds)
- The GNU ARM Embedded Toolchain installed on your system
- A Ghidra database of NSMB DS
-
Eventually, NSMB Central will host a shared Ghidra project so we have one centralized project anyone can contribute to. For now, you can generate a Ghidra project using this tool. If you need help, please ask in our Discord!
Configuring melonDS
To enable the GDB, you need to do the following:
- Click on the Config menu at the top of the emulator, then click on Emu Settings
- Click on the Devtools tab
- Check Enable GDB stub
-
If you do not see the Devtools tab, then you have not built melonDS with GDB enabled. Please check the link at the start of the guide to find a download with GDB enabled or build it yourself enabling GDB in CMake
melonDS is ready to go!
Setting up Ghidra
To begin, open your Ghidra project in the code viewer as you normally would.
- Click on File -> Configure, which should open a list of tools
- Check the "Debugger" box

This should cause windows to appear in your current project, likely making the following steps redundant. If you are unable to find a window, the following steps will either open the window, or present it to you in the project.
Creating a Debugger Target
This method has been tested on Linux and macOS. You should be able to follow these steps using WSL on Windows. Follow this guide if you need help setting up WSL.
To begin, open the Debugger Targets window by navigating to Windows -> Debugger -> Debugger Targets.
The window should look something like this:
 As you'll notice, there is an active connection in the screenshot but nothing on your end...let's fix that!
Click on the ![]() button to open the connect window.
button to open the connect window.
If you are on Linux:
- Choose gdb in the dropdown
- Set arm-none-eabi-gdb -ex "set arch armv5t" as the GDB Launch Command
-
If you have not added arm-none-eabi-gdb to your PATH, you'll need to provide the absolute path
- Click

If you are on macOS
- Choose gdb via SSH in the dropdown
- Set arm-none-eabi-gdb -ex "set arch armv5t" as the GDB Launch Command
-
If you have not added arm-none-eabi-gdb to your PATH, you'll need to provide the absolute path
- Set SSH hostname to localhost
- Set SSH username to your username
-
You can use the command whoami in the terminal to get your username if you don't know it
- Click
If you are on Windows
-
This still needs to be tested on Windows. This guide will be updated when steps have been made
You have now created a Debugger Target
Connecting to melonDS
The gdb interpreter should have opened for you when you connected to the debugging target.
-
If you have lost the interpreter window, open the objects window (Window -> Debugger -> Objects) and click on
 to bring the menu back
 - In melonDS, open your ROM. (You can either boot directly to the game or launch the firmware)
Now, in the interpreter menu, run the command target remote localhost:[ARM9 Port] (Where [ARM9 Port] is the ARM9 Port set in the Devtools tab.)
-
By default, it should be 3333. The command would be target remote localhost:3333
If melonDS pauses after running this command, GDB is now talking to melonDS
-
If the connection immediately closes after running the command: change the ARM9 port to something else, restart melonDS, and close the current GDB connection.
You have now connected Ghidra to melonDS
Using Breakpoints
If you would like to set breakpoints, you'll need to use the Dynamic PC
- Open the Dynamic PC window by clicking Window -> Listing -> Dynamic - Auto PC, [...]
-
If you do not see this option, you can alternatively open it via Window -> Debugger -> New Dynamic Listing
-
- Next, open the Modules window by clicking Window -> Debugger -> Modules
- Lastly, click on
 in the Modules window.
Now, setting a breakpoint in your code view should set a breakpoint in the Dynamic PC
-
Breakpoints will only update if the emulator has hit a breakpoint or has been paused by pressing

You have now set up Ghidra to debug melonDS. Happy coding!
Setting Up Code Modifications
So, you're ready to dive into the code of the game? Let's get started!
In this tutorial, you will learn how to:
- Set up the NSMB DS Code Template
- Set up ARM GCC
- Set up NCPatcher
- Extract/Build your ROM
This guide will cover the "NCPatcher Standalone" method described in the code template as the steps are more synchronized between all operating systems.
Setting Up the Code Template
- Head over to the code template's GitHub
- Click on Code -> Download ZIP
- Now extract this zip and rename the folder to what you want to call your project (this will be referred to as your project root)
-
Don't put any spaces in your folder name!
You have now set up the code template
Setting up ARM GCC
- Head to the Arm GNU Toolchain Download Page
- Now search (using CTRL/CMD + F) for AArch32 bare-metal target (arm-none-eabi) and download the correct installer for your operating system.
- Open the installer and install the toolchain.
-
Pick a location without spaces to install the toolchain!
You have now set up ARM GCC
Setting Up NCPatcher
- Head over to the NCPatcher GitHub releases page
- Download the latest release for your operating system
- Extract NCPatcher
Now, NCPatcher depends on ncpatcher.json, so lets make it!
If you'd like to learn more about this file, head over to the NCPatcher GitHub!
In your project root, create the following files:
- ncpatcher.json
- Copy/Paste the following JSON into the file
{
  "$arm_flags": "-masm-syntax-unified -mno-unaligned-access -mfloat-abi=soft -mabi=aapcs",
  "$c_flags": "-Os -fomit-frame-pointer -ffast-math -fno-builtin -nostdlib -nodefaultlibs -nostartfiles -DSDK_GCC -DSDK_FINALROM",
  "$cpp_flags": "-fno-rtti -fno-exceptions -std=c++20",
  "$asm_flags": "-Os -x assembler-with-cpp -fomit-frame-pointer",
  "$ld_flags": "-lgcc -lc -lstdc++ --use-blx",

  "backup": "backup",
  "filesystem": "nsmb",
  "toolchain": "arm-none-eabi-",

  "arm7": {},
  "arm9": {
  "target": "arm9.json",
  "build": "build"
  },

  "pre-build": [],
  "post-build": [],

  "thread-count": 0
}
You have now set up NCPatcher
Extracting, Building, and Repackaging Your ROM
If you're on Windows
- Download fireflower.zip and extract it.
- Move nds-build.exe and nds-extract.exe out from the folder
If you're on macOS/Linux
- Download nds-extract.zip
- Download nds-build.zip
- Extract both ZIPs
Now, you need to build the tools.
For NDS Extract:
- Open a new Terminal window in the folder of the code
- Run this command:
g++ nds-extract.cpp -o nds-extract -std=c++20
For NDS Build:
- Open a new Terminal window in the folder of the code
- Run this command:
g++ nds-build.cpp -o nds-build -std=c++20
From here on, the instructions will work for all operating systems. If you are on Windows 10, you can use Command Prompt instead of Terminal
Extracting Your ROM
- Open a Terminal window in your project root
- Run this command:
/path/to/nds-extract rom.nds nsmb
Replace /path/to/ with the actual file path to nds-extract. Also replace "rom" with the actual name of your .nds file
This will extract the contents of your ROM into a folder named nsmb
You have extracted your ROM
Building Your ROM
This step will compile and patch your ROM with any code files found in the source directory in your project root. The Code Template comes with a few examples included in the source directory.
- Open a Terminal window in your project root
- Run this command:
/path/to/ncpatcher
Replace /path/to/ with the actual file path to ncpatcher
You have built your ROM
Repackaging Your ROM
nds-extract depends on buildrules.txt, so let's create it!
- buildrules.txt
- Copy/Paste the following text into the file:
rom_header NSNDY/header.bin
arm9_entry KEEP
arm9_load KEEP
arm7_entry KEEP
arm7_load KEEP
fnt nsmb/fnt.bin
file_mode ADJUST
arm9 nsmb/arm9.bin
arm7 nsmb/arm7.bin
arm9ovt nsmb/arm9ovt.bin
arm7ovt nsmb/arm7ovt.bin
icon nsmb/banner.bin
rsa_sig nsmb/rsasig.bin
data nsmb/root
ovt_repl_flag 0xFF
ov9 nsmb/overlay9
ov7 nsmb/overlay7
This step will take the files form the nsmb folder and repackage them into a .nds file
- Open a Terminal window in your project root
- Run this command:
/path/to/nds-build buildrules.txt NSMB.nds
Replace /path/to/ with the actual file path to nds-build.
You have repackaged your ROM
Porting old patch syntax to NCPatcher
This page will help you understand how you can port any patching syntax to NCPatcher's.
You are searching through NSMBHD or NSMB Central and you find a shiny code patch, you rush and put it in the source folder of your project only to find that a code patch is not compatible with your code! That sucks.
So what can we do?
For this example NSMB E3 Recreation's PlayerAnims.cpp code patch will be used.
Step 1 - Investigation
Let's start by taking a look at PlayerAnims.cpp.
#include <nsmb.hpp>
#include <nsmb/extra/fixedpoint.hpp>

#define NAKED __attribute__((naked))

// Slow down rotation speed
NAKED void repl_02114DFC_ov_0A() { asm("MOV R5, #0xC00\nBX LR"); }

// Walking transition delay
void repl_0211667C_ov_0A() {}

void repl_02116698_ov_0A(Player* player, int id, bool doBlend, Player::FrameMode frameMode, fx32 speed, u16 frame) {
	// 3.75fx (0x3C00) is the max walk animation speed
	if (speed > (3.75fx / 2)) {
		speed = (3.75fx / 2);
	}

	if (player->animID == 2) {
		player->setBodyAnimationSpeed(speed);
	} else {
		if (player->animID == 1) {
			fx32 xvel = Math::abs(player->velocity.x);
			if (xvel >= 1.5fx) {
				player->setAnimation(2, doBlend, frameMode, speed, frame);
			} else {
				player->setBodyAnimationSpeed(speed);
			}
		} else {
			player->setAnimation(1, doBlend, frameMode, speed, frame);
		}
	}
}

// Force jump on anim 1
NAKED void nsub_02116A14_ov_0A() { asm("CMP R0, #1\nB 0x02116A18"); }

// Use anim 1
NAKED void repl_02116A2C_ov_0A() { asm("MOV R1, #1\nBX LR"); }
We must now wonder, what kind of a patch is this? Is this an NSMBe type patch or a Fireflower type patch?
By comparing common traits that each patcher uses we can guess what kind of patch type we are dealing with.
NSMBe type patches:
- Does not use attributes to declare patches, uses the function name.
void hook_x() {} - Patches always follow the format
<PATCH TYPE>_<ADDRESS HEX>_ov_<OVERLAY HEX>or<PATCH TYPE>_<ADDRESS HEX>if you don't need to specify an overlay. -
PATCH TYPEcan only behook,replornsub.
Fireflower type patches:
- Uses attributes to declare patches.
hook(X) void func() {} - Patches always follow the format
<PATCH TYPE>(0x<ADDRESS HEX>, 0x<OVERLAY HEX>)or<PATCH TYPE>(0x<ADDRESS HEX>)if you don't need to specify an overlay. -
PATCH TYPEcan only behook,rlnk,safeorover.
Did you guess correctly what kind of patch we are working with?
Click here to reveal the answer
NSMBeStep 2 - Porting
This is a fairly simple process. Here is a list that shows the different patch syntax between the patchers:
| NSMBe | Fireflower | NCPatcher |
|---|---|---|
| hook | safe | ncp_hook |
| repl | rlnk | ncp_call |
| nsub | hook | ncp_jump |
| over | ncp_over | |
| ncp_repl |
And here is an example comparing some of them:
// NSMBe
void hook_02000000() {} // doSomethingPatch
void repl_0200A000() {} // doUnspecifiedPatch
void repl_02010000_ov_0A() {} // doWhateverOverlayPatch
// over does not exist in NSMBe

// Fireflower
safe(0x02000000) void doSomethingPatch() {}
rlnk(0x0200A000) void doUnspecifiedPatch() {}
rlnk(0x02010000, 10) void doWhateverOverlayPatch() {}
over(0x02159348, 52) static int stupidVar = 0x0215CA6C;

// NCPatcher
ncp_hook(0x02000000) void doSomethingPatch() {}
ncp_call(0x0200A000) void doUnspecifiedPatch() {}
ncp_call(0x02010000, 10) void doWhateverOverlayPatch() {}
ncp_over(0x02159348, 52) static int stupidVar = 0x0215CA6C;
These addresses are ficticious and purely for demonstration!
An important thing to remember is that all values in NSMBe patches are always written in hexadecimal without 0x prepended to them. In NCPatcher if you want to specify an hexadecimal value you need to prepend 0x, otherwise the value will be interpreted as a decimal value!
Let's go back to PlayerAnims.cpp and try to apply these changes.
#include <nsmb.hpp>
#include <nsmb/extra/fixedpoint.hpp>

#define NAKED __attribute__((naked))

NAKED ncp_call(0x02114DFC, 10)
void slowDownRotationSpeed() { asm("MOV R5, #0xC00\nBX LR"); }

// Walking transition delay
ncp_call(0x0211667C, 10) void doNotJumpOnAnim2() {}

ncp_call(0x02116698, 10)
void customPlayerAnimator(Player* player, int id, bool doBlend, Player::FrameMode frameMode, fx32 speed, u16 frame) {
	// 3.75fx (0x3C00) is the max walk animation speed
	if (speed > (3.75fx / 2)) {
		speed = (3.75fx / 2);
	}

	if (player->animID == 2) {
		player->setBodyAnimationSpeed(speed);
	} else {
		if (player->animID == 1) {
			fx32 xvel = Math::abs(player->velocity.x);
			if (xvel >= 1.5fx) {
				player->setAnimation(2, doBlend, frameMode, speed, frame);
			} else {
				player->setBodyAnimationSpeed(speed);
			}
		} else {
			player->setAnimation(1, doBlend, frameMode, speed, frame);
		}
	}
}

NAKED ncp_jump(0x02116A14, 10)
void forceJumpOnAnim1() { asm("CMP R0, #1\nB 0x02116A18"); }

NAKED ncp_call(0x02116A2C, 10)
void useAnim1() { asm("MOV R1, #1\nBX LR"); }
The code should now compile!
If your code still doesn't work because it complains about some functions not being defined or not existing then you might want to check this out as well: Porting old patches to the NSMB Code Reference
What if the patch was an assembly .s file instead of C .c or C++ .cpp?
The process is the same.
hook_....:
    BX LR
Becomes
ncp_hook(...)
    BX LR
Step 4 - Tidying up
Even though the code should now be able to execute, it is still not in its optimal state. This part is slightly more complicated because it requires understanding the code.
NCPatcher includes its own definition of __attribute__((naked)) which is ncp_asmfunc so we remove that macro definition and use ncp_asmfunc instead.
#include <nsmb.hpp>
#include <nsmb/extra/fixedpoint.hpp>

ncp_asmfunc ncp_call(0x02114DFC, 10)
void slowDownRotationSpeed() { asm("MOV R5, #0xC00\nBX LR"); }

// Walking transition delay
ncp_call(0x0211667C, 10) void doNotJumpOnAnim2() {}

ncp_call(0x02116698, 10)
void customPlayerAnimator(Player* player, int id, bool doBlend, Player::FrameMode frameMode, fx32 speed, u16 frame) {
	// 3.75fx (0x3C00) is the max walk animation speed
	if (speed > (3.75fx / 2)) {
		speed = (3.75fx / 2);
	}

	if (player->animID == 2) {
		player->setBodyAnimationSpeed(speed);
	} else {
		if (player->animID == 1) {
			fx32 xvel = Math::abs(player->velocity.x);
			if (xvel >= 1.5fx) {
				player->setAnimation(2, doBlend, frameMode, speed, frame);
			} else {
				player->setBodyAnimationSpeed(speed);
			}
		} else {
			player->setAnimation(1, doBlend, frameMode, speed, frame);
		}
	}
}

ncp_asmfunc ncp_jump(0x02116A14, 10)
void forceJumpOnAnim1() { asm("CMP R0, #1\nB 0x02116A18"); }

ncp_asmfunc ncp_call(0x02116A2C, 10)
void useAnim1() { asm("MOV R1, #1\nBX LR"); }
Now, take a look at the original purpose of repl_0211667C_ov_0A (now named doNotJumpOnAnim2) and the code it targeted.
ov10:02116678   CMP R0, #2
ov10:0211667C   BEQ 0x021166A0
ov10:02116680   MOV R0, R5
We can see that what we are doing is the following:
ov10:02116678    CMP R0, #2
ov10:0211667C    BL  repl_0211667C_ov_0A
ov10:02116680    MOV R0, R5
//...
repl_0211667C_ov_0A:
    BX LR // return generated by the compiler
Essentially we are just making it so BEQ 0x021166A0 will never jump to 0x021166A0, but we are not doing this efficiently because we jump from 0x0211667C to repl_0211667C_ov_0A and then back to 0x02116680 instead of just continuing.
This wastes memory and CPU cycles, but it was the only way of doing so in NSMBe.
Instead we can write it like ncp_repl(0x0211667C, 10, "NOP") in NCPatcher, making the instruction do nothing and just skip to the next one without using any more memory.
ov10:02116678    CMP R0, #2
ov10:0211667C    NOP        // Skips to the next instruction
ov10:02116680    MOV R0, R5
After evaluating all theses different cases, our optimal code should look like this:
#include <nsmb.hpp>
#include <nsmb/extra/fixedpoint.hpp>

// Slow down rotation speed
ncp_repl(0x02114DFC, 10, "MOV R5, #0xC00")

// Walking transition delay
ncp_repl(0x0211667C, 10, "NOP")

ncp_call(0x02116698, 10)
void customPlayerAnimator(Player* player, int id, bool doBlend, Player::FrameMode frameMode, fx32 speed, u16 frame) {
	// 3.75fx (0x3C00) is the max walk animation speed
	if (speed > (3.75fx / 2)) {
		speed = (3.75fx / 2);
	}

	if (player->animID == 2) {
		player->setBodyAnimationSpeed(speed);
	} else {
		if (player->animID == 1) {
			fx32 xvel = Math::abs(player->velocity.x);
			if (xvel >= 1.5fx) {
				player->setAnimation(2, doBlend, frameMode, speed, frame);
			} else {
				player->setBodyAnimationSpeed(speed);
			}
		} else {
			player->setAnimation(1, doBlend, frameMode, speed, frame);
		}
	}
}

// Force jump on anim 1
ncp_repl(0x02116A14, 10, "CMP R0, #1")

// Use anim 1
ncp_repl(0x02116A2C, 10, "MOV R1, #1")
Porting old patches to the NSMB Code Reference
Custom Actors
Sometimes the base game doesn't offer exactly what you need for your level. That's when you should turn to custom actors!
This guide provides a basic overview of how to create custom actors. A decent understanding of C++ along with some prior NSMB code modding knowledge are recommended for this tutorial.
Section 1 - The Boiler Plate
This is code you will be writing basically every time you go to create a custom actor. It is standard practice to split your actor into two files myActor.cpp and myActor.hpp
myActor.cpp
#include "nsmb.hpp"
#include "myActor.hpp"

ncp_over(0x020c560c, 0) const ObjectInfo objectInfo = MyActor::objectInfo; //Stage Actor ID 44 (use this in the editor)
ncp_over(0x02039a34) static constexpr const ActorProfile* profile = &MyActor::profile; //objectID 46

s32 MyActor::onCreate(){
	return true;
}

bool MyActor::loadResources() {
    return true;
}

s32 MyActor::onDestroy(){
	return true;
}

s32 MyActor::onRender(){
	return true;
}

bool MyActor::updateMain(){
	return true;
}
This file is where you program your actor.
At the beginning of the file is where you define:
- Where in the object bank table your actor's object info is stored. The array index is what you place in the editor to "place" your object. In the sample above, it is replacing ID 44. The beginning of this array is located at
0x020c529c - Where in the main process table your actor's profile is stored. The beginning of this array is located at
0x0203997c
Here's an overview of what these functions are usually used for:
| Function | Purpose |
onCreate() |
This function is ran when your actor is first created. This function is used for initalizing variables and anything that should be done once. |
loadResources() |
This function is called when the game is setting up your actor. [Todo]: Find the normal use case for this function. |
onDestroy() |
This function is called when your Actor is being removed from the stage. This function is used for cleaning up after the actor (i.e. freeing resources). |
onRender() |
This function is called every game tick while your actor is in view of the camera. This is typically used for graphics related code (for example, changing what texture an NSBTX is currently drawing). |
updateMain() |
This function is called every game tick while your actor is loaded. This function is used for the main functionality of your code (i.e. calculating positions, updating variables, etc). |
TODO: Expand this table with more functions you can override in a StageEntity
myActor.hpp
#pragma once

#include "nsmb.hpp"

class MyActor: public StageEntity {
public:
    virtual s32 onCreate() override;

    static bool loadResources();

    virtual bool updateMain() override;

    virtual s32 onRender() override;

    virtual s32 onDestroy() override;

    static constexpr u16 objectID = 46;

    static constexpr ObjectInfo objectInfo = {
        0, 0,
        0, 0,
        0, 0,
        0, 0,
        CollisionSwitch::None,
    };

    static constexpr u16 updatePriority = objectID;
    static constexpr u16 renderPriority = objectID;
    static constexpr ActorProfile profile = {&constructObject<MyActor>, updatePriority, renderPriority, loadResources};
};
This file is where you store your instance variables and declare your functions.
Section 2 - State Machines
While not all Actors need to have a state machine, it can often times greatly improve the readability and reliability of your code (state machines are also a strategy Nintendo used when writing actors for the game).
Defining the State Machine
In your .hpp, you need to add the following:
class MyActor: public StageEntity {
    /* ... */

    // Functions for the state machine. Add more as needed.
    void exampleState();
    void anotherExampleState();

    void (*updateFunc)(MyActor*);
	s8 updateStep;

    void switchState(void (MyActor::*updateFunc)());

    /* ... */
}
In your .cpp, here's what you need:
s32 MyActor::onCreate(){
  /* ... */

  // Initalize the current state
  switchState(&MyActor::exampleState);

  /* ... */
}

bool MyActor::updateMain(){
	/* ... */

    // Make sure to call the update function every tick
	updateFunc(this);

	/* ... */
}

bool MyActor::exampleState(){
    if (updateStep == Func::Init) {
        updateStep++;
        return;
    }

    if (updateStep == Func::Exit) {
        return;
    }
}

bool MyActor::anotherExampleState(){
    if (updateStep == Func::Init) {
        updateStep++;
        return;
    }

    if (updateStep == Func::Exit) {
        return;
    }
}

void MyActor::switchState(void (MyActor::*updateFunc)()) {
	auto updateFuncRaw = ptmf_cast(updateFunc);

	if (this->updateFunc != updateFuncRaw) {
		if (this->updateFunc) {
			this->updateStep = Func::Exit;
			this->updateFunc(this);
		}

		this->updateFunc = updateFuncRaw;

		this->updateStep = Func::Init;
		this->updateFunc(this);
	}
}
Using the State Machine
While the code may look intimidating, state machines are very intuitive once you start working with them.
| Function/Variable | Purpose |
updateStep |
This variable keeps track of what update step the current state is in.
1 (or
-1 (or
All other update step values can be used inside a step to create "sub steps" via conditional code. |
switchState() |
This function will swap the current state to the function passed as a parameter. Call this function when you want to change what state you are in. |
TODO: Expand this page with more actor components (for example, colliders)
2D Graphics
Documentation of 2D graphics (anything that uses NCG, NCL and NSC)
Tileset Information
TODO: Verify randomization table somehow. Add more info for palette animations (such as which colours animate & info on slots 7 and 31) and tile animations (such as which tiles animate). Mention unused files? Unused 3D tile IDs? Double-check animation speed. Add info on how ghost house stairs work. Add info from here: https://nsmbhd.net/post/46490/
Bitmap Table
Files stored in BG_ncg/ folder.
Table address in overlay 0: 0x00030EA4
Table address in memory: 0x020C9584
| Slot | Bitmap |
|---|---|
| Tileset 0 (Jyotyu) | d_2d_A_J_jyotyu_ncg.bin |
| Tileset 2 (Sub Nohara) | d_2d_I_S_tikei_nohara_ncg.bin |
| 0: Grassland | d_2d_I_M_tikei_nohara_ncg.bin |
| 1: Castle | d_2d_I_M_tikei_yakata_ncg.bin |
| 2: Desert | d_2d_I_M_tikei_sabaku_ncg.bin |
| 3: Underground (with ice) | d_2d_I_M_tikei_chika_ncg.bin |
| 4: Sky/mushrooms (world 7 style) | d_2d_I_M_tikei_kumo_ncg.bin |
| 5: Underwater | d_2d_W_M_tikei_suichu_ncg.bin |
| 6: Desert | d_2d_I_M_tikei_sabaku_ncg.bin |
| 7: Volcano (brown) | d_2d_W_M_tikei_yougan_ncg.bin |
| 8: Grassland | d_2d_I_M_tikei_nohara_ncg.bin |
| 9: Beach (blue) | d_2d_W_M_tikei_kaigan_ncg.bin |
| 10: Beach (blue) | d_2d_W_M_tikei_kaigan_ncg.bin |
| 11: Forest | d_2d_W_M_tikei_jungle_ncg.bin |
| 12: Grassland | d_2d_I_M_tikei_nohara_ncg.bin |
| 13: Sky/mushrooms (with flowers and bushes) | d_2d_I_M_tikei_kinoko_ncg.bin |
| 14: Sky/mushrooms (with flowers and bushes) | d_2d_I_M_tikei_kinoko_ncg.bin |
| 15: Volcano (black) | d_2d_W_M_tikei_kazan_ncg.bin |
| 16: Volcano (black 2) [Unused] | d_2d_W_M_tikei_kazangake_ncg.bin |
| 17: Snow (with ice) | d_2d_I_M_tikei_setsugen_ncg.bin |
| 18: Snow | d_2d_I_M_tikei_setsugen2_ncg.bin |
| 19: Forest | d_2d_W_M_tikei_jungle_ncg.bin |
| 20: Oasis in Desert | d_2d_W_M_tikei_kaigan3_ncg.bin |
| 21: Bonus Room [Unused] | d_2d_I_M_tikei_mame_ncg.bin |
| 22: Volcano (black 2) [Unused] | d_2d_W_M_tikei_kanzagake_ncg.bin |
| 23: Ghost House | d_2d_S_M_tikei_obakeyasiki_ncg.bin |
| 24: Cliffs | d_2d_W_M_tikei_kazangake2_ncg.bin |
| 25: Cliffs | d_2d_W_M_tikei_kazangake2_ncg.bin |
| 26: Snow (with ice) | d_2d_I_M_tikei_setsugen_ncg.bin |
| 27: Grassland | d_2d_I_M_tikei_nohara_ncg.bin |
| 28: Snow (with ice) | d_2d_I_M_tikei_setsugen_ncg.bin |
| 29: Factory (W7-A) | d_2d_W_M_tikei_dokansoto_ncg.bin |
| 30: Sewer (W2-3) | d_2d_W_M_tikei_dokannaka_ncg.bin |
| 31: Volcano (yellow) | d_2d_W_M_tikei_yougantate_ncg.bin |
| 32: Castle | d_2d_I_M_tikei_yakata_ncg.bin |
| 33: Sky/mushrooms (with flowers and bushes) | d_2d_I_M_tikei_kinoko_ncg.bin |
| 34: Grassland | d_2d_I_M_tikei_nohara_ncg.bin |
| 35: Underground | d_2d_I_M_tikei_chika3_ncg.bin |
| 36: Underground (dark blue) [Unused] | d_2d_I_M_tikei_chika_ncg.bin |
| 37: Dark world (purple) | d_2d_I_M_tikei_koopa_heigen_ncg.bin |
| 38: Dark world (brown) | d_2d_I_M_tikei_koopa_iwa_ncg.bin |
| 39: Tower | d_2d_I_M_tikei_toride_ncg.bin |
| 40: Ghost house exit | d_2d_S_M_tikei_obake_soto_ncg.bin |
| 41: Final Castle | d_2d_I_M_tikei_yakata_ncg.bin |
| 42: Toad house 1 | d_2d_W_M_tikei_kinokoA_ncg.bin |
| 43: Toad house 2 | d_2d_W_M_tikei_kinokoB_ncg.bin |
| 44: Toad house 3 | d_2d_W_M_tikei_kinokoC_ncg.bin |
| 45: Final Castle | d_2d_I_M_tikei_yakata_ncg.bin |
| 46: Toad house 4 | d_2d_I_M_tikei_kinokoD_ncg.bin |
| 47: Bowser Jr battle | d_2d_I_M_tikei_toride_boss_ncg.bin |
| 48: Beach (blue) | d_2d_W_M_tikei_kaigan_ncg.bin |
| 49: Boss battle | d_2d_I_M_tikei_yakata_boss_ncg.bin |
| 50: Sky/mushrooms (with flowers and bushes) | d_2d_I_M_tikei_kinoko_boss_ncg.bin |
| 51: Forest | d_2d_W_M_tikei_jungle_ncg.bin |
| 52: Desert | d_2d_I_M_tikei_sabaku_ncg.bin |
| 53: Desert | d_2d_I_M_tikei_sabaku_ncg.bin |
| 54: Forest | d_2d_W_M_tikei_jungle_ncg.bin |
| 55: Final boss battle | d_2d_I_M_tikei_koopa_boss_ncg.bin |
| 56: Volcano (black) | d_2d_W_M_tikei_kazan_ncg.bin |
| 57: Underwater | d_2d_W_M_tikei_suichu_ncg.bin |
| 58: Light grey castle (W8 Castle 1) | d_2d_I_M_tikei_yakata_nise_ncg.bin |
| 59: Sky/Mushrooms (yellow-ish) | d_2d_I_M_tikei_kumo2_ncg.bin |
| 60: Beach (turquoise, without moss) | d_2d_W_M_tikei_kaigan2_ncg.bin |
| 61: Lakithunder and Monty Tank battles | d_2d_I_M_tikei_yakata_bossW7_ncg.bin |
| 62: Boss battle | d_2d_I_M_tikei_yakata_boss_ncg.bin |
| 63: Mummy-Pokey battle | d_2d_I_M_tikei_sabaku_boss_ncg.bin |
| 64: Oasis in Desert | d_2d_W_M_tikei_kaigan3_ncg.bin |
| 65: Desert | d_2d_I_M_tikei_sabaku_ncg.bin |
| 66: Oasis in Desert | d_2d_W_M_tikei_kaigan3_ncg.bin |
| 67: Bonus room [Unused] | d_2d_I_M_tikei_mame_ncg.bin |
| 68: Bonus room [Unused] | d_2d_I_M_tikei_mame_ncg.bin |
| 69: Bonus room [Unused] | d_2d_I_M_tikei_mame_ncg.bin |
| 70: Bonus room [Unused] | d_2d_I_M_tikei_mame_ncg.bin |
| 71: Bonus room [Unused] | d_2d_I_M_tikei_mame_ncg.bin |
| 72: Bonus room [Unused] | d_2d_I_M_tikei_mame_ncg.bin |
| 73: Underground (gold) [Unused] | d_2d_I_M_tikei_chika4_ncg.bin |
| 74: Bonus room | d_2d_I_M_tikei_mame_bonus_ncg.bin |
| 75: Grassland | d_2d_I_M_tikei_nohara_ncg.bin |
Animations Table
Files stored in BG_ncg/ folder.
| Slot | Animations |
|---|---|
| Tileset 0 (Jyotyu) | d_2d_TEN_A_J_jyotyu_ncg.bin |
| Tileset 2 (Sub Nohara) | None |
| 0: Grassland | None |
| 1: Castle | d_2d_TEN_I_yakata_ncg.bin |
| 2: Desert | None |
| 3: Underground (with ice) | None |
| 4: Sky/mushrooms (world 7 style) | None |
| 5: Underwater | None |
| 6: Desert | None |
| 7: Volcano (brown) | None |
| 8: Grassland | None |
| 9: Beach (blue) | None |
| 10: Beach (blue) | None |
| 11: Forest | None |
| 12: Grassland | None |
| 13: Sky/mushrooms (with flowers and bushes) | None |
| 14: Sky/mushrooms (with flowers and bushes) | None |
| 15: Volcano (black) | None |
| 16: Volcano (black 2) [Unused] | None |
| 17: Snow (with ice) | None |
| 18: Snow | None |
| 19: Forest | None |
| 20: Oasis in Desert | None |
| 21: Bonus Room [Unused] | None |
| 22: Volcano (black 2) [Unused] | None |
| 23: Ghost House | d_2d_TEN_S_obakeyasiki_ncg.bin |
| 24: Cliffs | None |
| 25: Cliffs | None |
| 26: Snow (with ice) | None |
| 27: Grassland | None |
| 28: Snow (with ice) | None |
| 29: Factory (W7-A) | None |
| 30: Sewer (W2-3) | None |
| 31: Volcano (yellow) | None |
| 32: Castle | None |
| 33: Sky/mushrooms (with flowers and bushes) | None |
| 34: Grassland | None |
| 35: Underground | None |
| 36: Underground (dark blue) [Unused] | None |
| 37: Dark world (purple) | None |
| 38: Dark world (brown) | None |
| 39: Tower | d_2d_TEN_I_toride_ncg.bin |
| 40: Ghost house exit | None |
| 41: Final Castle | None |
| 42: Toad house 1 | None |
| 43: Toad house 2 | None |
| 44: Toad house 3 | None |
| 45: Final Castle | None |
| 46: Toad house 4 | None |
| 47: Bowser Jr battle | None |
| 48: Beach (blue) | None |
| 49: Boss battle | None |
| 50: Sky/mushrooms (with flowers and bushes) | None |
| 51: Forest | None |
| 52: Desert | None |
| 53: Desert | None |
| 54: Forest | None |
| 55: Final boss battle | None |
| 56: Volcano (black) | None |
| 57: Underwater | None |
| 58: Light grey castle (W8 Castle 1) | None |
| 59: Sky/Mushrooms (yellow-ish) | None |
| 60: Beach (turquoise, without moss) | None |
| 61: Lakithunder and Monty Tank battles | None |
| 62: Boss battle | None |
| 63: Mummy-Pokey battle | None |
| 64: Oasis in Desert | None |
| 65: Desert | None |
| 66: Oasis in Desert | None |
| 67: Bonus room [Unused] | None |
| 68: Bonus room [Unused] | None |
| 69: Bonus room [Unused] | None |
| 70: Bonus room [Unused] | None |
| 71: Bonus room [Unused] | None |
| 72: Bonus room [Unused] | None |
| 73: Underground (gold) [Unused] | None |
| 74: Bonus room | None |
| 75: Grassland | None |
Animated Tiles
Slot 1: Castle
| Tile Number | Animation | Tiles | Frames | Animates Every... | Animation Type |
|---|---|---|---|---|---|
| 200, 201, 232, 233 | Lava | 4 | 6 | 7 Frames | Loop |
| 85, 86, 300, 301 | Rightward conveyor tile | 1 | 8 | 2 Frames | Loop |
| 87, 88, 302, 303 | Rightward conveyor tile | 1 | 8 | 1 Frame | Loop |
| 117, 118, 268, 269 | Leftward conveyor tile | 1 | 8 | 2 Frames | Loop |
| 119, 120, 302, 303 | Leftward conveyor tile | 1 | 8 | 1 Frame | Loop |
| 388, 389, 420, 421 | Conveyor left edge | 4 | 8 | 2 Frames | Loop |
| 392, 393, 424, 425 | Conveyor left edge | 4 | 8 | 2 Frames | Loop (reverse order) |
| 396, 397, 428, 429 | Conveyor left edge | 4 | 8 | 1 Frame | Loop |
| 400, 401, 432, 433 | Conveyor left edge | 4 | 8 | 1 Frame | Loop (reverse order) |
| 390, 391, 422, 423 | Conveyor right edge | 4 | 8 | 2 Frames | Loop |
| 394, 395, 426, 427 | Conveyor right edge | 4 | 8 | 2 Frames | Loop (reverse order) |
| 398, 399, 430, 431 | Conveyor right edge | 4 | 8 | 1 Frame | Loop |
| 402, 403, 434, 435 | Conveyor right edge | 4 | 8 | 1 Frame | Loop (reverse order) |
Slot 23: Ghost House
| Tile Number | Animation | Tiles | Frames | Animates Every... | Animation Type |
|---|---|---|---|---|---|
| 283, 284, 315, 316 | Collapsing stairs | 4 | 4 | TBA | Event activated (event ID 16). Frame 4 is held when not triggered. Plays in reverse order when triggered and holds on frame 1 while event is active. Plays and holds on frame 4 when event ends. |
| 347, 348, 379, 380 | Collapsing stairs | 4 | 4 | TBA | Event activated (event ID 15). Frame 4 is held when not triggered. Plays in reverse order when triggered and holds on frame 1 while event is active. Plays and holds on frame 4 when event ends. |
| 411, 412, 443, 444 | Collapsing stairs | 4 | 4 | TBA | Event activated (event ID 14). Frame 4 is held when not triggered. Plays in reverse order when triggered and holds on frame 1 while event is active. Plays and holds on frame 4 when event ends. |
Slot 39: Tower
| Tile Number | Animation | Tiles | Frames | Animates Every... | Animation Type |
|---|---|---|---|---|---|
| 85, 86, 300, 301 | Rightward conveyor tile | 1 | 8 | 2 Frames | Loop |
| 87, 88, 302, 303 | Rightward conveyor tile | 1 | 8 | 1 Frame | Loop |
| 117, 118, 268, 269 | Leftward conveyor tile | 1 | 8 | 2 Frames | Loop |
| 119, 120, 302, 303 | Leftward conveyor tile | 1 | 8 | 1 Frame | Loop |
| 388, 389, 420, 421 | Conveyor left edge | 4 | 8 | 2 Frames | Loop |
| 392, 393, 424, 425 | Conveyor left edge | 4 | 8 | 2 Frames | Loop (reverse order) |
| 396, 397, 428, 429 | Conveyor left edge | 4 | 8 | 1 Frame | Loop |
| 400, 401, 432, 433 | Conveyor left edge | 4 | 8 | 1 Frame | Loop (reverse order) |
| 390, 391, 422, 423 | Conveyor right edge | 4 | 8 | 2 Frames | Loop |
| 394, 395, 426, 427 | Conveyor right edge | 4 | 8 | 2 Frames | Loop (reverse order) |
| 398, 399, 430, 431 | Conveyor right edge | 4 | 8 | 1 Frame | Loop |
| 402, 403, 434, 435 | Conveyor right edge | 4 | 8 | 1 Frame | Loop (reverse order) |
Palette Table
Files stored in BG_ncl/ folder.
Table address in overlay 0: 0x00031494
Table address in memory: 0x020C9B74
| Slot | Palette |
|---|---|
| Tileset 0 (Jyotyu) | d_2d_A_J_jyotyu_B_ncl.bin d_2d_A_J_jyotyu_F_ncl.bin d_2d_A_J_jyotyu_ncl.bin d_2d_A_J_jyotyu_R_ncl.bin d_2d_A_J_jyotyu_W_ncl.bin |
| Tileset 2 (Sub Nohara) | d_2d_I_S_tikei_nohara_ncl.bin |
| 0: Grassland | d_2d_I_M_tikei_nohara_ncl.bin |
| 1: Castle | d_2d_I_M_tikei_yakata_ncl.bin |
| 2: Desert | d_2d_I_M_tikei_sabaku_ncl.bin |
| 3: Underground (with ice) | d_2d_I_M_tikei_cika_ncl.bin |
| 4: Sky/mushrooms (world 7 style) | d_2d_I_M_tikei_kumo_ncl.bin |
| 5: Underwater | d_2d_W_M_tikei_suichu_ncl.bin |
| 6: Desert | d_2d_I_M_tikei_sabaku_ncl.bin |
| 7: Volcano (brown) | d_2d_W_M_tikei_yougan_ncl.bin |
| 8: Grassland | d_2d_I_M_tikei_nohara_ncl.bin |
| 9: Beach (blue) | d_2d_W_M_tikei_kaigan_ncl.bin |
| 10: Beach (blue) | d_2d_W_M_tikei_kaigan_ncl.bin |
| 11: Forest | d_2d_W_M_tikei_jungle_ncl.bin |
| 12: Grassland | d_2d_I_M_tikei_nohara_ncl.bin |
| 13: Sky/mushrooms (with flowers and bushes) | d_2d_I_M_tikei_kinoko_ncl.bin |
| 14: Sky/mushrooms (with flowers and bushes) | d_2d_I_M_tikei_kinoko_ncl.bin |
| 15: Volcano (black) | d_2d_W_M_tikei_kazan_ncl.bin |
| 16: Volcano (black 2) [Unused] | d_2d_W_M_tikei_kazangake_ncl.bin |
| 17: Snow (with ice) | d_2d_I_M_tikei_setsugen_ncl.bin |
| 18: Snow | d_2d_I_M_tikei_setsugen2_ncl.bin |
| 19: Forest | d_2d_W_M_tikei_jungle_ncl.bin |
| 20: Oasis in Desert | d_2d_W_M_tikei_kaigan3_ncl.bin |
| 21: Bonus Room [Unused] | d_2d_I_M_tikei_mame_ncl.bin |
| 22: Volcano (black 2) [Unused] | d_2d_W_M_tikei_kanzagake_ncl.bin |
| 23: Ghost House | d_2d_S_M_tikei_obakeyasiki_ncl.bin |
| 24: Cliffs | d_2d_W_M_tikei_kazangake2_ncl.bin |
| 25: Cliffs | d_2d_W_M_tikei_kazangake2_ncl.bin |
| 26: Snow (with ice) | d_2d_I_M_tikei_setsugen_ncl.bin |
| 27: Grassland | d_2d_I_M_tikei_nohara_ncl.bin |
| 28: Snow (with ice) | d_2d_I_M_tikei_setsugen_ncl.bin |
| 29: Factory (W7-A) | d_2d_W_M_tikei_dokansoto_ncl.bin |
| 30: Sewer (W2-3) | d_2d_W_M_tikei_dokannaka_ncl.bin |
| 31: Volcano (yellow) | d_2d_W_M_tikei_yougantate_ncl.bin |
| 32: Castle | d_2d_I_M_tikei_yakata_ncl.bin |
| 33: Sky/mushrooms (with flowers and bushes) | d_2d_I_M_tikei_kinoko_ncl.bin |
| 34: Grassland | d_2d_I_M_tikei_nohara_ncl.bin |
| 35: Underground | d_2d_I_M_tikei_chika3_ncl.bin |
| 36: Underground (dark blue) [Unused] | d_2d_I_M_tikei_chika_ncl.bin |
| 37: Dark world (purple) | d_2d_I_M_tikei_koopa_heigen_ncl.bin |
| 38: Dark world (brown) | d_2d_I_M_tikei_koopa_iwa_ncl.bin |
| 39: Tower | d_2d_I_M_tikei_toride_ncl.bin |
| 40: Ghost house exit | d_2d_S_M_tikei_obake_soto_ncl.bin |
| 41: Final Castle | d_2d_I_M_tikei_yakata_ncl.bin |
| 42: Toad house 1 | d_2d_W_M_tikei_kinokoA_ncl.bin |
| 43: Toad house 2 | d_2d_W_M_tikei_kinokoB_ncl.bin |
| 44: Toad house 3 | d_2d_W_M_tikei_kinokoC_ncl.bin |
| 45: Final Castle | d_2d_I_M_tikei_yakata_ncl.bin |
| 46: Toad house 4 | d_2d_I_M_tikei_kinokoD_ncl.bin |
| 47: Bowser Jr battle | d_2d_I_M_tikei_toride_boss_ncl.bin |
| 48: Beach (blue) | d_2d_W_M_tikei_kaigan_ncl.bin |
| 49: Boss battle | d_2d_I_M_tikei_yakata_boss_ncl.bin |
| 50: Sky/mushrooms (with flowers and bushes) | d_2d_I_M_tikei_kinoko_boss_ncl.bin |
| 51: Forest | d_2d_W_M_tikei_jungle_ncl.bin |
| 52: Desert | d_2d_I_M_tikei_sabaku_ncl.bin |
| 53: Desert | d_2d_I_M_tikei_sabaku_ncl.bin |
| 54: Forest | d_2d_W_M_tikei_jungle_ncl.bin |
| 55: Final boss battle | d_2d_I_M_tikei_koopa_boss_ncl.bin |
| 56: Volcano (black) | d_2d_W_M_tikei_kazan_ncl.bin |
| 57: Underwater | d_2d_W_M_tikei_suichu_ncl.bin |
| 58: Light grey castle (W8 Castle 1) | d_2d_I_M_tikei_yakata_nise_ncl.bin |
| 59: Sky/Mushrooms (yellow-ish) | d_2d_I_M_tikei_kumo2_ncl.bin |
| 60: Beach (turquoise, without moss) | d_2d_W_M_tikei_kaigan2_ncl.bin |
| 61: Lakithunder and Monty Tank battles | d_2d_I_M_tikei_yakata_bossW7_ncl.bin |
| 62: Boss battle | d_2d_I_M_tikei_yakata_boss_ncl.bin |
| 63: Mummy-Pokey battle | d_2d_I_M_tikei_sabaku_boss_ncl.bin |
| 64: Oasis in Desert | d_2d_W_M_tikei_kaigan3_ncl.bin |
| 65: Desert | d_2d_I_M_tikei_sabaku_ncl.bin |
| 66: Oasis in Desert | d_2d_W_M_tikei_kaigan3_ncl.bin |
| 67: Bonus room [Unused] | d_2d_I_M_tikei_mame_ncl.bin |
| 68: Bonus room [Unused] | d_2d_I_M_tikei_mame_ncl.bin |
| 69: Bonus room [Unused] | d_2d_I_M_tikei_mame_ncl.bin |
| 70: Bonus room [Unused] | d_2d_I_M_tikei_mame_ncl.bin |
| 71: Bonus room [Unused] | d_2d_I_M_tikei_mame_ncl.bin |
| 72: Bonus room [Unused] | d_2d_I_M_tikei_mame_ncl.bin |
| 73: Underground (gold) [Unused] | d_2d_I_M_tikei_chika4_ncl.bin |
| 74: Bonus room | d_2d_I_M_tikei_mame_bonus_ncl.bin |
| 75: Grassland | d_2d_I_M_tikei_nohara_ncl.bin |
Palette Animations Table
Files stored in BG_ncl/ folder.
Table address for files in overlay 0: 0x00030CC0
Table address for files in memory: 0x020C93A0
Table address for tileset slots in overlay 0: 0x00030A38
Table address for tileset slots in memory: 0x020C9118
Do note that tileset slot table above only controls which tilesets load the files for the animations — it does not determine which slots play the animations.
| Slot | Palette |
|---|---|
| 3: Underground (with ice) | d_2d_Bg2_TEN_I_setsugen_ncl.bin |
| 17: Snow (with ice) | d_2d_Bg2_TEN_I_setsugen_ncl.bin |
Object Definitions Table
Files stored in BG_unt/ folder.
Table address for unt files in overlay 0: 0x0002FA14
Table address for unt files in memory: 0x020C80F4
Table address for unt_hd files in overlay 0: 0x0002F8E4
Table address for unt_hd files in memory: 0x020C7FC4
| Slot | Object Definitions |
|---|---|
| Tileset 0 (Jyotyu) | A_J_jyotyu.bin A_J_jyotyu_hd.bin |
| Tileset 2 (Sub Nohara) | I_S_nohara.bin I_S_nohara_hd.bin |
| 0: Grassland | I_M_nohara.bin I_M_nohara_hd.bin |
| 1: Castle | I_M_yakata.bin I_M_yakata_hd.bin |
| 2: Desert | I_M_sabaku.bin I_M_sabaku_hd.bin |
| 3: Underground (with ice) | I_M_chika.bin I_M_chika_hd.bin |
| 4: Sky/mushrooms (world 7 style) | I_M_kumo.bin I_M_kumo_hd.bin |
| 5: Underwater | W_M_suichu.bin W_M_suichu_hd.bin |
| 6: Desert | I_M_sabaku I_M_sabaku_hd.bin |
| 7: Volcano (brown) | W_M_yougan.bin W_M_yougan_hd.bin |
| 8: Grassland | I_M_nohara.bin I_M_nohara_hd.bin |
| 9: Beach (blue) | W_M_kaigan.bin W_M_kaigan_hd.bin |
| 10: Beach (blue) | W_M_kaigan.bin W_M_kaigan_hd.bin |
| 11: Forest | W_M_jungle.bin W_M_jungle_hd.bin |
| 12: Grassland | I_M_nohara2.bin I_M_nohara2_hd.bin |
| 13: Sky/mushrooms (with flowers and bushes) | I_M_kinoko.bin I_M_kinoko_hd.bin |
| 14: Sky/mushrooms (with flowers and bushes) | I_M_kinoko.bin I_M_kinoko_hd.bin |
| 15: Volcano (black) | W_M_kazan.bin W_M_kazan_hd.bin |
| 16: Volcano (black 2) [Unused] | W_M_kazangake.bin W_M_kazangake_hd.bin |
| 17: Snow (with ice) | I_M_setsugen.bin I_M_setsugen_hd.bin |
| 18: Snow | I_M_setsugen2.bin I_M_setsugen2_hd.bin |
| 19: Forest | W_M_jungle.bin W_M_jungle_hd.bin |
| 20: Oasis in Desert | W_M_kaigan3.bin W_M_kaigan3_hd.bin |
| 21: Bonus Room [Unused] | I_M_mame.bin I_M_mame_hd.bin |
| 22: Volcano (black 2) [Unused] | W_M_kazangake.bin W_M_kazangake_hd.bin |
| 23: Ghost House | S_M_obakeyasiki.bin S_M_obakeyasiki_hd.bin |
| 24: Cliffs | W_M_kazangake2.bin W_M_kazangake2_hd.bin |
| 25: Cliffs | W_M_kazangake2.bin W_M_kazangake2_hd.bin |
| 26: Snow (with ice) | I_M_setsugen.bin I_M_setsugen_hd.bin |
| 27: Grassland | I_M_yakata.bin I_M_yakata_hd.bin |
| 28: Snow (with ice) | I_M_setsugen.bin I_M_setsugen_hd.bin |
| 29: Factory (W7-A) | W_M_dokansoto.bin W_M_dokansoto_hd.bin |
| 30: Sewer (W2-3) | W_M_dokannaka.bin W_M_dokannaka_hd.bin |
| 31: Volcano (yellow) | W_M_yougantate.bin W_M_yougantate_hd.bin |
| 32: Castle | I_M_yakata.bin I_M_yakata_hd.bin |
| 33: Sky/mushrooms (with flowers and bushes) | I_M_kinoko.bin I_M_kinoko_hd.bin |
| 34: Grassland | I_M_nohara.bin I_M_nohara_hd.bin |
| 35: Underground | I_M_chika3.bin I_M_chika3_hd.bin |
| 36: Underground (dark blue) [Unused] | I_M_chika2.bin I_M_chika2_hd.bin |
| 37: Dark world (purple) | I_M_koopa_heigen.bin I_M_koopa_heigen_hd.bin |
| 38: Dark world (brown) | I_M_koopa_iwa.bin I_M_koopa_iwa_hd.bin |
| 39: Tower | I_M_toride.bin I_M_toride_hd.bin |
| 40: Ghost house exit | I_M_obake_soto.bin I_M_obake_soto_hd.bin |
| 41: Final Castle | I_M_yakata.bin I_M_yakata_hd.bin |
| 42: Toad house 1 | W_M_kinokoA.bin W_M_kinokoA_hd.bin |
| 43: Toad house 2 | W_M_kinokoB.bin W_M_kinokoB_hd.bin |
| 44: Toad house 3 | W_M_kinokoC.bin W_M_kinokoC_hd.bin |
| 45: Final Castle | I_M_yakata2.bin I_M_yakata2_hd.bin |
| 46: Toad house 4 | W_M_kinokoD.bin W_M_kinokoD_hd.bin |
| 47: Bowser Jr battle | I_M_toride_boss.bin I_M_toride_boss_hd.bin |
| 48: Beach (blue) | W_M_kaigan.bin W_M_kaigan_hd.bin |
| 49: Boss battle | I_M_yakata_boss.bin I_M_yakata_boss_hd.bin |
| 50: Sky/mushrooms (with flowers and bushes) | I_M_kinoko.bin I_M_kinoko_hd.bin |
| 51: Forest | W_M_jungle.bin W_M_jungle_hd.bin |
| 52: Desert | I_M_sabaku.bin I_M_sabaku_hd.bin |
| 53: Desert | I_M_sabaku.bin I_M_sabaku_hd.bin |
| 54: Forest | W_M_jungle.bin W_M_jungle_hd.bin |
| 55: Final boss battle | I_M_koopa_boss.bin I_M_koopa_boss_hd.bin |
| 56: Volcano (black) | W_M_kazan.bin W_M_kazan_hd.bin |
| 57: Underwater | W_M_suichu.bin W_M_suichu_hd.bin |
| 58: Light grey castle (W8 Castle 1) | I_M_yakata_nise.bin I_M_yakata_nise_hd.bin |
| 59: Sky/Mushrooms (yellow-ish) | I_M_kumo.bin I_M_kumo2_hd.bin |
| 60: Beach (turquoise, without moss) | W_M_kaigan2.bin W_M_kaigan2_hd.bin |
| 61: Lakithunder and Monty Tank battles | I_M_yakata_bossW7.bin I_M_yakata_bossW7_hd.bin |
| 62: Boss battle | I_M_yakata_boss.bin I_M_yakata_boss_hd.bin |
| 63: Mummy-Pokey battle | I_M_sabaku_boss.bin I_M_sabaku_boss_hd.bin |
| 64: Oasis in Desert | W_M_kaigan3.bin W_M_kaigan3_hd.bin |
| 65: Desert | I_M_sabaku2.bin I_M_sabaku2_hd.bin |
| 66: Oasis in Desert | W_M_kaigan3.bin W_M_kaigan3_hd.bin |
| 67: Bonus room [Unused] | I_M_mame.bin I_M_mame_hd.bin |
| 68: Bonus room [Unused] | I_M_mame.bin I_M_mame_hd.bin |
| 69: Bonus room [Unused] | I_M_mame.bin I_M_mame_hd.bin |
| 70: Bonus room [Unused] | I_M_mame.bin I_M_mame_hd.bin |
| 71: Bonus room [Unused] | I_M_mame.bin I_M_mame_hd.bin |
| 72: Bonus room [Unused] | I_M_mame.bin I_M_mame_hd.bin |
| 73: Underground (gold) [Unused] | I_M_chika4.bin I_M_chika4_hd.bin |
| 74: Bonus room | I_M_mame_bonus.bin I_M_mame_bonus_hd.bin |
| 75: Grassland | I_M_nohara.bin I_M_nohara_hd.bin |
Map16 Table
Files stored in BG_pnl/ folder.
Table address in overlay 0: 0x000316F4
Table address in memory: 0x020C9DD4
| Slot | Map16 |
|---|---|
| Tileset 0 (Jyotyu) | d_2d_PA_A_J_jyotyu.bin |
| Tileset 2 (Sub Nohara) | d_2d_PA_I_S_nohara.bin |
| 0: Grassland | d_2d_PA_I_M_nohara.bin |
| 1: Castle | d_2d_PA_I_M_yakata.bin |
| 2: Desert | d_2d_PA_I_M_sabaku.bin |
| 3: Underground (with ice) | d_2d_PA_I_M_chika.bin |
| 4: Sky/mushrooms (world 7 style) | d_2d_PA_I_M_kumo.bin |
| 5: Underwater | d_2d_PA_W_M_suichu.bin |
| 6: Desert | d_2d_PA_I_M_sabaku.bin |
| 7: Volcano (brown) | d_2d_PA_W_M_yougan.bin |
| 8: Grassland | d_2d_PA_I_M_nohara.bin |
| 9: Beach (blue) | d_2d_PA_W_M_kaigan.bin |
| 10: Beach (blue) | d_2d_PA_W_M_kaigan.bin |
| 11: Forest | d_2d_PA_W_M_jungle.bin |
| 12: Grassland | d_2d_PA_I_M_nohara2.bin |
| 13: Sky/mushrooms (with flowers and bushes) | d_2d_PA_I_M_kinoko.bin |
| 14: Sky/mushrooms (with flowers and bushes) | d_2d_PA_I_M_kinoko.bin |
| 15: Volcano (black) | d_2d_PA_W_M_kazan.bin |
| 16: Volcano (black 2) [Unused] | d_2d_PA_W_M_kazangake.bin |
| 17: Snow (with ice) | d_2d_PA_I_M_setsugen.bin |
| 18: Snow | d_2d_PA_I_M_setsugen2.bin |
| 19: Forest | d_2d_PA_W_M_jungle.bin |
| 20: Oasis in Desert | d_2d_PA_W_M_kaigan3.bin |
| 21: Bonus Room [Unused] | d_2d_PA_I_M_mame.bin |
| 22: Volcano (black 2) [Unused] | d_2d_PA_W_M_kazangake.bin |
| 23: Ghost House | d_2d_PA_S_M_obakeyasiki.bin |
| 24: Cliffs | d_2d_PA_W_M_kazangake2.bin |
| 25: Cliffs | d_2d_PA_W_M_kazangake2.bin |
| 26: Snow (with ice) | d_2d_PA_I_M_setsugen.bin |
| 27: Grassland | d_2d_PA_I_M_nohara.bin |
| 28: Snow (with ice) | d_2d_PA_I_M_setsugen.bin |
| 29: Factory (W7-A) | d_2d_PA_W_M_dokansoto.bin |
| 30: Sewer (W2-3) | d_2d_PA_W_M_dokannaka.bin |
| 31: Volcano (yellow) | d_2d_PA_W_M_yougantate.bin |
| 32: Castle | d_2d_PA_I_M_yakata.bin |
| 33: Sky/mushrooms (with flowers and bushes) | d_2d_PA_I_M_kinoko.bin |
| 34: Grassland | d_2d_PA_I_M_nohara.bin |
| 35: Underground | d_2d_PA_I_M_chika3.bin |
| 36: Underground (dark blue) [Unused] | d_2d_PA_I_M_chika2.bin |
| 37: Dark world (purple) | d_2d_PA_I_M_koopa_heigen.bin |
| 38: Dark world (brown) | d_2d_PA_I_M_koopa_iwa.bin |
| 39: Tower | d_2d_PA_I_M_toride.bin |
| 40: Ghost house exit | d_2d_PA_S_M_obake_soto.bin |
| 41: Final Castle | d_2d_PA_I_M_yakata.bin |
| 42: Toad house 1 | d_2d_PA_W_M_kinokoA.bin |
| 43: Toad house 2 | d_2d_PA_W_M_kinokoB.bin |
| 44: Toad house 3 | d_2d_PA_W_M_kinokoC.bin |
| 45: Final Castle | d_2d_PA_I_M_yakata.bin |
| 46: Toad house 4 | d_2d_PA_W_M_kinokoD.bin |
| 47: Bowser Jr battle | d_2d_PA_I_M_toride_boss.bin |
| 48: Beach (blue) | d_2d_PA_W_M_kaigan.bin |
| 49: Boss battle | d_2d_PA_I_M_yakata_boss.bin |
| 50: Sky/mushrooms (with flowers and bushes) | d_2d_PA_I_M_kinoko.bin |
| 51: Forest | d_2d_PA_W_M_jungle.bin |
| 52: Desert | d_2d_PA_I_M_sabaku.bin |
| 53: Desert | d_2d_PA_I_M_sabaku.bin |
| 54: Forest | d_2d_PA_W_M_jungle.bin |
| 55: Final boss battle | d_2d_PA_I_M_koopa_boss.bin |
| 56: Volcano (black) | d_2d_PA_W_M_kazan.bin |
| 57: Underwater | d_2d_PA_W_M_suichu.bin |
| 58: Light grey castle (W8 Castle 1) | d_2d_PA_I_M_yakata_nise.bin |
| 59: Sky/Mushrooms (yellow-ish) | d_2d_PA_I_M_kumo2.bin |
| 60: Beach (turquoise, without moss) | d_2d_PA_W_M_kaigan2.bin |
| 61: Lakithunder and Monty Tank battles | d_2d_PA_I_M_yakata_bossW7.bin |
| 62: Boss battle | d_2d_PA_I_M_yakata_boss.bin |
| 63: Mummy-Pokey battle | d_2d_PA_I_M_sabaku_boss.bin |
| 64: Oasis in Desert | d_2d_PA_W_M_kaigan3.bin |
| 65: Desert | d_2d_PA_I_M_sabaku.bin |
| 66: Oasis in Desert | d_2d_PA_W_M_kaigan3.bin |
| 67: Bonus room [Unused] | d_2d_PA_I_M_mame.bin |
| 68: Bonus room [Unused] | d_2d_PA_I_M_mame.bin |
| 69: Bonus room [Unused] | d_2d_PA_I_M_mame.bin |
| 70: Bonus room [Unused] | d_2d_PA_I_M_mame.bin |
| 71: Bonus room [Unused] | d_2d_PA_I_M_mame.bin |
| 72: Bonus room [Unused] | d_2d_PA_I_M_mame.bin |
| 73: Underground (gold) [Unused] | d_2d_PA_I_M_chika4.bin |
| 74: Bonus room | d_2d_PA_I_M_mame_bonus.bin |
| 75: Grassland | d_2d_PA_I_M_nohara.bin |
Tile Behaviors Table
Files stored in BG_chk/ folder.
Table address in overlay 0: 0x0002FB44
Table address in memory: 0x020C8224
| Slot | Tile Behaviors |
|---|---|
| Tileset 0 (Jyotyu) | Overlay 0 (0x2FDA4–0x301A3) |
| Tileset 2 (Sub Nohara) | NoHaRaSubUnitChangeData.bin |
| 0: Grassland | NoHaRaMainUnitChangeData.bin |
| 1: Castle | YaKaTaMainUnitChangeData.bin |
| 2: Desert | SaBaKuMainUnitChangeData.bin |
| 3: Underground (with ice) | ChiKaMainUnitChangeData.bin |
| 4: Sky/mushrooms (world 7 style) | KuMoMainUnitChangeData.bin |
| 5: Underwater | SuIChuMainUnitChangeData.bin |
| 6: Desert | SaBaKuMainUnitChangeData.bin |
| 7: Volcano (brown) | YoUGaNMainUnitChangeData.bin |
| 8: Grassland | NoHaRaMainUnitChangeData.bin |
| 9: Beach (blue) | KaIGaNMainUnitChangeData.bin |
| 10: Beach (blue) | KaIGaNMainUnitChangeData.bin |
| 11: Forest | JungleMainUnitChangeData.bin |
| 12: Grassland | NoHaRaMainUnitChangeData.bin |
| 13: Sky/mushrooms (with flowers and bushes) | KiNoKoMainUnitChangeData.bin |
| 14: Sky/mushrooms (with flowers and bushes) | KiNoKoMainUnitChangeData.bin |
| 15: Volcano (black) | KaZaNMainUnitChangeData.bin |
| 16: Volcano (black 2) [Unused] | KaZaNGaKeMainUnitChangeData.bin |
| 17: Snow (with ice) | SeTsuGeNMainUnitChangeData.bin |
| 18: Snow | SeTsuGeN2MainUnitChangeData.bin |
| 19: Forest | JungleMainUnitChangeData.bin |
| 20: Oasis in Desert | KaIGaN3MainUnitChangeData.bin |
| 21: Bonus Room [Unused] | MaMeMainUnitChangeData.bin |
| 22: Volcano (black 2) [Unused] | KaZaNGaKeMainUnitChangeData.bin |
| 23: Ghost House | OBaKeYaSiKiMainUnitChangeData.bin |
| 24: Cliffs | KaZaNGaKe2MainUnitChangeData.bin |
| 25: Cliffs | KaZaNGaKe2MainUnitChangeData.bin |
| 26: Snow (with ice) | SeTsuGeNMainUnitChangeData.bin |
| 27: Grassland | NoHaRaMainUnitChangeData.bin |
| 28: Snow (with ice) | SeTsuGeNMainUnitChangeData.bin |
| 29: Factory (W7-A) | DoKaNSoToMainUnitChangeData.bin |
| 30: Sewer (W2-3) | DoKaNNaKaMainUnitChangeData.bin |
| 31: Volcano (yellow) | YoUGaNTaTeMainUnitChangeData.bin |
| 32: Castle | YaKaTaMainUnitChangeData.bin |
| 33: Sky/mushrooms (with flowers and bushes) | KiNoKoMainUnitChangeData.bin |
| 34: Grassland | NoHaRaMainUnitChangeData.bin |
| 35: Underground | ChiKa3MainUnitChangeData.bin |
| 36: Underground (dark blue) [Unused] | ChiKa2MainUnitChangeData.bin |
| 37: Dark world (purple) | KoopaHeIGeNMainUnitChangeData.bin |
| 38: Dark world (brown) | KoopaIwaMainUnitChangeData.bin |
| 39: Tower | ToRiDeMainUnitChangeData.bin |
| 40: Ghost house exit | OBaKe_SoToMainUnitChangeData.bin |
| 41: Final Castle | YaKaTaMainUnitChangeData.bin |
| 42: Toad house 1 | kinokoAMainUnitChangeData.bin |
| 43: Toad house 2 | kinokoBMainUnitChangeData.bin |
| 44: Toad house 3 | kinokoCMainUnitChangeData.bin |
| 45: Final Castle | YaKaTaMainUnitChangeData.bin |
| 46: Toad house 4 | kinokoDMainUnitChangeData.bin |
| 47: Bowser Jr battle | ToRiDeBossMainUnitChangeData.bin |
| 48: Beach (blue) | KaIGaNMainUnitChangeData.bin |
| 49: Boss battle | YaKaTaBossMainUnitChangeData.bin |
| 50: Sky/mushrooms (with flowers and bushes) | KiNoKoMainUnitChangeData.bin |
| 51: Forest | JungleMainUnitChangeData.bin |
| 52: Desert | SaBaKuMainUnitChangeData.bin |
| 53: Desert | SaBaKuMainUnitChangeData.bin |
| 54: Forest | JungleMainUnitChangeData.bin |
| 55: Final boss battle | KoopaBossMainUnitChangeData.bin |
| 56: Volcano (black) | KaZaNMainUnitChangeData.bin |
| 57: Underwater | SuIChuMainUnitChangeData.bin |
| 58: Light grey castle (W8 Castle 1) | YaKaTaNiSeMainUnitChangeData.bin |
| 59: Sky/Mushrooms (yellow-ish) | KuMo2MainUnitChangeData.bin |
| 60: Beach (turquoise, without moss) | KaIGaN2MainUnitChangeData.bin |
| 61: Lakithunder and Monty Tank battles | YaKaTaBossW7MainUnitChangeData.bin |
| 62: Boss battle | YaKaTaBossMainUnitChangeData.bin |
| 63: Mummy-Pokey battle | SaBaKuBossMainUnitChangeData.bin |
| 64: Oasis in Desert | KaIGaN3MainUnitChangeData.bin |
| 65: Desert | SaBaKuMainUnitChangeData.bin |
| 66: Oasis in Desert | KaIGaN3MainUnitChangeData.bin |
| 67: Bonus room [Unused] | MaMeMainUnitChangeData.bin |
| 68: Bonus room [Unused] | MaMeMainUnitChangeData.bin |
| 69: Bonus room [Unused] | MaMeMainUnitChangeData.bin |
| 70: Bonus room [Unused] | MaMeMainUnitChangeData.bin |
| 71: Bonus room [Unused] | MaMeMainUnitChangeData.bin |
| 72: Bonus room [Unused] | MaMeMainUnitChangeData.bin |
| 73: Underground (gold) [Unused] | ChiKa4MainUnitChangeData.bin |
| 74: Bonus room | MaMeBonusMainUnitChangeData.bin |
| 75: Grassland | NoHaRaMainUnitChangeData.bin |
Mario vs Luigi File Table
| Slot | Archive | Bitmap | Animations | Palette | Object Definitions | Map16 | Tile Behaviors |
|---|---|---|---|---|---|---|---|
| 1: Castle | Dat_Fort.narc | d_2d_I_M_tikei_yakata_ncg.bin | d_2d_TEN_I_tikei_yakata_ncg.bin | d_2d_I_M_tikei_yakata_ncl.bin | I_M_yakata.bin, I_M_yakata_hd.bin | d_2d_PA_I_M_yakata.bin | YaKaTaMainUnitChangeData.bin |
| 18: Snow | Dat_Ice.narc | d_2d_I_M_tikei_setsugen2_ncg.bin | None | d_2d_I_M_tikei_setsugen2_ncl.bin | I_M_setsugen2.bin, I_M_setsugen2_hd.bin | d_2d_PA_I_M_setsugen2.bin | SeTsuGeN2MainUnitChangeData.bin |
| 29: Factory (W7-A) | Dat_Pipe.narc | d_2d_W_M_tikei_dokansoto_ncg.bin | None | d_2d_W_M_tikei_dokansoto_ncl.bin | W_M_dokansoto.bin, W_M_dokansoto_hd.bin | d_2d_PA_W_M_dokansoto.bin | DoKaNSoToMainUnitChangeData.bin |
| 35: Underground | Dat_Basement.narc | d_2d_I_M_tikei_chika3_ncg.bin | None | d_2d_I_M_tikei_chika3_ncl.bin | I_M_chika3.bin, I_M_chika3_hd.bin | d_2d_PA_I_M_chika3.bin | ChiKa3MainUnitChangeData.bin |
| 41: Final Castle | Dat_Fort.narc | d_2d_I_M_tikei_yakata_ncg.bin | None | d_2d_I_M_tikei_yakata_ncl.bin | I_M_yakata.bin, I_M_yakata_hd.bin | d_2d_PA_I_M_yakata.bin | YaKaTaMainUnitChangeData.bin |
| 75: Grassland | Dat_Field.narc | d_2d_I_M_tikei_nohara_ncg.bin | None | d_2d_I_M_tikei_nohara_ncl.bin | I_M_nohara.bin, I_M_nohara_hd.bin | d_2d_PA_I_M_nohara.bin | NoHaRaMainUnitChangeData.bin |
Randomization Table
| Slot | Randomization |
|---|---|
| Tileset 0 (Jyotyu) | No |
| Tileset 2 (Sub Nohara) | No |
| 0: Grassland | Tiles 0-5 |
| 1: Castle | No |
| 2: Desert | Tiles 0-5 |
| 3: Underground (with ice) | Tiles 0-5, 48-53 |
| 4: Sky/mushrooms (world 7 style) | None |
| 5: Underwater | Tiles 0-5 |
| 6: Desert | Tiles 0-5 |
| 7: Volcano (brown) | Tiles 0-5 |
| 8: Grassland | Tiles 0-5 |
| 9: Beach (blue) | Tiles 0-5 |
| 10: Beach (blue) | Tiles 0-5 |
| 11: Forest | Tiles 0-2 |
| 12: Grassland | Tiles 0-5 |
| 13: Sky/mushrooms (with flowers and bushes) | Tiles 0-5 |
| 14: Sky/mushrooms (with flowers and bushes) | Tiles 0-5 |
| 15: Volcano (black) | Tiles 0-5 |
| 16: Volcano (black 2) [Unused] | Tiles 0-5 |
| 17: Snow (with ice) | Tiles 96-99 |
| 18: Snow | None |
| 19: Forest | Tiles 0-2 |
| 20: Oasis in Desert | Tiles 0-5 |
| 21: Bonus Room [Unused] | None |
| 22: Volcano (black 2) [Unused] | None |
| 23: Ghost House | None |
| 24: Cliffs | Tiles 0-3 |
| 25: Cliffs | TBA |
| 26: Snow (with ice) | TBA |
| 27: Grassland | Tiles 0-5 |
| 28: Snow (with ice) | TBA |
| 29: Factory (W7-A) | None |
| 30: Sewer (W2-3) | None |
| 31: Volcano (yellow) | Tiles 0-5 |
| 32: Castle | None |
| 33: Sky/mushrooms (with flowers and bushes) | Tiles 0-5 |
| 34: Grassland | Tiles 0-5 |
| 35: Underground | Tiles 0-5, 48-53 |
| 36: Underground (dark blue) [Unused] | Tiles 0-5, 48-53 |
| 37: Dark world (purple) | Tiles 0-5 |
| 38: Dark world (brown) | Tiles 0-5 |
| 39: Tower | None |
| 40: Ghost house exit | Tiles 0-5 |
| 41: Final Castle | None |
| 42: Toad house 1 | None |
| 43: Toad house 2 | None |
| 44: Toad house 3 | None |
| 45: Final Castle | None |
| 46: Toad house 4 | None |
| 47: Bowser Jr battle | None |
| 48: Beach (blue) | Tiles 0-5 |
| 49: Boss battle | None |
| 50: Sky/mushrooms (with flowers and bushes) | Tiles 0-5 |
| 51: Forest | Tiles 0-2 |
| 52: Desert | Tiles 0-5 |
| 53: Desert | Tiles 0-5 |
| 54: Forest | Tiles 0-2 |
| 55: Final boss battle | None |
| 56: Volcano (black) | Tiles 0-5 |
| 57: Underwater | Tiles 0-5 |
| 58: Light grey castle (W8 Castle 1) | None |
| 59: Sky/Mushrooms (yellow-ish) | None |
| 60: Beach (turquoise, without moss) | Tiles 0-5 |
| 61: Lakithunder and Monty Tank battles | None |
| 62: Boss battle | None |
| 63: Mummy-Pokey battle | None |
| 64: Oasis in Desert | Tiles 0-5 |
| 65: Desert | None |
| 66: Oasis in Desert | Tiles 0-5 |
| 67: Bonus room [Unused] | None |
| 68: Bonus room [Unused] | None |
| 69: Bonus room [Unused] | None |
| 70: Bonus room [Unused] | None |
| 71: Bonus room [Unused] | None |
| 72: Bonus room [Unused] | None |
| 73: Underground (gold) [Unused] | Tiles 0-5, 48-53 |
| 74: Bonus room | None |
| 75: Grassland | Tiles 0-5 |
3D Tile ID Table
Table address in overlay 10: 0x00055BE0
Table address in memory: 0x02121ec0
| 3d Tile ID | File | Bitmap | Palette | Description | MvsL Archive |
|---|---|---|---|---|---|
| 1 | I_dokan.nsbtx | I_do_d_ld | I_dokan:0 | Downwards-facing green pipe (left half) | Dat_enemy.narc |
| 2 | I_dokan.nsbtx | I_do_d_rd | I_dokan:0 | Downwards-facing green pipe (right half) | Dat_enemy.narc |
| 3 | I_dokan.nsbtx | I_do_kousa_t_ld | I_dokan:0 | Green pipe vertical-over-horizontal junction (bottom left) | Dat_enemy.narc |
| 4 | I_dokan.nsbtx | I_do_kousa_t_lu | I_dokan:0 | Green pipe vertical-over-horizontal junction (top left) | Dat_enemy.narc |
| 5 | I_dokan.nsbtx | I_do_kousa_t_rd | I_dokan:0 | Green pipe vertical-over-horizontal junction (bottom right) | Dat_enemy.narc |
| 6 | I_dokan.nsbtx | I_do_kousa_t_ru | I_dokan:0 | Green pipe vertical-over-horizontal junction (top right) | Dat_enemy.narc |
| 7 | I_dokan.nsbtx | I_do_kousa_y_ld | I_dokan:0 | Green pipe horizontal-over-vertical junction (bottom left) | Dat_enemy.narc |
| 8 | I_dokan.nsbtx | I_do_kousa_y_lu | I_dokan:0 | Green pipe horizontal-over-vertical junction (top left) | Dat_enemy.narc |
| 9 | I_dokan.nsbtx | I_do_kousa_y_rd | I_dokan:0 | Green pipe horizontal-over-vertical junction (bottom right) | Dat_enemy.narc |
| 10 | I_dokan.nsbtx | I_do_kousa_y_ru | I_dokan:0 | Green pipe horizontal-over-vertical junction (top right) | Dat_enemy.narc |
| 11 | I_dokan.nsbtx | I_do_ld | I_dokan:0 | Vertical green pipe (left half) | Dat_enemy.narc |
| 12 | I_dokan.nsbtx | I_do_lu | I_dokan:0 | Upwards-facing green pipe (left half) | Dat_enemy.narc |
| 13 | I_dokan.nsbtx | I_do_rd | I_dokan:0 | Vertical green pipe (right half) | Dat_enemy.narc |
| 14 | I_dokan.nsbtx | I_do_ru | I_dokan:0 | Upwards-facing green pipe (right half) | Dat_enemy.narc |
| 15 | I_dokan.nsbtx | I_do_yoko_d | I_dokan:0 | Horizontal green pipe (bottom half) | Dat_enemy.narc |
| 16 | I_dokan.nsbtx | I_do_yoko_ld | I_dokan:0 | Leftward-facing green pipe (bottom half) | Dat_enemy.narc |
| 17 | I_dokan.nsbtx | I_do_yoko_lu | I_dokan:0 | Leftward-facing green pipe (top half) | Dat_enemy.narc |
| 18 | I_dokan.nsbtx | I_do_yoko_rd | I_dokan:0 | Rightward-facing green pipe (bottom half) | Dat_enemy.narc |
| 19 | I_dokan.nsbtx | I_do_yoko_ru | I_dokan:0 | Rightward-facing green pipe (top half) | Dat_enemy.narc |
| 20 | I_dokan.nsbtx | I_do_yoko_u | I_dokan:0 | Horizontal green pipe (top half) | Dat_enemy.narc |
| 21 | I_dokan.nsbtx | I_do_ashiba_l | I_dokan:0 | Upwards-facing cracked green pipe (left half) | Dat_enemy.narc |
| 22 | I_dokan.nsbtx | I_do_ashiba_r | I_dokan:0 | Upwards-facing cracked green pipe (right half) | Dat_enemy.narc |
| 23 | I_dokan.nsbtx | I_do_ashiba_ld | I_dokan:0 | Downwards-facing cracked green pipe (left half) | Dat_enemy.narc |
| 24 | I_dokan.nsbtx | I_do_ashiba_rd | I_dokan:0 | Downwards-facing cracked green pipe (right half) | Dat_enemy.narc |
| 25 | I_dokan.nsbtx | I_do_hahen_l | I_dokan:0 | Downwards-facing green pipe fragment (left half) | Dat_enemy.narc |
| 26 | I_dokan.nsbtx | I_do_hahen_ld | I_dokan:0 | Upwards-facing green pipe fragment (left half) | Dat_enemy.narc |
| 27 | I_dokan.nsbtx | I_do_hahen_r | I_dokan:0 | Downwards-facing green pipe fragment (right half) | Dat_enemy.narc |
| 28 | I_dokan.nsbtx | I_do_hahen_rd | I_dokan:0 | Upwards-facing green pipe fragment (left half) | Dat_enemy.narc |
| 29 | I_dokan.nsbtx | I_do_d_ld | I_dokan:1 | Downwards-facing red pipe (left half) | Dat_enemy.narc |
| 30 | I_dokan.nsbtx | I_do_d_rd | I_dokan:1 | Downwards-facing red pipe (right half) | Dat_enemy.narc |
| 31 | I_dokan.nsbtx | I_do_ld | I_dokan:1 | Vertical red pipe (left half) | Dat_enemy.narc |
| 32 | I_dokan.nsbtx | I_do_lu | I_dokan:1 | Upwards-facing red pipe (left half) | Dat_enemy.narc |
| 33 | I_dokan.nsbtx | I_do_rd | I_dokan:1 | Vertical red pipe (right half) | Dat_enemy.narc |
| 34 | I_dokan.nsbtx | I_do_ru | I_dokan:1 | Upwards-facing red pipe (right half) | Dat_enemy.narc |
| 35 | I_dokan.nsbtx | I_do_yoko_d | I_dokan:1 | Horizontal red pipe (bottom half) | Dat_enemy.narc |
| 36 | I_dokan.nsbtx | I_do_yoko_ld | I_dokan:1 | Leftward-facing red pipe (bottom half) | Dat_enemy.narc |
| 37 | I_dokan.nsbtx | I_do_yoko_lu | I_dokan:1 | Leftward-facing red pipe (top half) | Dat_enemy.narc |
| 38 | I_dokan.nsbtx | I_do_yoko_rd | I_dokan:1 | Rightward-facing red pipe (bottom half) | Dat_enemy.narc |
| 39 | I_dokan.nsbtx | I_do_yoko_ru | I_dokan:1 | Rightward-facing red pipe (top half) | Dat_enemy.narc |
| 40 | I_dokan.nsbtx | I_do_yoko_u | I_dokan:1 | Horizontal red pipe (top half) | Dat_enemy.narc |
| 41 | I_dokan.nsbtx | I_do_ashiba_l | I_dokan:1 | Upwards-facing cracked red pipe (left half) | Dat_enemy.narc |
| 42 | I_dokan.nsbtx | I_do_ashiba_r | I_dokan:1 | Upwards-facing cracked red pipe (right half) | Dat_enemy.narc |
| 43 | I_dokan.nsbtx | I_do_ashiba_ld | I_dokan:1 | Downwards-facing cracked red pipe (left half) | Dat_enemy.narc |
| 44 | I_dokan.nsbtx | I_do_ashiba_rd | I_dokan:1 | Downwards-facing cracked red pipe (right half) | Dat_enemy.narc |
| 45 | I_dokan.nsbtx | I_do_hahen_l | I_dokan:1 | Downwards-facing red pipe fragment (left half) | Dat_enemy.narc |
| 46 | I_dokan.nsbtx | I_do_hahen_ld | I_dokan:1 | Upwards-facing red pipe fragment (left half) | Dat_enemy.narc |
| 47 | I_dokan.nsbtx | I_do_hahen_r | I_dokan:1 | Downwards-facing red pipe fragment (right half) | Dat_enemy.narc |
| 48 | I_dokan.nsbtx | I_do_hahen_rd | I_dokan:1 | Upwards-facing red pipe fragment (left half) | Dat_enemy.narc |
| 49 | I_dokan.nsbtx | I_do_d_ld | I_dokan:2 | Downwards-facing yellow pipe (left half) | Dat_enemy.narc |
| 50 | I_dokan.nsbtx | I_do_d_rd | I_dokan:2 | Downwards-facing yellow pipe (right half) | Dat_enemy.narc |
| 51 | I_dokan.nsbtx | I_do_ld | I_dokan:2 | Vertical yellow pipe (left half) | Dat_enemy.narc |
| 52 | I_dokan.nsbtx | I_do_lu | I_dokan:2 | Upwards-facing yellow pipe (left half) | Dat_enemy.narc |
| 53 | I_dokan.nsbtx | I_do_rd | I_dokan:2 | Vertical yellow pipe (right half) | Dat_enemy.narc |
| 54 | I_dokan.nsbtx | I_do_ru | I_dokan:2 | Upwards-facing yellow pipe (right half) | Dat_enemy.narc |
| 55 | I_dokan.nsbtx | I_do_yoko_d | I_dokan:2 | Horizontal yellow pipe (bottom half) | Dat_enemy.narc |
| 56 | I_dokan.nsbtx | I_do_yoko_ld | I_dokan:2 | Leftward-facing yellow pipe (bottom half) | Dat_enemy.narc |
| 57 | I_dokan.nsbtx | I_do_yoko_lu | I_dokan:2 | Leftward-facing yellow pipe (top half) | Dat_enemy.narc |
| 58 | I_dokan.nsbtx | I_do_yoko_rd | I_dokan:2 | Rightward-facing yellow pipe (bottom half) | Dat_enemy.narc |
| 59 | I_dokan.nsbtx | I_do_yoko_ru | I_dokan:2 | Rightward-facing yellow pipe (top half) | Dat_enemy.narc |
| 60 | I_dokan.nsbtx | I_do_yoko_u | I_dokan:2 | Horizontal yellow pipe (top half) | Dat_enemy.narc |
| 61 | I_dokan.nsbtx | I_do_ashiba_l | I_dokan:2 | Upwards-facing cracked yellow pipe (left half) | Dat_enemy.narc |
| 62 | I_dokan.nsbtx | I_do_ashiba_r | I_dokan:2 | Upwards-facing cracked yellow pipe (right half) | Dat_enemy.narc |
| 63 | I_dokan.nsbtx | I_do_ashiba_ld | I_dokan:2 | Downwards-facing cracked yellow pipe (left half) | Dat_enemy.narc |
| 64 | I_dokan.nsbtx | I_do_ashiba_rd | I_dokan:2 | Downwards-facing cracked yellow pipe (right half) | Dat_enemy.narc |
| 65 | I_dokan.nsbtx | I_do_hahen_l | I_dokan:2 | Downwards-facing yellow pipe fragment (left half) | Dat_enemy.narc |
| 66 | I_dokan.nsbtx | I_do_hahen_ld | I_dokan:2 | Upwards-facing yellow pipe fragment (left half) | Dat_enemy.narc |
| 67 | I_dokan.nsbtx | I_do_hahen_r | I_dokan:2 | Downwards-facing yellow pipe fragment (right half) | Dat_enemy.narc |
| 68 | I_dokan.nsbtx | I_do_hahen_rd | I_dokan:2 | Upwards-facing yellow pipe fragment (left half) | Dat_enemy.narc |
| 69 | wire_netting1.nsbtx | wire_netting1 | wire_netting1:0 | Climbable fence centre | None |
| 70 | wire_netting2.nsbtx | wire_netting2 | wire_netting2:0 | Climbable fence top left corner | None |
| 71 | wire_netting3.nsbtx | wire_netting3 | wire_netting3:0 | Climbable fence top centre | None |
| 72 | wire_netting4.nsbtx | wire_netting4 | wire_netting4:0 | Climbable fence top centre | None |
| 73 | wire_netting5.nsbtx | wire_netting5 | wire_netting5:0 | Climbable fence top centre | None |
| 74 | wire_netting6.nsbtx | wire_netting6 | wire_netting6:0 | Climbable fence top right corner | None |
| 75 | wire_netting7.nsbtx | wire_netting7 | wire_netting7:0 | Climbable fence left edge | None |
| 76 | wire_netting8.nsbtx | wire_netting8 | wire_netting8:0 | Climbable fence right edge | None |
| 77 | wire_netting9.nsbtx | wire_netting9 | wire_netting9:0 | Climbable fence left edge | None |
| 78 | wire_netting10.nsbtx | wire_netting10 | wire_netting10:0 | Climbable fence right edge | None |
| 79 | wire_netting11.nsbtx | wire_netting11 | wire_netting11:0 | Climbable fence left edge | None |
| 80 | wire_netting12.nsbtx | wire_netting12 | wire_netting12:0 | Climbable fence right edge | None |
| 81 | wire_netting13.nsbtx | wire_netting13 | wire_netting13:0 | Climbable fence bottom left corner | None |
| 82 | wire_netting14.nsbtx | wire_netting14 | wire_netting14:0 | Climbable fence bottom centre | None |
| 83 | wire_netting15.nsbtx | wire_netting15 | wire_netting15:0 | Climbable fence bottom centre | None |
| 84 | wire_netting16.nsbtx | wire_netting16 | wire_netting16:0 | Climbable fence bottom centre | None |
| 85 | wire_netting17.nsbtx | wire_netting17 | wire_netting17:0 | Climbable fence bottom right corner | None |
| 86 | I_do_kanagu_ld.nsbtx | I_do_kanagu_ld | I_do_kanagu_ld:0 | Pipe joint bottom left | None |
| 87 | I_do_kanagu_lu.nsbtx | I_do_kanagu_lu | I_do_kanagu_lu:0 | Pipe joint top left | None |
| 88 | I_do_kanagu_rd.nsbtx | I_do_kanagu_rd | I_do_kanagu_rd:0 | Pipe joint bottom right | None |
| 89 | I_do_kanagu_ru.nsbtx | I_do_kanagu_ru | I_do_kanagu_ru:0 | Pipe joint top right | None |
| 90 | I_ryusa_1.nsbtx | I_ryusa_1 | I_ryusa_1:0 | Quicksand (frame 1) | None |
| 91 | I_ryusa_2.nsbtx | I_ryusa_2 | I_ryusa_2:0 | Quicksand (frame 2) | None |
| 92 | I_ryusa_3.nsbtx | I_ryusa_3 | I_ryusa_3:0 | Quicksand (frame 3) | None |
| 93 | I_ryusa_4.nsbtx | I_ryusa_4 | I_ryusa_4:0 | Quicksand (frame 4) | None |
| 94 | I_ryusa_ue1.nsbtx | I_ryusa_ue1 | I_ryusa_ue1:0 | Quicksand surface (frame 1) | None |
| 95 | I_ryusa_ue2.nsbtx | I_ryusa_ue2 | I_ryusa_ue2:0 | Quicksand surface (frame 2) | None |
| 96 | I_ryusa_ue3.nsbtx | I_ryusa_ue3 | I_ryusa_ue3:0 | Quicksand surface (frame 3) | None |
| 97 | I_ryusa_ue4.nsbtx | I_ryusa_ue4 | I_ryusa_ue4:0 | Quicksand surface (frame 4) | None |
| 98 | I_hashira_lu.nsbtx | I_hashira_lu | I_hashira_lu:0 | Pillar top left | None |
| 99 | I_hashira_cu.nsbtx | I_hashira_cu | I_hashira_cu:0 | Pillar top centre | None |
| 100 | I_hashira_ru.nsbtx | I_hashira_ru | I_hashira_ru.tga:0 | Pillar top right | None |
| 101 | I_hashira_l.nsbtx | I_hashira_l | I_hashira_l:0 | Pillar left edge | None |
| 102 | I_hashira_c.nsbtx | I_hashira_c | I_hashira_c:0 | Pillar centre | None |
| 103 | I_hashira_r.nsbtx | I_hashira_r | I_hashira_r:0 | Pillar right edge | None |
| 104 | I_hashira_ld.nsbtx | I_hashira_ld | I_hashira_ld:0 | Pillar bottom left | None |
| 105 | I_hashira_cd.nsbtx | I_hashira_cd | I_hashira_cd:0 | Pillar bottom centre | None |
| 106 | I_hashira_rd.nsbtx | I_hashira_rd | I_hashira_rd:0 | Pillar bottom right | None |
| 107 | I_mamedokan.nsbtx | I_mamedokan_a_d | I_mamedokan:0 | Downwards-facing cracked mini-pipe | None |
| 108 | I_mamedokan.nsbtx | I_mamedokan_a_u | I_mamedokan:0 | Upwards-facing cracked mini-pipe | None |
| 109 | I_mamedokan.nsbtx | I_mamedokan_d | I_mamedokan:0 | Downwards-facing mini-pipe | None |
| 110 | I_mamedokan.nsbtx | I_mamedokan_h_d | I_mamedokan:0 | Downwards-facing mini-pipe fragment | None |
| 111 | I_mamedokan.nsbtx | I_mamedokan_h_u | I_mamedokan:0 | Upwards-facing mini-pipe fragment | None |
| 112 | I_mamedokan.nsbtx | I_mamedokan_l | I_mamedokan:0 | Leftwards-facing mini-pipe | None |
| 113 | I_mamedokan.nsbtx | I_mamedokan_r | I_mamedokan:0 | Rightwards-facing mini-pipe | None |
| 114 | I_mamedokan.nsbtx | I_mamedokan_tate | I_mamedokan:0 | Mini-pipe vertical-over-horizontal junction | None |
| 115 | I_mamedokan.nsbtx | I_mamedokan_tt | I_mamedokan:0 | Vertical mini-pipe | None |
| 116 | I_mamedokan.nsbtx | I_mamedokan_u | I_mamedokan:0 | Upwards-facing mini-pipe | None |
| 117 | I_mamedokan.nsbtx | I_mamedokan_yoko | I_mamedokan:0 | Mini-pipe horizontal-over-vertical junction | None |
| 118 | I_mamedokan.nsbtx | I_mamedokan_yt | I_mamedokan:0 | Horizontal mini-pipe | None |
| 119 | I_mamedokan_tome.nsbtx | I_mamedokan_tome | I_mamedokan_tome:0 | Mini-pipe joint | None |
| 120 | I_mizu.nsbtx | I_mizu_suimen | I_mizu_ue:0 | Water tile | None |
| 121 | I_mizu.nsbtx | I_mizu_suichu | I_mizu_ue:0 | Water surface tile | None |
| 122 | I_toride1.nsbtx | I_toride1 | I_toride:0 | End-of-level castle wall top left corner | None |
| 123 | I_toride2.nsbtx | I_toride2 | I_toride:0 | End-of-level castle wall top centre | None |
| 124 | I_toride3.nsbtx | I_toride3 | I_toride:0 | End-of-level castle wall top right corner | None |
| 125 | I_toride4.nsbtx | I_toride4 | I_toride:0 | End-of-level castle wall left centre | None |
| 126 | I_toride5.nsbtx | I_toride5 | I_toride:0 | End-of-level castle wall centre | None |
| 127 | I_toride6.nsbtx | I_toride6 | I_toride:0 | End-of-level castle wall right centre | None |
| 128 | I_toride7.nsbtx | I_toride7 | I_toride:0 | End-of-level castle wall bottom left corner | None |
| 129 | I_toride8.nsbtx | I_toride8 | I_toride:0 | End-of-level castle wall bottom centre | None |
| 130 | I_toride9.nsbtx | I_toride9 | I_toride:0 | End-of-level castle wall bottom right corner | None |
| 131 | I_toride2_1.nsbtx | I_toride2_1 | I_toride2:0 | End-of-level castle turret top left corner | None |
| 132 | I_toride2_2.nsbtx | I_toride2_2 | I_toride2:0 | End-of-level castle turret top left centre | None |
| 133 | I_toride2_3.nsbtx | I_toride2_3 | I_toride2:0 | End-of-level castle turret top right centre | None |
| 134 | I_toride2_4.nsbtx | I_toride2_4 | I_toride2:0 | End-of-level castle turret top right corner | None |
| 135 | I_toride2_5.nsbtx | I_toride2_5 | I_toride2:0 | End-of-level castle turret middle left edge | None |
| 136 | I_toride2_6.nsbtx | I_toride2_6 | I_toride2:0 | End-of-level castle turret middle left centre | None |
| 137 | I_toride2_7.nsbtx | I_toride2_7 | I_toride2:0 | End-of-level castle turret middle right centre | None |
| 138 | I_toride2_8.nsbtx | I_toride2_8 | I_toride2:0 | End-of-level castle turret middle right edge | None |
| 139 | I_toride2_9.nsbtx | I_toride2_9 | I_toride2:0 | End-of-level castle turret bottom left corner | None |
| 140 | I_toride2_10.nsbtx | I_toride2_10 | I_toride2:0 | End-of-level castle turret bottom left centre | None |
| 141 | I_toride2_11.nsbtx | I_toride2_11 | I_toride2:0 | End-of-level castle turret bottom right centre | None |
| 142 | I_toride2_12.nsbtx | I_toride2_12 | I_toride2:0 | End-of-level castle turret bottom right corner | None |
Background Information
TODO: A lot.
- Tile and palette animations
- Parallax tables. Probably one listing the types BGs use, then several detailing those types?
- Backgrounds with other special properties (e.g., Underwater, Peach's Castle, etc.)
- Table for BGs that use tile share?
- Details on BGs that are broken?
Bitmap Tables
Stored in BG_ncg/ folder.
Top Backgrounds
| Slot | Bitmap |
|---|---|
| 0: Grassland (hills and clouds) | d_2d_I_M_free_nohara_ncg.bin |
| 1: Castle | d_2d_I_M_free_yakata_ncg.bin |
| 2: Desert (pyramids, W2-Cannon) | d_2d_I_M_free_dokan_W2_ncg.bin |
| 3: Underground | d_2d_I_M_free_chika_ncg.bin |
| 4: Clouds | d_2d_I_M_free_kumo_ncg.bin |
| 5: Underwater | d_2d_W_M_free_suichu_ncg.bin |
| 6: Desert (pyramids) | d_2d_I_M_free_sabaku_ncg.bin |
| 7: Volcanoes 1 (inside) | d_2d_W_M_free_yougan_ncg.bin |
| 8: Grassland (Peach Castle) | d_2d_I_M_free_nohara_W1_1_ncg.bin |
| 9: Beach (cliffs) | d_2d_W_M_free_kaigan_ncg.bin |
| 10: Beach (cliffs) | d_2d_W_M_free_kaigan_ncg.bin |
| 11: Forest | d_2d_W_M_free_jungle_ncg.bin |
| 12: Grassland (green/white hills and clouds) | d_2d_I_M_free_nohara2_ncg.bin |
| 13: Bushes on mountain [Unused] | d_2d_I_M_free_kinoko_ncg.bin |
| 14: Bushes on mountain [Unused] | d_2d_I_M_free_kinoko_ncg.bin |
| 15: Volcanoes 2 (outside) [including raining debris] | d_2d_W_M_free_kazan_ncg.bin |
| 16: Volcanoes 3 (outside) [Unused] | d_2d_W_M_free_kazangake_ncg.bin |
| 17: Snowy trees | d_2d_I_M_free_setsugen_ncg.bin |
| 18: Snowy hills | d_2d_I_M_free_setsugen2_ncg.bin |
| 19: Bushes (W4-Cannon) | d_2d_I_M_free_dokan_W4_ncg.bin |
| 20: Desert sand | d_2d_I_M_free_sabaku5_ncg.bin |
| 21: Empty | None |
| 22: Volcanoes 3 (outside) [Unused] | d_2d_W_M_free_kazangake_ncg.bin |
| 23: Ghost house | d_2d_S_M_free_obakeyasiki_ncg.bin |
| 24: Mountains with clouds | d_2d_W_M_free_kazangake2_ncg.bin |
| 25: Mountains with clouds | d_2d_W_M_free_kazangake2_ncg.bin |
| 26: Snowy trees (darker, W5-Cannon) | d_2d_I_M_free_dokan_W5_ncg.bin |
| 27: Grassland (hills and clouds) | d_2d_I_M_free_nohara_ncg.bin |
| 28: Snowy trees | d_2d_I_M_free_setsugen_ncg.bin |
| 29: Pipes | d_2d_W_M_free_dokansoto_ncg.bin |
| 30: Sewer wall (W2-3) | d_2d_W_M_free_dokannaka_ncg.bin |
| 31: Volcano tower | d_2d_W_M_free_yougantate_ncg.bin |
| 32: Empty | None |
| 33: Low clouds | d_2d_I_M_free_kinoko3_ncg.bin |
| 34: Grassland (hills and clouds, W1-Cannon) | d_2d_I_M_free_dokan_W1_ncg.bin |
| 35: Empty | d_2d_I_M_free_sabaku_ncg.bin |
| 36: Stalagmites (glitchy) [Unused] | d_2d_I_M_free_chika2_ncg.bin |
| 37: Dark world 1 (dead trees, purple clouds) | d_2d_I_M_free_koopa_heigen_ncg.bin |
| 38: Dark world 2 (rocks, purple clouds) | d_2d_I_M_free_koopa_iwa_ncg.bin |
| 39: Tower | d_2d_I_M_free_toride_ncg.bin |
| 40: Ghost house exit | d_2d_S_M_free_obake_soto_ncg.bin |
| 41: Final Castle | d_2d_I_M_free_koopa_shiro_ncg.bin |
| 42: Toad house 1 | d_2d_W_M_free_kinokoA_ncg.bin |
| 43: Toad house 2 | d_2d_W_M_free_kinokoB_ncg.bin |
| 44: Toad house 3 | d_2d_W_M_free_kinokoC_ncg.bin |
| 45: Final Castle | d_2d_I_M_free_koopa_shiro_ncg.bin |
| 46: Toad house 4 | d_2d_W_M_free_kinokoD_ncg.bin |
| 47: Bowser Jr battle | d_2d_I_M_free_toride_boss_ncg.bin |
| 48: Beach (cliffs, tall) | d_2d_W_M_free_kaigan_ncg.bin |
| 49: Boss battle | d_2d_I_M_free_yakata_boss_ncg.bin |
| 50: Low clouds | d_2d_I_M_free_kinoko3_ncg.bin |
| 51: Foggy forest | d_2d_W_M_free_jungle2_ncg.bin |
| 52: Desert (pyramids) | d_2d_I_M_free_sabaku2_ncg.bin |
| 53: Desert (with underground bit) | d_2d_I_M_free_sabaku3_ncg.bin |
| 54: Foggy forest | d_2d_W_M_free_jungle2_ncg.bin |
| 55: Final boss battle | d_2d_I_M_free_koopa_boss_ncg.bin |
| 56: Volcanoes 2 (outside) | d_2d_W_M_free_kazan_ncg.bin |
| 57: Underwater cave | d_2d_W_M_free_suichu2_ncg.bin |
| 58: Light grey castle (W8 Castle 1) | d_2d_I_M_free_yakata_nise_ncg.bin |
| 59: Yellow clouds (Desert) | d_2d_I_M_free_kumo2_ncg.bin |
| 60: Beach (world 6 style, with bushes) | d_2d_W_M_free_kaigan2_ncg.bin |
| 61: Medium clouds | d_2d_I_M_free_yakata_bossW7_ncg.bin |
| 62: Stone wall | d_2d_I_M_free_choropu_ncg.bin |
| 63: Mummy-Pokey battle | d_2d_I_M_free_sabaku_boss_ncg.bin |
| 64: Desert (pyramids) | d_2d_I_M_free_sabaku_ncg.bin |
| 65: Desert (pyramids) | d_2d_I_M_free_sabaku_ncg.bin |
| 66: Desert (pyramids, higher) | d_2d_I_M_free_sabaku4_ncg.bin |
| 67: Empty | None |
| 68: Empty | None |
| 69: Empty | None |
| 70: Empty | None |
| 71: Empty | None |
| 72: Empty | None |
| 73: Empty | None |
| 74: Empty | None |
| 75: Grassland (hills and clouds) | d_2d_I_M_free_nohara_W1_1_ncg.bin |
Bottom Backgrounds
| Slot | Bitmap |
|---|---|
| 0: Grassland (orange hills and clouds) | d_2d_I_M_back_nohara_ncg.bin |
| 1: Castle | d_2d_I_M_back_yakata_ncg.bin |
| 2: Desert (blue sky, pyramids, W2-Cannon) | d_2d_I_M_back_dokan_W2_ncg.bin |
| 3: Underground | d_2d_I_M_back_chika_ncg.bin |
| 4: Clouds | d_2d_I_M_back_kumo_ncg.bin |
| 5: Underwater | d_2d_W_M_back_suichu_ncg.bin |
| 6: Desert (yellow sky, pyramids) | d_2d_I_M_back_sabaku_ncg.bin |
| 7: Volcanoes 1 (inside) | d_2d_W_M_back_yougan_ncg.bin |
| 8: Grassland (pastel hills and clouds) | d_2d_I_M_back_nohara_W1_1_ncg.bin |
| 9: Background clouds | d_2d_W_M_back_kaigan_ncg.bin |
| 10: Background mountains | d_2d_W_M_back_kazangake2_ncg.bin |
| 11: Forest | d_2d_W_M_back_jungle_ncg.bin |
| 12: Grassland (blue/white hills and clouds) | d_2d_I_M_back_nohara2_ncg.bin |
| 13: Background clouds 2 [Unused] | d_2d_I_M_back_kinoko_ncg.bin |
| 14: Background clouds 2 [Unused] | d_2d_I_M_back_kinoko_ncg.bin |
| 15: Volcanoes 2 (outside) [including raining debris] | d_2d_W_M_back_kazan_ncg.bin |
| 16: Volcanoes 3 (outside) [Unused] | d_2d_W_M_back_kazangake_ncg.bin |
| 17: Snowy trees | d_2d_I_M_back_setsugen_ncg.bin |
| 18: Snowy hills | d_2d_I_M_back_setsugen2_ncg.bin |
| 19: Background clouds (W4-Cannon) | d_2d_I_M_back_dokan_W4_ncg.bin |
| 20: Desert (blue sky, pyramids, higher) | d_2d_I_M_back_sabaku5_ncg.bin |
| 21: Bonus room (NES Mario and Luigi 1) | d_2d_I_M_back_mame_ncg.bin |
| 22: Volcanoes 3 (outside) [Unused] | d_2d_W_M_back_kazangake_ncg.bin |
| 23: Ghost house | d_2d_S_M_back_obakeyasiki_ncg.bin |
| 24: Background mountains | d_2d_W_M_back_kazangake2_ncg.bin |
| 25: Background mountains | d_2d_W_M_back_kazangake2_ncg.bin |
| 26: Purple sky (W5-Cannon) | d_2d_I_M_back_dokan_W5_ncg.bin |
| 27: Grassland (orange hills and clouds) | d_2d_I_M_back_nohara_ncg.bin |
| 28: Snowy hills | d_2d_I_M_back_setsugen2_ncg.bin |
| 29: Pipes | d_2d_W_M_back_dokansoto_ncg.bin |
| 30: Empty | d_2d_W_M_back_dokannaka_ncg.bin |
| 31: Volcano tower | d_2d_W_M_back_yougantate_ncg.bin |
| 32: Castle 2 | d_2d_I_M_back_toride_ncg.bin |
| 33: Clouds with orange hills at back | d_2d_I_M_back_kinoko3_ncg.bin |
| 34: Snowy hills (W1-Cannon) | d_2d_I_M_back_dokan_W1_ncg.bin |
| 35: Cave | d_2d_I_M_back_chika3_ncg.bin |
| 36: Stalagmites (glitchy) [Unused] | d_2d_I_M_back_chika3_ncg.bin |
| 37: Dark world 1 (dead trees, purple clouds) | d_2d_I_M_back_koopa_heigen_ncg.bin |
| 38: Dark world 2 (rocks, purple clouds) | d_2d_I_M_back_koopa_iwa_ncg.bin |
| 39: Tower | d_2d_I_M_back_toride_ncg.bin |
| 40: Ghost house exit | d_2d_S_M_back_obake_soto_ncg.bin |
| 41: Final Castle (Normal Jyotyu) | d_2d_I_M_back_koopa_shiro_ncg.bin |
| 42: Toad house 1 | d_2d_W_M_back_kinokoA_ncg.bin |
| 43: Toad house 2 | d_2d_W_M_back_kinokoB_ncg.bin |
| 44: Toad house 3 | d_2d_W_M_back_kinokoC_ncg.bin |
| 45: Final Castle (Blue Jyotyu) | d_2d_I_M_back_koopa_shiro_ncg.bin |
| 46: Toad house 4 | d_2d_W_M_back_kinokoD_ncg.bin |
| 47: Bowser Jr battle | d_2d_I_M_back_toride_boss_ncg.bin |
| 48: Background clouds (tall) | d_2d_W_M_back_kaigan_ncg.bin |
| 49: Boss battle | d_2d_I_M_back_yakata_boss_ncg.bin |
| 50: Background clouds | d_2d_W_M_back_kaigan_ncg.bin |
| 51: Background clouds | d_2d_W_M_back_kaigan_ncg.bin |
| 52: Desert (blue sky, pyramids) | d_2d_I_M_back_sabaku2_ncg.bin |
| 53: Desert (yellow sky, higher) | d_2d_I_M_back_sabaku3_ncg.bin |
| 54: Background mountains | d_2d_W_M_back_kazangake3_ncg.bin |
| 55: Final boss battle | d_2d_I_M_back_koopa_boss_ncg.bin |
| 56: Volcanoes 2 | d_2d_W_M_back_kazan_ncg.bin |
| 57: Underwater cave | d_2d_W_M_back_suichu_ncg.bin |
| 58: Light grey castle (W8 Castle 1) | d_2d_I_M_back_yakata_nise_ncg.bin |
| 59: Yellow clouds (Desert) | d_2d_I_M_back_kumo2_ncg.bin |
| 60: Big mountains (higher, world 6 beach) | d_2d_W_M_back_kaigan2_ncg.bin |
| 61: Background clouds | d_2d_I_M_back_yakata_bossW7_ncg.bin |
| 62: Background mountains | d_2d_W_M_back_kazangake2_ncg.bin |
| 63: Mummy-Pokey battle | d_2d_I_M_back_sabaku_boss_ncg.bin |
| 64: Desert (yellow sky, pyramids) | d_2d_I_M_back_sabaku_ncg.bin |
| 65: Desert (yellow sky, pyramids) | d_2d_I_M_back_sabaku_ncg.bin |
| 66: Desert (blue sky, pyramids, higher) | d_2d_I_M_back_sabaku4_ncg.bin |
| 67: Bonus room (NES Lakitu) [Unused] | d_2d_I_M_back_mame_ncg.bin |
| 68: Bonus room (NES Mario + Bowser) [Unused] | d_2d_I_M_back_mame_ncg.bin |
| 69: Bonus room (NES M/L swimming) [Unused] | d_2d_I_M_back_mame_ncg.bin |
| 70: Bonus room (NES Mario and Luigi 2) | d_2d_I_M_back_mame_ncg.bin |
| 71: Bonus room (NES Mario on vine) [Unused] | d_2d_I_M_back_mame_ncg.bin |
| 72: Bonus room (NES Mario and Luigi 3) [Unused] | d_2d_I_M_back_mame_ncg.bin |
| 73: Underground cave (red) | d_2d_I_M_back_chika4_ncg.bin |
| 74: Bonus room | d_2d_I_M_back_mame_bonus_ncg.bin |
| 75: Grassland (orange hills and clouds) | d_2d_I_M_back_nohara_VS_ncg.bin |
Animation Table
TBA
Palette Tables
Stored in BG_ncl/ folder.
Top Backgrounds
| Slot | Palette |
|---|---|
| 0: Grassland (hills and clouds) | d_2d_I_M_free_nohara_ncl.bin |
| 1: Castle | d_2d_I_M_free_yakata_ncl.bin |
| 2: Desert (pyramids, W2-Cannon) | d_2d_I_M_free_dokan_W2_ncl.bin |
| 3: Underground | d_2d_I_M_free_cika_ncl.bin |
| 4: Clouds | d_2d_I_M_free_kumo_ncl.bin |
| 5: Underwater | d_2d_W_M_free_suichu_ncl.bin |
| 6: Desert (pyramids) | d_2d_I_M_free_sabaku_ncl.bin |
| 7: Volcanoes 1 (inside) | d_2d_W_M_free_yougan_ncl.bin |
| 8: Grassland (Peach Castle) | d_2d_I_M_free_nohara_W1_1_ncl.bin |
| 9: Beach (cliffs) | d_2d_W_M_free_kaigan_ncl.bin |
| 10: Beach (cliffs) | d_2d_W_M_free_kaigan_ncl.bin |
| 11: Forest | d_2d_W_M_free_jungle_ncl.bin |
| 12: Grassland (green/white hills and clouds) | d_2d_I_M_free_nohara2_ncl.bin |
| 13: Bushes on mountain [Unused] | d_2d_I_M_free_kinoko_ncl.bin |
| 14: Bushes on mountain [Unused] | d_2d_I_M_free_kinoko_ncl.bin |
| 15: Volcanoes 2 (outside) [including raining debris] | d_2d_W_M_free_kazan_ncl.bin |
| 16: Volcanoes 3 (outside) [Unused] | d_2d_W_M_free_kazangake_ncl.bin |
| 17: Snowy trees | d_2d_I_M_free_setsugen_ncl.bin |
| 18: Snowy hills | d_2d_I_M_free_setsugen2_ncl.bin |
| 19: Bushes (W4-Cannon) | d_2d_I_M_free_dokan_W4_ncl.bin |
| 20: Desert sand | d_2d_I_M_free_sabaku5_ncl.bin |
| 21: Empty | None |
| 22: Volcanoes 3 (outside) [Unused] | d_2d_W_M_free_kazangake_ncl.bin |
| 23: Ghost house | d_2d_S_M_free_obakeyasiki_ncl.bin |
| 24: Mountains with clouds | d_2d_W_M_free_kazangake2_ncl.bin |
| 25: Mountains with clouds | d_2d_W_M_free_kazangake2_ncl.bin |
| 26: Snowy trees (darker, W5-Cannon) | d_2d_I_M_free_dokan_W5_ncl.bin |
| 27: Grassland (hills and clouds) | d_2d_I_M_free_nohara_ncl.bin |
| 28: Snowy trees | d_2d_I_M_free_setsugen_ncl.bin |
| 29: Pipes | d_2d_W_M_free_dokansoto_ncl.bin |
| 30: Sewer wall (W2-3) | d_2d_W_M_free_dokannaka_ncl.bin |
| 31: Volcano tower | d_2d_W_M_free_yougantate_ncl.bin |
| 32: Empty | None |
| 33: Low clouds | d_2d_I_M_free_kinoko3_ncl.bin |
| 34: Grassland (hills and clouds, W1-Cannon) | d_2d_I_M_free_dokan_W1_ncl.bin |
| 35: Empty | None |
| 36: Stalagmites (glitchy) [Unused] | d_2d_I_M_free_chika2_ncl.bin |
| 37: Dark world 1 (dead trees, purple clouds) | d_2d_I_M_free_koopa_heigen_ncl.bin |
| 38: Dark world 2 (rocks, purple clouds) | d_2d_I_M_free_koopa_iwa_ncl.bin |
| 39: Tower | d_2d_I_M_free_toride_ncl.bin |
| 40: Ghost house exit | d_2d_S_M_free_obake_soto_ncl.bin |
| 41: Final Castle | d_2d_I_M_free_koopa_shiro_ncl.bin |
| 42: Toad house 1 | d_2d_W_M_free_kinokoA_ncl.bin |
| 43: Toad house 2 | d_2d_W_M_free_kinokoB_ncl.bin |
| 44: Toad house 3 | d_2d_W_M_free_kinokoC_ncl.bin |
| 45: Final Castle | d_2d_I_M_free_koopa_shiro_ncl.bin |
| 46: Toad house 4 | d_2d_W_M_free_kinokoD_ncl.bin |
| 47: Bowser Jr battle | d_2d_I_M_free_toride_boss_ncl.bin |
| 48: Beach (cliffs, tall) | d_2d_W_M_free_kaigan_ncl.bin |
| 49: Boss battle | d_2d_I_M_free_yakata_boss_ncl.bin |
| 50: Low clouds | d_2d_I_M_free_kinoko3_ncl.bin |
| 51: Foggy forest | d_2d_W_M_free_jungle2_ncl.bin |
| 52: Desert (pyramids) | d_2d_I_M_free_sabaku2_ncl.bin |
| 53: Desert (with underground bit) | d_2d_I_M_free_sabaku3_ncl.bin |
| 54: Foggy forest | d_2d_W_M_free_jungle2_ncl.bin |
| 55: Final boss battle | d_2d_I_M_free_koopa_boss_ncl.bin |
| 56: Volcanoes 2 (outside) | d_2d_W_M_free_kazan_ncl.bin |
| 57: Underwater cave | d_2d_W_M_free_suichu2_ncl.bin |
| 58: Light grey castle (W8 Castle 1) | d_2d_I_M_free_yakata_nise_ncl.bin |
| 59: Yellow clouds (Desert) | d_2d_I_M_free_kumo2_ncl.bin |
| 60: Beach (world 6 style, with bushes) | d_2d_W_M_free_kaigan2_ncl.bin |
| 61: Medium clouds | d_2d_I_M_free_yakata_bossW7_ncl.bin |
| 62: Stone wall | d_2d_W_M_free_choropu_ncl.bin |
| 63: Mummy-Pokey battle | d_2d_I_M_free_sabaku_boss_ncl.bin |
| 64: Desert (pyramids) | d_2d_I_M_free_sabaku_ncl.bin |
| 65: Desert (pyramids) | d_2d_I_M_free_sabaku_ncl.bin |
| 66: Desert (pyramids, higher) | d_2d_I_M_free_sabaku4_ncl.bin |
| 67: Empty | None |
| 68: Empty | None |
| 69: Empty | None |
| 70: Empty | None |
| 71: Empty | None |
| 72: Empty | None |
| 73: Empty | None |
| 74: Empty | None |
| 75: Grassland (hills and clouds) | d_2d_I_M_free_nohara_VS_ncl.bin |
Bottom Backgrounds
| Slot | Palette |
|---|---|
| 0: Grassland (orange hills and clouds) | d_2d_I_M_back_nohara_ncl.bin |
| 1: Castle | d_2d_I_M_back_yakata_ncl.bin |
| 2: Desert (blue sky, pyramids, W2-Cannon) | d_2d_I_M_back_dokan_W2_ncl.bin |
| 3: Underground | d_2d_I_M_back_cika_ncl.bin |
| 4: Clouds | d_2d_I_M_back_kumo_ncl.bin |
| 5: Underwater | d_2d_W_M_back_suichu_ncl.bin |
| 6: Desert (yellow sky, pyramids) | d_2d_I_M_back_sabaku_ncl.bin |
| 7: Volcanoes 1 (inside) | d_2d_W_M_back_yougan_ncl.bin |
| 8: Grassland (pastel hills and clouds) | d_2d_I_M_back_nohara_W1_1_ncl.bin |
| 9: Background clouds | d_2d_W_M_back_kaigan_ncl.bin |
| 10: Background mountains | d_2d_W_M_back_kazangake2_ncl.bin |
| 11: Forest | d_2d_W_M_back_jungle_ncl.bin |
| 12: Grassland (blue/white hills and clouds) | d_2d_I_M_back_nohara2_ncl.bin |
| 13: Background clouds 2 [Unused] | d_2d_I_M_back_kinoko_ncl.bin |
| 14: Background clouds 2 [Unused] | d_2d_I_M_back_kinoko_ncl.bin |
| 15: Volcanoes 2 (outside) [including raining debris] | d_2d_W_M_back_kazan_ncl.bin |
| 16: Volcanoes 3 (outside) [Unused] | d_2d_W_M_back_kazangake_ncl.bin |
| 17: Snowy trees | d_2d_I_M_back_setsugen_ncl.bin |
| 18: Snowy hills | d_2d_I_M_back_setsugen2_ncl.bin |
| 19: Background clouds (W4-Cannon) | d_2d_I_M_back_dokan_W4_ncl.bin |
| 20: Desert (blue sky, pyramids, higher) | d_2d_I_M_back_sabaku5_ncl.bin |
| 21: Bonus room (NES Mario and Luigi 1) | d_2d_I_M_back_mame_ncl.bin |
| 22: Volcanoes 3 (outside) [Unused] | d_2d_W_M_back_kazangake_ncl.bin |
| 23: Ghost house | d_2d_S_M_back_obakeyasiki_ncl.bin |
| 24: Background mountains | d_2d_W_M_back_kazangake2_ncl.bin |
| 25: Background mountains | d_2d_W_M_back_kazangake2_ncl.bin |
| 26: Purple sky (W5-Cannon) | d_2d_I_M_back_dokan_W5_ncl.bin |
| 27: Grassland (orange hills and clouds) | d_2d_I_M_back_nohara_ncl.bin |
| 28: Snowy hills | d_2d_I_M_back_setsugen2_ncl.bin |
| 29: Pipes | d_2d_W_M_back_dokansoto_ncl.bin |
| 30: Empty | d_2d_W_M_back_dokannaka_ncl.bin |
| 31: Volcano tower | d_2d_W_M_back_yougantate_ncl.bin |
| 32: Castle 2 | d_2d_I_M_back_toride_ncl.bin |
| 33: Clouds with orange hills at back | d_2d_I_M_back_kinoko3_ncl.bin |
| 34: Snowy hills (W1-Cannon) | d_2d_I_M_back_dokan_W1_ncl.bin |
| 35: Cave | d_2d_I_M_back_chika3_ncl.bin |
| 36: Stalagmites (glitchy) [Unused] | d_2d_I_M_back_chika2_ncl.bin |
| 37: Dark world 1 (dead trees, purple clouds) | d_2d_I_M_back_koopa_heigen_ncl.bin |
| 38: Dark world 2 (rocks, purple clouds) | d_2d_I_M_back_koopa_iwa_ncl.bin |
| 39: Tower | d_2d_I_M_back_toride_ncl.bin |
| 40: Ghost house exit | d_2d_S_M_back_obake_soto_ncl.bin |
| 41: Final Castle (Normal Jyotyu) | d_2d_I_M_back_koopa_shiro_ncl.bin |
| 42: Toad house 1 | d_2d_W_M_back_kinokoA_ncl.bin |
| 43: Toad house 2 | d_2d_W_M_back_kinokoB_ncl.bin |
| 44: Toad house 3 | d_2d_W_M_back_kinokoC_ncl.bin |
| 45: Final Castle (Blue Jyotyu) | d_2d_I_M_back_koopa_shiro_ncl.bin |
| 46: Toad house 4 | d_2d_W_M_back_kinokoD_ncl.bin |
| 47: Bowser Jr battle | d_2d_I_M_back_toride_boss_ncl.bin |
| 48: Background clouds (tall) | d_2d_W_M_back_kaigan_ncl.bin |
| 49: Boss battle | d_2d_I_M_back_yakata_boss_ncl.bin |
| 50: Background clouds | d_2d_W_M_back_kaigan_ncl.bin |
| 51: Background clouds | d_2d_W_M_back_kaigan_ncl.bin |
| 52: Desert (blue sky, pyramids) | d_2d_I_M_back_sabaku2_ncl.bin |
| 53: Desert (yellow sky, higher) | d_2d_I_M_back_sabaku3_ncl.bin |
| 54: Background mountains | d_2d_W_M_back_kazangake3_ncl.bin |
| 55: Final boss battle | d_2d_I_M_back_koopa_boss_ncl.bin |
| 56: Volcanoes 2 | d_2d_W_M_back_kazan_ncl.bin |
| 57: Underwater cave | d_2d_W_M_back_suichu_ncl.bin |
| 58: Light grey castle (W8 Castle 1) | d_2d_I_M_back_yakata_nise_ncl.bin |
| 59: Yellow clouds (Desert) | d_2d_I_M_back_kumo2_ncl.bin |
| 60: Big mountains (higher, world 6 beach) | d_2d_W_M_back_kaigan2_ncl.bin |
| 61: Background clouds | d_2d_I_M_back_yakata_bossW7_ncl.bin |
| 62: Background mountains | d_2d_W_M_back_kazangake2_ncl.bin |
| 63: Mummy-Pokey battle | d_2d_I_M_back_sabaku_boss_ncl.bin |
| 64: Desert (yellow sky, pyramids) | d_2d_I_M_back_sabaku_ncl.bin |
| 65: Desert (yellow sky, pyramids) | d_2d_I_M_back_sabaku_ncl.bin |
| 66: Desert (blue sky, pyramids, higher) | d_2d_I_M_back_sabaku4_ncl.bin |
| 67: Bonus room (NES Lakitu) [Unused] | d_2d_I_M_back_mame_ncl.bin |
| 68: Bonus room (NES Mario + Bowser) [Unused] | d_2d_I_M_back_mame_ncl.bin |
| 69: Bonus room (NES M/L swimming) [Unused] | d_2d_I_M_back_mame_ncl.bin |
| 70: Bonus room (NES Mario and Luigi 2) | d_2d_I_M_back_mame_ncl.bin |
| 71: Bonus room (NES Mario on vine) [Unused] | d_2d_I_M_back_mame_ncl.bin |
| 72: Bonus room (NES Mario and Luigi 3) [Unused] | d_2d_I_M_back_mame_ncl.bin |
| 73: Underground cave (red) | d_2d_I_M_back_chika4_ncl.bin |
| 74: Bonus room | d_2d_I_M_back_mame_bonus_ncl.bin |
| 75: Grassland (orange hills and clouds) | d_2d_I_M_back_nohara_VS_ncl.bin |
Palette Animation Tables
Stored in BG_ncl/ folder. Do note that while the background slots load the palettes, the tileset slot determines if the animations play.
Top Backgrounds
| Slot | Palette |
|---|---|
| 7: Volcanoes 1 (inside) | d_2d_Bg3_TEN_W_yougan_ncl.bin |
| 31: Volcano tower | d_2d_Bg3_TEN_W_yougantate_ncl.bin |
Bottom Backgrounds
| Slot | Palette |
|---|---|
| 7: Volcanoes 1 (inside) | d_2d_Bg1_TEN_W_yougan_ncl.bin |
| 31: Volcano tower | d_2d_Bg1_TEN_W_yougantate_ncl.bin |
Tilemap Tables
Stored in BG_nsc/ folder.
Top Backgrounds
| Slot | Tilemap |
|---|---|
| 0: Grassland (hills and clouds) | d_2d_I_M_free_nohara_UR_nsc.bin |
| 1: Castle | d_2d_I_M_free_yakata_UR_nsc.bin |
| 2: Desert (pyramids, W2-Cannon) | d_2d_I_M_free_dokan_W2_UR_nsc.bin |
| 3: Underground | d_2d_I_M_free_chika_R_nsc.bin |
| 4: Clouds | d_2d_I_M_free_kumo_R_nsc.bin |
| 5: Underwater | d_2d_W_M_free_suichu_mizu_UR_nsc.bin |
| 6: Desert (pyramids) | d_2d_I_M_free_sabaku_UR_nsc.bin |
| 7: Volcanoes 1 (inside) | d_2d_W_M_free_yougan_nsc.bin |
| 8: Grassland (Peach Castle) | d_2d_I_M_free_nohara_W1_1_nsc.bin |
| 9: Beach (cliffs) | d_2d_W_M_free_kaigan_UR_nsc.bin |
| 10: Beach (cliffs) | d_2d_W_M_free_kaigan_UR_nsc.bin |
| 11: Forest | d_2d_W_M_free_jungle_nsc.bin |
| 12: Grassland (green/white hills and clouds) | d_2d_I_M_free_nohara2_UR_nsc.bin |
| 13: Bushes on mountain [Unused] | d_2d_I_M_free_kinoko_nsc.bin |
| 14: Bushes on mountain [Unused] | d_2d_I_M_free_kinoko_nsc.bin |
| 15: Volcanoes 2 (outside) [including raining debris] | d_2d_W_M_free_kazan_nsc.bin |
| 16: Volcanoes 3 (outside) [Unused] | d_2d_W_M_free_kazangake_nsc.bin |
| 17: Snowy trees | d_2d_I_M_free_setsugen_UR_nsc.bin |
| 18: Snowy hills | d_2d_I_M_free_setsugen2_UR_nsc.bin |
| 19: Bushes (W4-Cannon) | d_2d_I_M_free_dokan_W4_UR_nsc.bin |
| 20: Desert sand | d_2d_I_M_free_sabaku5_nsc.bin |
| 21: Empty | None |
| 22: Volcanoes 3 (outside) [Unused] | d_2d_W_M_free_kazangake_01_nsc.bin |
| 23: Ghost house | d_2d_S_M_free_obakeyasiki_UR_nsc.bin |
| 24: Mountains with clouds | d_2d_W_M_free_kazangake2_UR_nsc.bin |
| 25: Mountains with clouds | d_2d_W_M_free_kazangake2_UR_nsc.bin |
| 26: Snowy trees (darker, W5-Cannon) | d_2d_I_M_free_dokan_W5_UR_nsc.bin |
| 27: Grassland (hills and clouds) | d_2d_I_M_free_nohara_UR_nsc.bin |
| 28: Snowy trees | d_2d_I_M_free_setsugen_UR_nsc.bin |
| 29: Pipes | d_2d_W_M_free_dokansoto_R_nsc.bin |
| 30: Sewer wall (W2-3) | d_2d_W_M_free_dokannaka_R_nsc.bin |
| 31: Volcano tower | d_2d_W_M_free_yougantate_R_nsc.bin |
| 32: Empty | None |
| 33: Low clouds | d_2d_I_M_free_kinoko3_UR_nsc.bin |
| 34: Grassland (hills and clouds, W1-Cannon) | d_2d_I_M_free_dokan_W1_UR_nsc.bin |
| 35: Empty | None |
| 36: Stalagmites (glitchy) [Unused] | d_2d_I_M_free_chika2_nsc.bin |
| 37: Dark world 1 (dead trees, purple clouds) | d_2d_I_M_free_koopa_heigen_UR_nsc.bin |
| 38: Dark world 2 (rocks, purple clouds) | d_2d_I_M_free_koopa_iwa_UR_nsc.bin |
| 39: Tower | d_2d_I_M_free_toride_UR_nsc.bin |
| 40: Ghost house exit | d_2d_S_M_free_obake_soto_UR_nsc.bin |
| 41: Final Castle | d_2d_I_M_free_koopa_shiro_UR_nsc.bin |
| 42: Toad house 1 | d_2d_W_M_free_kinokoA_nsc.bin |
| 43: Toad house 2 | d_2d_W_M_free_kinokoB_nsc.bin |
| 44: Toad house 3 | d_2d_W_M_free_kinokoC_nsc.bin |
| 45: Final Castle | d_2d_I_M_free_koopa_shiro_UR_nsc.bin |
| 46: Toad house 4 | d_2d_W_M_free_kinokoD_nsc.bin |
| 47: Bowser Jr battle | d_2d_I_M_free_toride_boss_nsc.bin |
| 48: Beach (cliffs, tall) | d_2d_W_M_free_kaigan_SR_nsc.bin |
| 49: Boss battle | d_2d_I_M_free_yakata_boss_nsc.bin |
| 50: Low clouds | d_2d_I_M_free_kinoko3_UR_nsc.bin |
| 51: Foggy forest | d_2d_W_M_free_jungle2_nsc.bin |
| 52: Desert (pyramids) | d_2d_I_M_free_sabaku2_UR_nsc.bin |
| 53: Desert (with underground bit) | d_2d_I_M_free_sabaku3_SR_nsc.bin |
| 54: Foggy forest | d_2d_W_M_free_jungle2_nsc.bin |
| 55: Final boss battle | d_2d_I_M_free_koopa_boss_nsc.bin |
| 56: Volcanoes 2 (outside) | d_2d_W_M_free_kazan_nsc.bin |
| 57: Underwater cave | d_2d_W_M_free_suichu2_mizu_UR_nsc.bin |
| 58: Light grey castle (W8 Castle 1) | d_2d_I_M_free_yakata_nise_UR_nsc.bin |
| 59: Yellow clouds (Desert) | d_2d_I_M_free_kumo2_R_nsc.bin |
| 60: Beach (world 6 style, with bushes) | d_2d_W_M_free_kaigan2_UR_nsc.bin |
| 61: Medium clouds | d_2d_I_M_free_yakata_bossW7_nsc.bin |
| 62: Stone wall | d_2d_W_M_free_choropu_nsc.bin |
| 63: Mummy-Pokey battle | d_2d_I_M_free_sabaku_boss_UR_nsc.bin |
| 64: Desert (pyramids) | d_2d_I_M_free_sabaku_UR_nsc.bin |
| 65: Desert (pyramids) | d_2d_I_M_free_sabaku_UR_nsc.bin |
| 66: Desert (pyramids, higher) | d_2d_I_M_free_sabaku4_nsc.bin |
| 67: Empty | None |
| 68: Empty | None |
| 69: Empty | None |
| 70: Empty | None |
| 71: Empty | None |
| 72: Empty | None |
| 73: Empty | None |
| 74: Empty | None |
| 75: Grassland (hills and clouds) | d_2d_I_M_free_nohara_VS_UR_nsc.bin |
Bottom Backgrounds
| Slot | Tilemap |
|---|---|
| 0: Grassland (orange hills and clouds) | d_2d_I_M_back_nohara_UR_nsc.bin |
| 1: Castle | d_2d_I_M_back_yakata_UR_nsc.bin |
| 2: Desert (blue sky, pyramids, W2-Cannon) | d_2d_I_M_back_dokan_W2_UR_nsc.bin |
| 3: Underground | d_2d_I_M_back_chika_R_nsc.bin |
| 4: Clouds | d_2d_I_M_back_kumo_R_nsc.bin |
| 5: Underwater | d_2d_W_M_back_suichu_UR_nsc.bin |
| 6: Desert (yellow sky, pyramids) | d_2d_I_M_back_sabaku_UR_nsc.bin |
| 7: Volcanoes 1 (inside) | d_2d_W_M_back_yougan_nsc.bin |
| 8: Grassland (pastel hills and clouds) | d_2d_I_M_back_nohara_W1_1_nsc.bin |
| 9: Background clouds | d_2d_W_M_back_kaigan_UR_nsc.bin |
| 10: Background mountains | d_2d_W_M_back_kazangake2_UR_nsc.bin |
| 11: Forest | d_2d_W_M_back_jungle_nsc.bin |
| 12: Grassland (blue/white hills and clouds) | d_2d_I_M_back_nohara2_UR_nsc.bin |
| 13: Background clouds 2 [Unused] | d_2d_I_M_back_kinoko_nsc.bin |
| 14: Background clouds 2 [Unused] | d_2d_I_M_back_kinoko_nsc.bin |
| 15: Volcanoes 2 (outside) [including raining debris] | d_2d_W_M_back_kazan_nsc.bin |
| 16: Volcanoes 3 (outside) [Unused] | d_2d_W_M_back_kazangake_nsc.bin |
| 17: Snowy trees | d_2d_I_M_back_setsugen_UR_nsc.bin |
| 18: Snowy hills | d_2d_I_M_back_setsugen2_UR_nsc.bin |
| 19: Background clouds (W4-Cannon) | d_2d_I_M_back_dokan_W4_UR_nsc.bin |
| 20: Desert (blue sky, pyramids, higher) | d_2d_I_M_back_sabaku5_nsc.bin |
| 21: Bonus room (NES Mario and Luigi 1) | d_2d_I_M_back_mame_nsc.bin |
| 22: Volcanoes 3 (outside) [Unused] | d_2d_W_M_back_kazangake_nsc.bin |
| 23: Ghost house | d_2d_S_M_back_obakeyasiki_UR_nsc.bin |
| 24: Background mountains | d_2d_W_M_back_kazangake2_UR_nsc.bin |
| 25: Background mountains | d_2d_W_M_back_kazangake2_UR_nsc.bin |
| 26: Purple sky (W5-Cannon) | d_2d_I_M_back_dokan_W5_UR_nsc.bin |
| 27: Grassland (orange hills and clouds) | d_2d_I_M_back_nohara_UR_nsc.bin |
| 28: Snowy hills | d_2d_I_M_back_setsugen2_UR_nsc.bin |
| 29: Pipes | d_2d_W_M_back_dokansoto_R_nsc.bin |
| 30: Empty | None |
| 31: Volcano tower | d_2d_W_M_back_yougantate_R_nsc.bin |
| 32: Castle 2 | d_2d_I_M_back_toride_UR_nsc.bin |
| 33: Clouds with orange hills at back | d_2d_I_M_back_kinoko3_UR_nsc.bin |
| 34: Snowy hills (W1-Cannon) | d_2d_I_M_back_dokan_W1_UR_nsc.bin |
| 35: Cave | d_2d_I_M_back_chika3_R_nsc.bin |
| 36: Stalagmites (glitchy) [Unused] | d_2d_I_M_back_chika2_R_nsc.bin |
| 37: Dark world 1 (dead trees, purple clouds) | d_2d_I_M_back_koopa_heigen_UR_nsc.bin |
| 38: Dark world 2 (rocks, purple clouds) | d_2d_I_M_back_koopa_iwa_UR_nsc.bin |
| 39: Tower | d_2d_I_M_back_toride_UR_nsc.bin |
| 40: Ghost house exit | d_2d_S_M_back_obake_soto_UR_nsc.bin |
| 41: Final Castle (Normal Jyotyu) | d_2d_I_M_back_koopa_shiro_UR_nsc.bin |
| 42: Toad house 1 | d_2d_W_M_back_kinokoA_nsc.bin |
| 43: Toad house 2 | d_2d_W_M_back_kinokoB_nsc.bin |
| 44: Toad house 3 | d_2d_W_M_back_kinokoC_nsc.bin |
| 45: Final Castle (Blue Jyotyu) | d_2d_I_M_back_koopa_shiro_UR_nsc.bin |
| 46: Toad house 4 | d_2d_W_M_back_kinokoD_nsc.bin |
| 47: Bowser Jr battle | d_2d_I_M_back_toride_boss_nsc.bin |
| 48: Background clouds (tall) | d_2d_W_M_back_kaigan_SR_nsc.bin |
| 49: Boss battle | d_2d_I_M_back_yakata_boss_nsc.bin |
| 50: Background clouds | d_2d_W_M_back_kaigan_UR_nsc.bin |
| 51: Background clouds | d_2d_W_M_back_kaigan_UR_nsc.bin |
| 52: Desert (blue sky, pyramids) | d_2d_I_M_back_sabaku2_UR_nsc.bin |
| 53: Desert (yellow sky, higher) | d_2d_I_M_back_sabaku3_SR_nsc.bin |
| 54: Background mountains | d_2d_W_M_back_kazangake3_UR_nsc.bin |
| 55: Final boss battle | d_2d_I_M_back_koopa_boss_nsc.bin |
| 56: Volcanoes 2 | d_2d_W_M_back_kazan_nsc.bin |
| 57: Underwater cave | d_2d_W_M_back_suichu_UR_nsc.bin |
| 58: Light grey castle (W8 Castle 1) | d_2d_I_M_back_yakata_nise_UR_nsc.bin |
| 59: Yellow clouds (Desert) | d_2d_I_M_back_kumo2_R_nsc.bin |
| 60: Big mountains (higher, world 6 beach) | d_2d_W_M_back_kaigan2_UR_nsc.bin |
| 61: Background clouds | d_2d_I_M_back_yakata_bossW7_nsc.bin |
| 62: Background mountains | d_2d_W_M_back_kazangake2_UR_nsc.bin |
| 63: Mummy-Pokey battle | d_2d_I_M_back_sabaku_boss_UR_nsc.bin |
| 64: Desert (yellow sky, pyramids) | d_2d_I_M_back_sabaku_UR_nsc.bin |
| 65: Desert (yellow sky, pyramids) | d_2d_I_M_back_sabaku_UR_nsc.bin |
| 66: Desert (blue sky, pyramids, higher) | d_2d_I_M_back_sabaku4_nsc.bin |
| 67: Bonus room (NES Lakitu) [Unused] | d_2d_I_M_back2_mame_nsc.bin |
| 68: Bonus room (NES Mario + Bowser) [Unused] | d_2d_I_M_back3_mame_nsc.bin |
| 69: Bonus room (NES M/L swimming) [Unused] | d_2d_I_M_back4_mame_nsc.bin |
| 70: Bonus room (NES Mario and Luigi 2) | d_2d_I_M_back5_mame_nsc.bin |
| 71: Bonus room (NES Mario on vine) [Unused] | d_2d_I_M_back6_mame_nsc.bin |
| 72: Bonus room (NES Mario and Luigi 3) [Unused] | d_2d_I_M_back7_mame_nsc.bin |
| 73: Underground cave (red) | d_2d_I_M_back_chika4_R_nsc.bin |
| 74: Bonus room | d_2d_I_M_back_mame_bonus_nsc.bin |
| 75: Grassland (orange hills and clouds) | d_2d_I_M_back_nohara_VS_UR_nsc.bin |
Parallax Type Tables
Top Backgrounds
| Slot | Type |
|---|---|
| 0: Grassland (hills and clouds) | 3 |
| 1: Castle | None |
| 2: Desert (pyramids, W2-Cannon) | None |
| 3: Underground | None |
| 4: Clouds | 7 |
| 5: Underwater | 2 |
| 6: Desert (pyramids) | None |
| 7: Volcanoes 1 (inside) | None |
| 8: Grassland (Peach Castle) | None |
| 9: Beach (cliffs) | 8 |
| 10: Beach (cliffs) | 8 |
| 11: Forest | None |
| 12: Grassland (green/white hills and clouds) | 15 |
| 13: Bushes on mountain [Unused] | None |
| 14: Bushes on mountain [Unused] | None |
| 15: Volcanoes 2 (outside) [including raining debris] | 6 |
| 16: Volcanoes 3 (outside) [Unused] | None |
| 17: Snowy trees | None |
| 18: Snowy hills | None |
| 19: Bushes (W4-Cannon) | None |
| 20: Desert sand | None |
| 21: Empty | None |
| 22: Volcanoes 3 (outside) [Unused] | None |
| 23: Ghost house | None |
| 24: Mountains with clouds | 9 |
| 25: Mountains with clouds | 9 |
| 26: Snowy trees (darker, W5-Cannon) | None |
| 27: Grassland (hills and clouds) | None |
| 28: Snowy trees | None |
| 29: Pipes | None |
| 30: Sewer wall (W2-3) | None |
| 31: Volcano tower | None |
| 32: Empty | None |
| 33: Low clouds | 5 |
| 34: Grassland (hills and clouds, W1-Cannon) | None |
| 35: Empty | None |
| 36: Stalagmites (glitchy) [Unused] | None |
| 37: Dark world 1 (dead trees, purple clouds) | 11 |
| 38: Dark world 2 (rocks, purple clouds) | 17 |
| 39: Tower | None |
| 40: Ghost house exit | 12 |
| 41: Final Castle | None |
| 42: Toad house 1 | None |
| 43: Toad house 2 | None |
| 44: Toad house 3 | None |
| 45: Final Castle | None |
| 46: Toad house 4 | None |
| 47: Bowser Jr battle | None |
| 48: Beach (cliffs, tall) | 14 |
| 49: Boss battle | None |
| 50: Low clouds | 5 |
| 51: Foggy forest | None |
| 52: Desert (pyramids) | None |
| 53: Desert (with underground bit) | None |
| 54: Foggy forest | None |
| 55: Final boss battle | None |
| 56: Volcanoes 2 (outside) | 6 |
| 57: Underwater cave | None |
| 58: Light grey castle (W8 Castle 1) | None |
| 59: Yellow clouds (Desert) | None |
| 60: Beach (world 6 style, with bushes) | None |
| 61: Medium clouds | 18 |
| 62: Stone wall | None |
| 63: Mummy-Pokey battle | None |
| 64: Desert (pyramids) | None |
| 65: Desert (pyramids) | None |
| 66: Desert (pyramids, higher) | None |
| 67: Empty | None |
| 68: Empty | None |
| 69: Empty | None |
| 70: Empty | None |
| 71: Empty | None |
| 72: Empty | None |
| 73: Empty | None |
| 74: Empty | None |
| 75: Grassland (hills and clouds) | None |
Bottom Backgrounds
| Slot | Type |
|---|---|
| 0: Grassland (orange hills and clouds) | 3 |
| 1: Castle | None |
| 2: Desert (blue sky, pyramids, W2-Cannon) | None |
| 3: Underground | None |
| 4: Clouds | 7 |
| 5: Underwater | 2 |
| 6: Desert (yellow sky, pyramids) | None |
| 7: Volcanoes 1 (inside) | None |
| 8: Grassland (pastel hills and clouds) | 19 |
| 9: Background clouds | None |
| 10: Background mountains | None |
| 11: Forest | None |
| 12: Grassland (blue/white hills and clouds) | 15 |
| 13: Background clouds 2 [Unused] | 4 |
| 14: Background clouds 2 [Unused] | None |
| 15: Volcanoes 2 (outside) [including raining debris] | 6 |
| 16: Volcanoes 3 (outside) [Unused] | 1 |
| 17: Snowy trees | 10 |
| 18: Snowy hills | 16 |
| 19: Background clouds (W4-Cannon) | None |
| 20: Desert (blue sky, pyramids, higher) | None |
| 21: Bonus room (NES Mario and Luigi 1) | 20 |
| 22: Volcanoes 3 (outside) [Unused] | None |
| 23: Ghost house | None |
| 24: Background mountains | 9 |
| 25: Background mountains | 9 |
| 26: Purple sky (W5-Cannon) | 11 |
| 27: Grassland (orange hills and clouds) | None |
| 28: Snowy hills | 16 |
| 29: Pipes | None |
| 30: Empty | None |
| 31: Volcano tower | None |
| 32: Castle 2 | None |
| 33: Clouds with orange hills at back | None |
| 34: Snowy hills (W1-Cannon) | 21 |
| 35: Cave | None |
| 36: Stalagmites (glitchy) [Unused] | None |
| 37: Dark world 1 (dead trees, purple clouds) | 11 |
| 38: Dark world 2 (rocks, purple clouds) | 17 |
| 39: Tower | None |
| 40: Ghost house exit | 12 |
| 41: Final Castle (Normal Jyotyu) | None |
| 42: Toad house 1 | 13 |
| 43: Toad house 2 | 13 |
| 44: Toad house 3 | 13 |
| 45: Final Castle (Blue Jyotyu) | None |
| 46: Toad house 4 | 13 |
| 47: Bowser Jr battle | None |
| 48: Background clouds (tall) | None |
| 49: Boss battle | None |
| 50: Background clouds | None |
| 51: Background clouds | None |
| 52: Desert (blue sky, pyramids) | None |
| 53: Desert (yellow sky, higher) | None |
| 54: Background mountains | None |
| 55: Final boss battle | None |
| 56: Volcanoes 2 | 6 |
| 57: Underwater cave | None |
| 58: Light grey castle (W8 Castle 1) | None |
| 59: Yellow clouds (Desert) | None |
| 60: Big mountains (higher, world 6 beach) | None |
| 61: Background clouds | None |
| 62: Background mountains | None |
| 63: Mummy-Pokey battle | None |
| 64: Desert (yellow sky, pyramids) | None |
| 65: Desert (yellow sky, pyramids) | None |
| 66: Desert (blue sky, pyramids, higher) | None |
| 67: Bonus room (NES Lakitu) [Unused] | 20 |
| 68: Bonus room (NES Mario + Bowser) [Unused] | 20 |
| 69: Bonus room (NES M/L swimming) [Unused] | 20 |
| 70: Bonus room (NES Mario and Luigi 2) | 20 |
| 71: Bonus room (NES Mario on vine) [Unused] | 20 |
| 72: Bonus room (NES Mario and Luigi 3) [Unused] | 20 |
| 73: Underground cave (red) | None |
| 74: Bonus room | None |
| 75: Grassland (orange hills and clouds) | None |
Jyotyu Palette Tables
The bottom background slot determines the jyotyu and enemy palettes used in the course.
| Slot | Palette |
|---|---|
| 0: Grassland (orange hills and clouds) | Normal |
| 1: Castle | Blue |
| 2: Desert (blue sky, pyramids, W2-Cannon) | Normal |
| 3: Underground | Blue |
| 4: Clouds | Normal |
| 5: Underwater | Normal |
| 6: Desert (yellow sky, pyramids) | Normal |
| 7: Volcanoes 1 (inside) | Red |
| 8: Grassland (pastel hills and clouds) | Normal |
| 9: Background clouds | Normal |
| 10: Background mountains | Normal |
| 11: Forest | Normal |
| 12: Grassland (blue/white hills and clouds) | Normal |
| 13: Background clouds 2 [Unused] | Normal |
| 14: Background clouds 2 [Unused] | Normal |
| 15: Volcanoes 2 (outside) [including raining debris] | Normal |
| 16: Volcanoes 3 (outside) [Unused] | Normal |
| 17: Snowy trees | Grey |
| 18: Snowy hills | Grey |
| 19: Background clouds (W4-Cannon) | Normal |
| 20: Desert (blue sky, pyramids, higher) | Normal |
| 21: Bonus room (NES Mario and Luigi 1) | Normal |
| 22: Volcanoes 3 (outside) [Unused] | Normal |
| 23: Ghost house | Grey |
| 24: Background mountains | Normal |
| 25: Background mountains | Normal |
| 26: Purple sky (W5-Cannon) | Normal |
| 27: Grassland (orange hills and clouds) | Normal |
| 28: Snowy hills | Normal |
| 29: Pipes | Blue |
| 30: Empty | Normal |
| 31: Volcano tower | Red |
| 32: Castle 2 | Normal |
| 33: Clouds with orange hills at back | Normal |
| 34: Snowy hills (W1-Cannon) | Normal |
| 35: Cave | Blue |
| 36: Stalagmites (glitchy) [Unused] | Blue |
| 37: Dark world 1 (dead trees, purple clouds) | Red |
| 38: Dark world 2 (rocks, purple clouds) | Red |
| 39: Tower | Blue |
| 40: Ghost house exit | Normal |
| 41: Final Castle (Normal Jyotyu) | Normal |
| 42: Toad house 1 | Normal |
| 43: Toad house 2 | Normal |
| 44: Toad house 3 | Normal |
| 45: Final Castle (Blue Jyotyu) | Blue |
| 46: Toad house 4 | Normal |
| 47: Bowser Jr battle | Blue |
| 48: Background clouds (tall) | Normal |
| 49: Boss battle | Blue |
| 50: Background clouds | Normal |
| 51: Background clouds | Normal |
| 52: Desert (blue sky, pyramids) | Normal |
| 53: Desert (yellow sky, higher) | Normal |
| 54: Background mountains | Normal |
| 55: Final boss battle | Normal |
| 56: Volcanoes 2 | Normal |
| 57: Underwater cave | Normal |
| 58: Light grey castle (W8 Castle 1) | Blue |
| 59: Yellow clouds (Desert) | Normal |
| 60: Big mountains (higher, world 6 beach) | Normal |
| 61: Background clouds | Blue |
| 62: Background mountains | Normal |
| 63: Mummy-Pokey battle | Normal |
| 64: Desert (yellow sky, pyramids) | Normal |
| 65: Desert (yellow sky, pyramids) | Normal |
| 66: Desert (blue sky, pyramids, higher) | Normal |
| 67: Bonus room (NES Lakitu) [Unused] | Normal |
| 68: Bonus room (NES Mario + Bowser) [Unused] | Normal |
| 69: Bonus room (NES M/L swimming) [Unused] | Normal |
| 70: Bonus room (NES Mario and Luigi 2) | Normal |
| 71: Bonus room (NES Mario on vine) [Unused] | Normal |
| 72: Bonus room (NES Mario and Luigi 3) [Unused] | Normal |
| 73: Underground cave (red) | Blue |
| 74: Bonus room | Normal |
| 75: Grassland (orange hills and clouds) | Normal |
Jyotyu Tileset
1. Jyotyu Palette
These files are the palettes used by the Jyotyu tileset:
| File |
Description |
| /BG_ncl/d_2d_A_J_jyotyu_B_ncl.bin | Blue (underground) jyotyu palette |
| /BG_ncl/d_2d_A_J_jyotyu_F_ncl.bin | Blue coin palette |
| /BG_ncl/d_2d_A_J_jyotyu_ncl.bin | Normal jyotyu palette |
| /BG_ncl/d_2d_A_J_jyotyu_R_ncl.bin | Red (volcanic) jyotyu palette |
| /BG_ncl/d_2d_A_J_jyotyu_W_ncl.bin | Grey (winter) jyotyu palette |
2. List of graphics that use the Jyotyu Palette
| Folder | Bitmap | Description |
| /BG_ncg | d_2d_A_J_jyotyu | Graphics for the jyotyu tileset |
| /BG_ncg | d_2d_TEN_A_J_jyotyu | Animated tiles for the jyotyu tileset |
| /obj | A_block_hahen | Debris animations for destroyed blocks |
| /obj | A_block | Animations for blocks being hit |
| /obj | A_tikuwa_block | Donut lift (stood on) |
| /obj | I_item | Power Ups |
| /obj | I_kakushitobira | Event Activated Door |
| /obj | I_mark_star | A star, seems to be unused |
| /obj | I_minigame_block | 1-Up Toad house block graphics |
| /obj | I_minigame_item | 1-Up Toad house card graphics |
| /obj | I_obj_kemuri | Smoke (?) seems to be unused too |
| /obj | I_obj_kira_I | Mega Mario sparkles |
| /obj | I_obj_kira | Small sparkles. Appear around a blue shell when dropped by a blue koopa troopa |
| /obj | I_obj_sunakemuri | Smoke (?) unused as well |
| /obj | I_obj_yajirushi | Arrow, apparently unused since it was removed from the European version |
3. Important
When you click "import bitmap and recreate palette" on a file that uses the Jyotyu Palette, it will recreate the Jyotyu Palette, with new colours.
Other objects use the Jyotyu Palette, but they will not match up with the palette anymore, because it has been modified to match the Jyotyu tileset, so you have to open all the files that use the palette and the palette open at the same time, then click "import bitmap and recreate palette".
Or you can modify the Jyotyu Tileset with the built in editor which will not modify the Jyotyu Palette.
4. Jyotyu labels
The following picture shows which objects use which colors in the different Jyotyu Palettes:
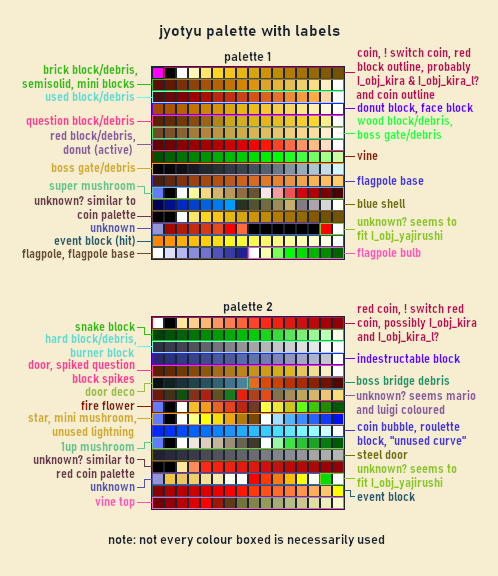
Credits to D.M. for the research and the image
Note: The palette colors will vary depending on the Jyotyu palette, but the objects will still use the same colors.
World Map Files
TODO: Finish the rest & update the descriptions
Map Folder:
| Files |
Description / Information
|
| cursor_koopa_jr.nsbca |
Bowser Jr's Animation (Joint)
|
| cursor_koopa_jr.nsbmd |
Bowser Jr's World Map Textures
|
| cursor_peach.nsbca |
Peach's Animation (Joint)
|
| cursor_peach.nsbmd |
Peach's World Map Textures
|
| hammer_map.nsbmd |
Hammer Bro's Hammer Texture
|
| map_dragon.nsbca |
Star Coin Sign's Animation (Joint)
|
| map_dragon.nsbmd |
Star Coin Sign's Textures
|
| map_dragon.nsbtp |
Star Coin Sign's Animation (Pattern)
|
| map_hole.nsbmd | ? |
| map_point.nsbmd |
World Map Node's Textures
|
| map_point.nsbtp |
World Map Node's Animation (Pattern)
|
| map_shadow.nsbca | ? |
| map_shadow.nsbmd | ? |
| map_swing.nsbca | ? |
| w1.nsbmd |
World 1's Textures (Doesn't have the texture for the elevated ground near the first tower & the green layering in the background)
|
| w1.nsbca |
World 1's Animation (Joint)
|
| w1.nsbtp |
World 1's Animation (Pattern)
|
| w1_castle.nsbca |
World 1 Castle's Animation (Joint)
|
| w1_castle.nsbmd |
World 1 Castle's Textures
|
| w1_kinoko_a.nsbmd |
Blue Mushroom House's Texture
|
| w1_kinoko_b.nsbmd |
Mega Mushroom House's Texture
|
| w1_kinoko_g.nsbmd |
1-Up Mushroom House's Texture
|
| w1_kinoko_p.nsbmd |
Wood Mushroom House Holder's Texture
|
| w1_kinoko_r.nsbmd |
Item Bonus House's Texture
|
| w1_move.nsbca |
The animation where Bowser Jr. brings Peach to 1-Tower
|
| w1_tower.nsbca |
World 1 Tower's Animation (Joint)
|
| w1_tower.nsbmd |
World 1 Tower's Textures
|
| w1_tree.nsbca |
World 1 Tree's Animation (Joint)
|
| w1_tree.nsbmd |
World 1 Tree's Textures
|
| w2.nsbmd |
World 2's Textures
|
| w2.nsbca |
World 2's Animation (Joint)
|
| w2.nsbtp |
World 2's Animation (Pattern)
|
| w2_castle.nsbmd |
World 2 Castle's Textures
|
| w2_kinoko_b.nsbmd |
Mega Mushroom House's Texture
|
| w2_kinoko_g.nsbmd |
1-Up Mushroom House's Texture
|
| w2_kinoko_p.nsbmd |
Wood Mushroom House Holder's Texture
|
| w2_kinoko_r.nsbmd |
Item Bonus House's Texture
|
| w2_move.nsbca |
The animation where Bowser Jr. brings Peach to 2-Tower
|
| w2_tower.nsbca |
World 2 Tower's Animation (Joint)
|
| w2_tower.nsbmd |
World 2 Tower's Textures
|
| w2_tree.nsbca |
World 2 Tree's Animation (Joint)
|
| w2_tree.nsbmd |
World 2 Tree's Textures
|
Enemy Palettes
The enemy palette is used by various in-level sprites. Like the jyotyu palette, the palette used will change depending on the bottom BG to better fit the level theme. All palettes, as well as the bitmaps of the sprites that use them, can be found in the /OBJ folder.
1. Enemy palettes
| File |
Description |
| I_enemy_ncl.bin | Normal enemy palette |
| I_enemy_B_ncl.bin | Blue (underground) enemy palette |
| I_enemy_R_ncl.bin | Red (volcanic) enemy palette |
| I_enemy_W_ncl.bin | Grey (winter) enemy palette |
2. List of bitmaps which use the enemy palette
| Bitmap | Description | Palette Number |
| I_awa_ncg.bin |
Underwater pipe current bubble |
0 |
| I_bubble256_ncg.bin | Podoboo (lava bubble) |
0 |
| I_dokan_hahen_ncg.bin |
Broken pipe fragments |
0 (yellow), 1 (green), 3 (red) |
| I_dokan_yajirushi_ncg.bin | Yellow sewer arrow (2-3) |
1 |
| I_fireball_ncg.bin |
Fireball; used by Fire Mario/Luigi, firebar, fire bros., and venus fire trap(?) |
0 |
| I_item_ncg.bin |
Power-up and vine top graphics |
0 (for star flash; jyotyu palette is used otherwise) |
| I_kazandan_hahen_ncg.bin |
Broken volcanic meteor fragments |
0 |
| I_kuribo256_ncg.bin |
Goomba, paragoomba, paragoomba wings |
0 |
| I_nokonoko256_ncl.bin | Koopa Troopa, Koopa Paratroopa, Paratroopa wings |
0 (green), 1 (red), 2 (blue) |
| I_obj_yougan_ncg.bin | Background volcanic meteor | 1 |
| I_ochiruhashi_ncg.bin | Falling beach platform | 1 |
| I_switch_ncg.bin | P-switch, ?-switch, !-switch, and boss (skull) switch | 2 |
| I_teresa256_ncg.bin | Boo | 1 |
| W_kinoko_ncg.bin | Graphics for the blue/yellow/red Toad house blocks and cards | 3 (for red/yellow Toad house graphics; enemy256 palette is used otherwise) |
3. Enemy256 palette
The enemy256 palette is used by only a few sprites and differs from the enemy palette in that it does not have underground/wintery/volcanic variants. The file for it is I_enemy256_ncl.bin.
4. List of bitmaps which use the enemy256 palette
| Bitmap | Description | Palette Number |
| I_star_red_ncg.bin |
MvsL big star |
1 |
| W_kinoko_ncg.bin | Graphics for the blue/yellow/red Toad house blocks and cards | 0 (for blue Toad house graphics; enemy palettes are used otherwise) |
World Map
Information related to modifying the world map.