Camera
The Camera in New Super Mario Bros is controlled in several ways. You have to take into account that the camera movements will condition the gameplay.
1. How the Camera restricts Mario
The camera restricts Mario's movements in two ways:
• Mario cannot go out of the camera view through the sides.
This means that if the camera doesn't pan further, Mario can't either. The camera sides act like walls (but you can't wall jump into them)
• Mario cannot go to the bottom of the camera.
If he does so, he will die. Note that there is some margin, so you can place something like a Warp to Level some blocks below the camera view. Mario will get it before he dies.
Mario does can go out from the top of the camera. Simply the camera will not pan there, so Mario will be out of the screen.
2. Views
The camera will NEVER get out of the view. That means Mario can't get out of the view by the sides or the bottom.
3. Panning blocks
This thing is a little bit confusing. An area (not each view) is divided in blocks of 16x16 tiles (256x256 pixels). The camera will not pan into blocks that are empty (don't contain any objects).
An example (thanks to Garmichael):
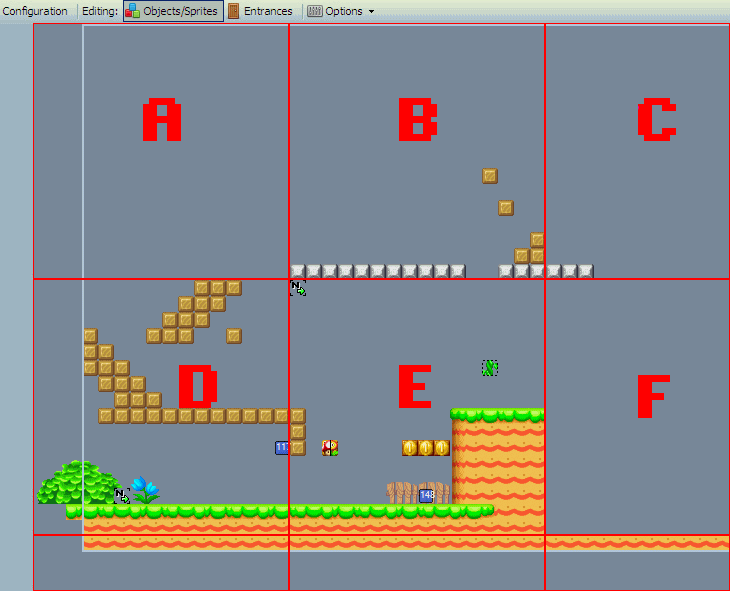
Look at this level:
Notice that blocks A and F are empty. Mario cannot get to A from B, but he can actually jump from D to B. While he is in A, the camera will not move, but as soon as he crosses into B, the camera will jump to that location and that boundary would act like a wall. From there, As Mario approaches C, he will be able to see some of F, but as soon as he crosses into C, the camera will reposition so that the border to F is the bottom of the screen. If Mario jumps down into F, he dies (even though the block under F has ground).
4. Scroll Control and Scroll Stop sprites
These sprites control the camera in more ways. How they work is generally unknown, except for:
• Vertical scroll controls: [sprite:198] and [sprite:199]
• Horizontal scroll stop: [sprite:276]
5. Header Blocks
Block 2, Block 4, and Block 5 control more settings of the camera. Look at the List of Header Blocks page for more info.
6. Camera X & Y
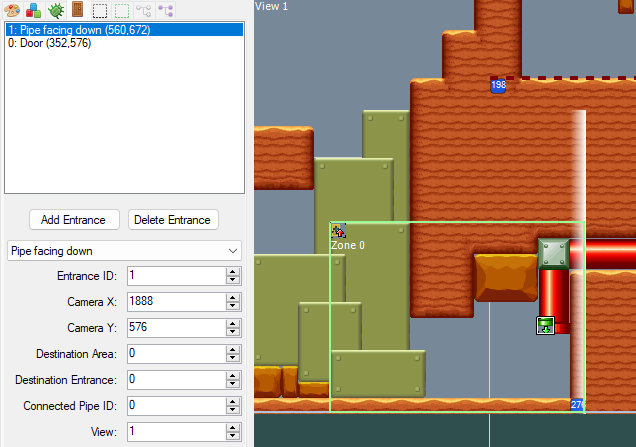
The entrance's settings include two boxes named "Camera X" and "Camera Y", usually you can leave their values as 0, but sometimes you need to put values in there:
The zone and door entrance don't actually have any purpose in-game but to showcase the coordinates.
The zone delimits what you can see on the NDS screen.
If at least one of the Camera values is different from 0, then the tile at said coordinates will calibrate the camera and will serve as the top-left tile of said camera.
You usually use them when sprites 198-199 and/or 276 are in the way, or eventually to calibrate the bottom of the camera to the bottom of the zone.
The purpose of this is to show a nice transition when you change areas.
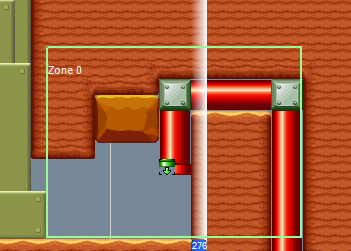
With the example earlier if both values were at 0, this is where the camera would spawn by default:
The camera is 1 tile higher than the bottom of the zone, but the biggest offender here is the sprite 276, it is only acknowledged when the player have control of Mario thus only when Mario completely exits the pipe, the camera would recognize sprite 276 and then scroll to the left at high speeds, which results in an ugly transition and you can bet this is a rookie mistake to leave that kind of camera error unchecked.


No comments to display
No comments to display